Sunday, February 19, 2023

Bizcochos de chocolate -- Chocolate biscuits, a Pinedo recipe

As I was reading through my translations of the Pinedo book, I tried to imagine the recipes--how they were made and what they were like when they were completed.  (Search this blog using the keyword "Pinedo" to see more details about this book.)

Some recipes didn't seem to be complete.  I left open the possibility that a recipe might be using a technique I was unaware of, so I didn't automatically assume the recipe was wrong.  Often I looked at other books or websites to see if I could find the same or similar recipes for confirmation.

This recipe, Bizcochos de chocolate, found on page 30, was one that caught my attention.  "Bizcocho" can mean a biscuit, a muffin, or a cake.  Ms. Pinedo used different words for muffin and cake, so I translated it as "Chocolate biscuits."


My Translation

Chocolate biscuits.
Beat or stir six fresh eggs well in a mortar, with one ounce of fine powdered chocolate and four ounces of well-ground sugar. All this is mashed, as I said, in a mortar until it turns into a paste; it is placed on papers or in molds.

I noticed there was no flour mentioned, which seemed odd to me.  So I looked at one of Ms. Pinedo's recipe sources, Nuevo cocinero mejicano (NCM), and found the same recipe on page 77.  That recipe said to use four ounces of flour and ten ounces of powdered sugar.

Ah, a challenge!

I wondered if Ms. Pinedo found a way to make the biscuits without using flour, or if she just made a mistake.  I had to try her recipe.

I had to decide what she meant by powdered chocolate.  My instinct was to get a tablet of Mexican chocolate, the kind you dissolve in hot milk or water for a beverage.  That would provide the chocolate flavor, some fat, and some added flavors like vanilla or cinnamon.

My Redaction (first attempt)

1 ounce Mexican chocolate 
6 eggs
4 ounces powdered sugar


Preheat oven to 350 degrees F.

Line a pan with parchment paper or set out paper muffin cups.

Crush the chocolate tablet in a mortar until finely powdered.  Use a sieve as necessary to separate the powder from the pieces that still need to be crushed.

Mortar and pestle at the ready!

Crushed to a powder.

Mix the chocolate, sugar, and eggs together.  ...  ...  ...


My Notes
This is where I ran into problems.  When the ingredients were mixed, the result was very soupy.  It was clear that the wet-to-dry ratio was wrong.  I was convinced that if I tried to bake it in any amount, I would end up with an omelette.

Chocolate omelette?

It is possible that my large eggs were bigger than those Ms. Pinedo used.  Perhaps I should have used four instead of six.  However, it did not seem likely this recipe was correct.

So I switched to NCM's version.  I added the four ounces of flour and six more ounces of powdered sugar to the mixture.

Improving the wet-to-dry ratio
A thorough mixing yielded a mixture that was more like a batter, although it did not become a paste as the recipes described.  It was this I decided to bake.

Batter up!
I expected cookies, so I used a ladle to put some batter onto parchment paper and some in a thin layer inside muffin cups.
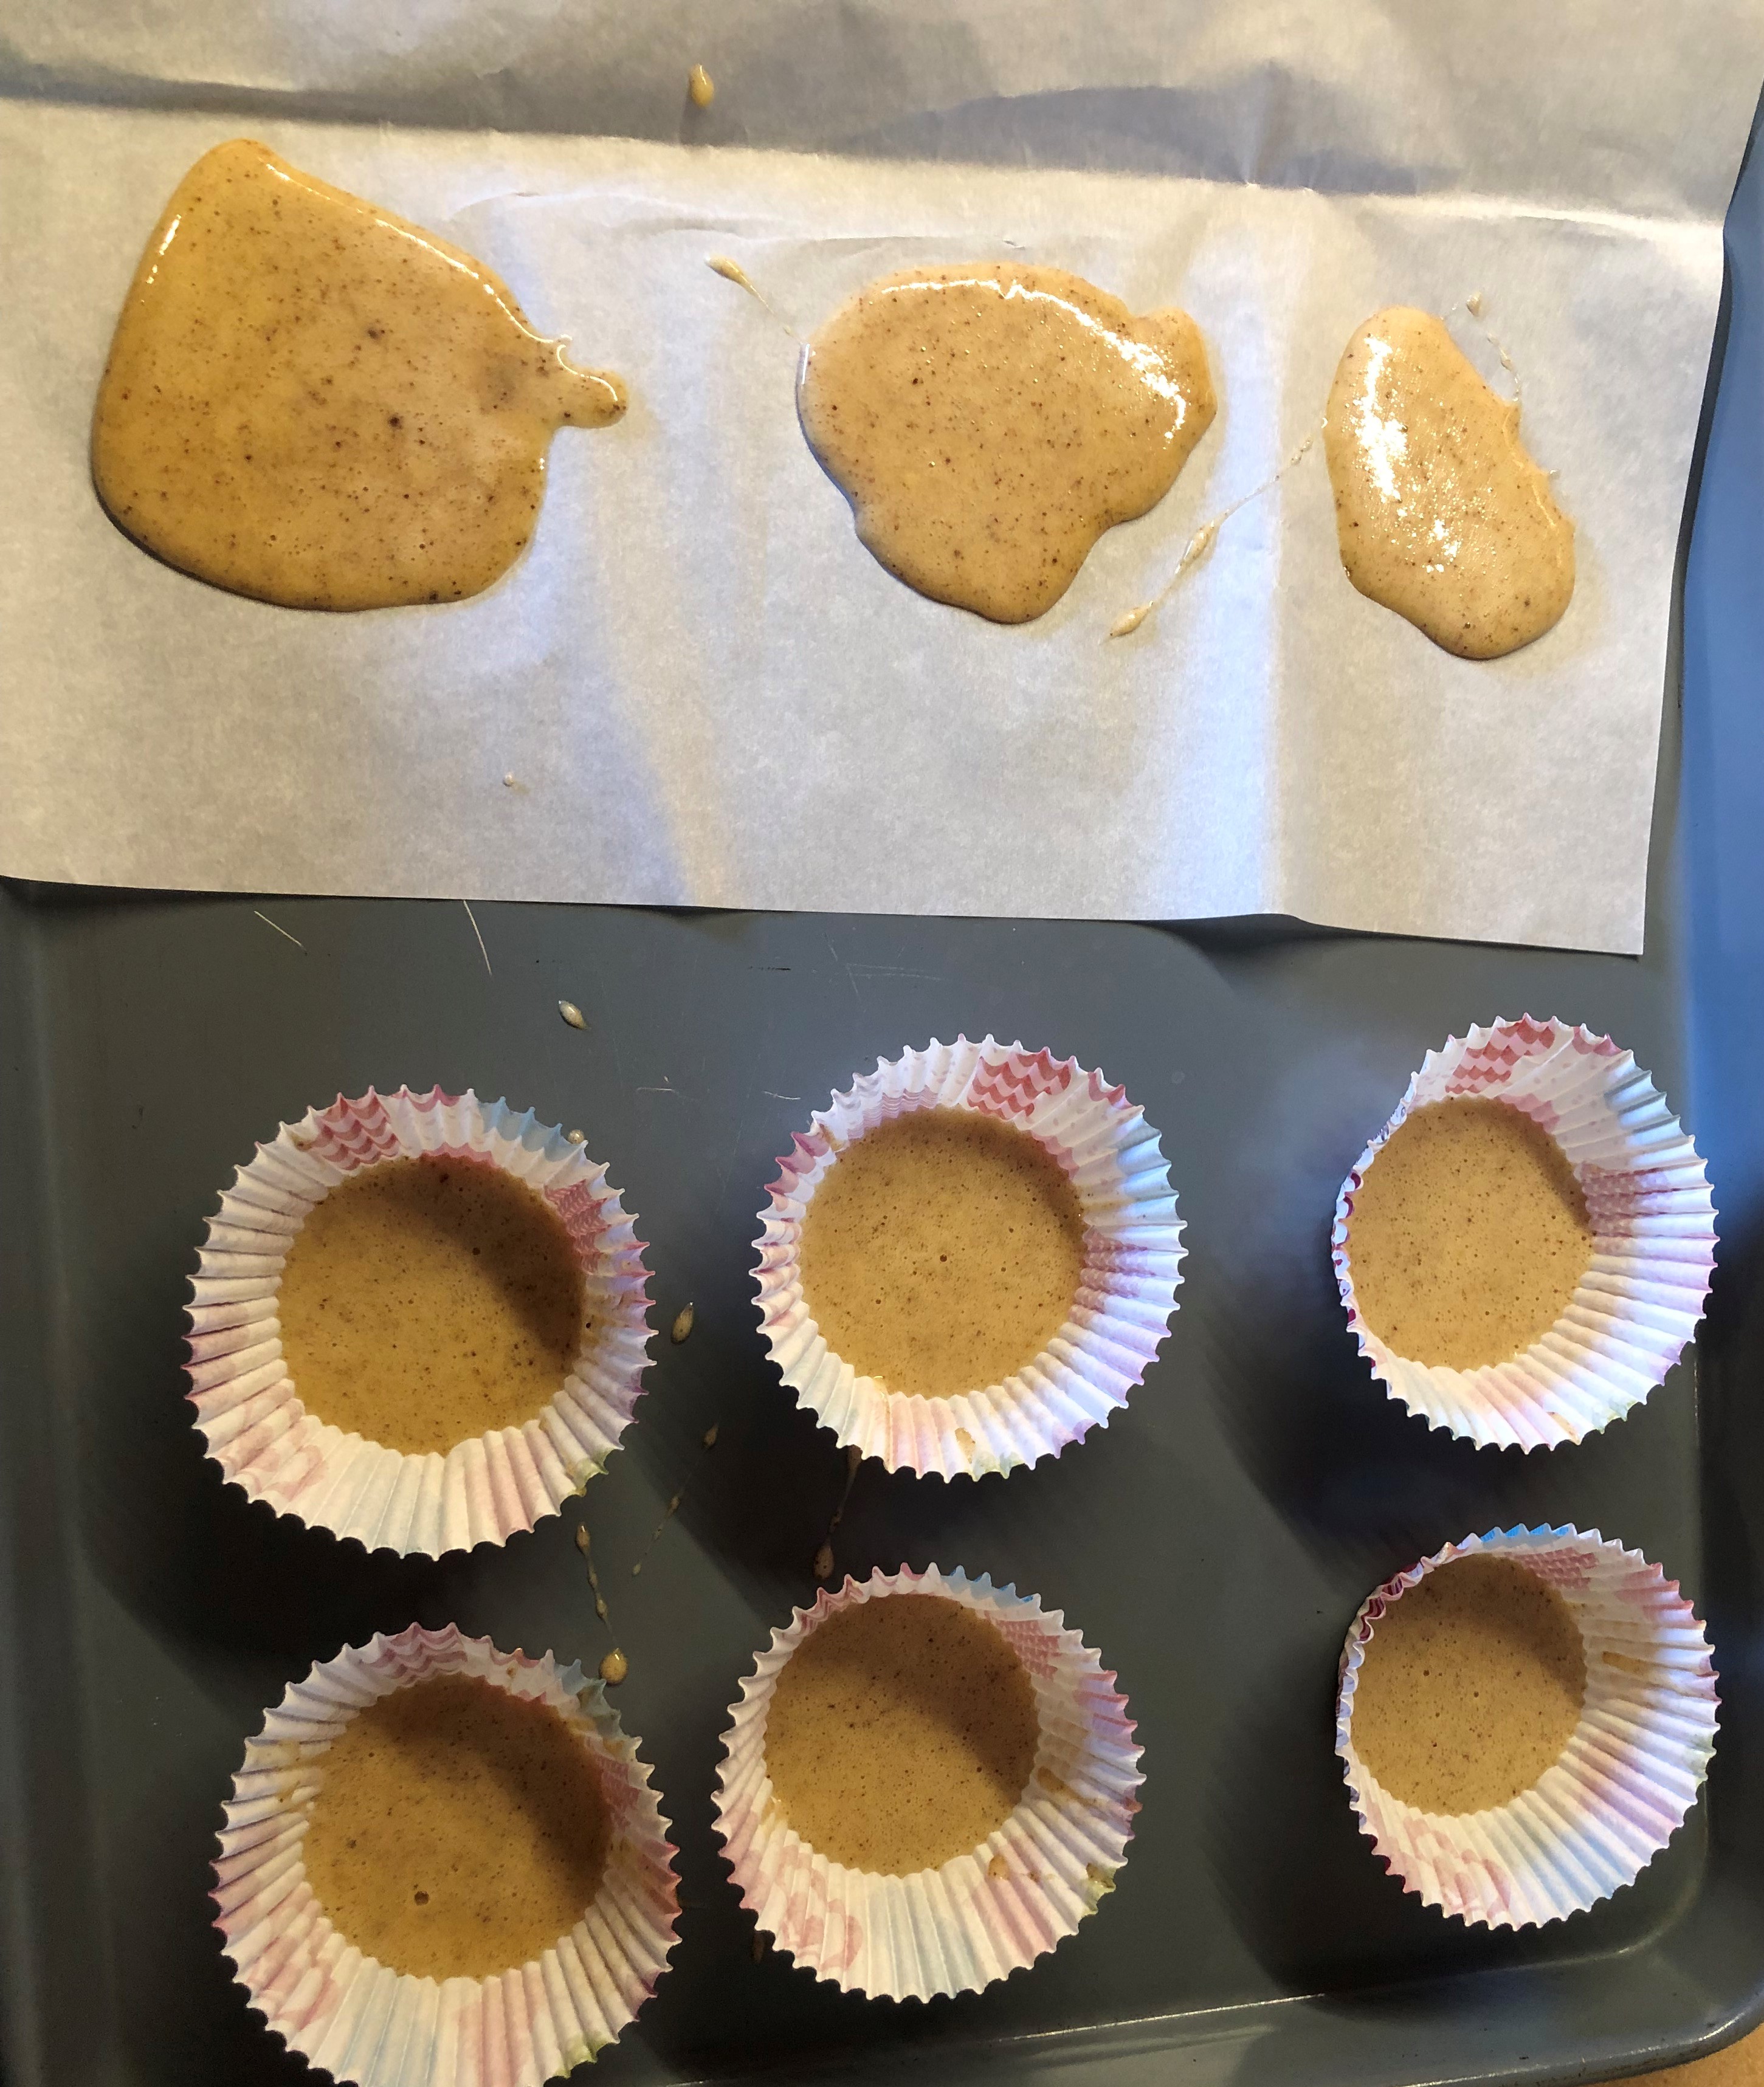
They baked for 7 minutes, then cooled so I could handle them.  


I was surprised at how fluffy they were!  Even the very thin ones on the paper had risen and had air bubbles.  
On paper

In muffin cup
The flavor was good -- I could taste the flavors from the Mexican chocolate (vanilla, cinnamon) but they didn't really taste like chocolate.  I think if you call it a chocolate biscuit, it should taste like chocolate.  

I decided I should try to bake the ones in the muffin cups with more batter, to get more of a muffin-like result.  I filled the cups to about half full.  Those baked for 15 minutes, which was just right.  A pick inserted in the middle came out clean.


I liked these, too.  The flavor was the same as the thinner ones.  There was more to bite into, which I liked.  One thing that bothered me were the "tubes" I could see inside the biscuit.  This made me think of quick breads that are stirred too much.  The texture wasn't quite right - they were a little rubbery.  One guest taster thought they were dry.  And I still wanted to taste chocolate.

There should not be tubes
So I took the rest of the batter and mixed in 2 tablespoons of cocoa powder.  This made the batter thicker.  These baked for 15 minutes, too, at half full or a little more.
Now that looks like chocolate.

Contrast:  with cocoa powder on the left.
These definitely tasted like chocolate.  The texture was better!  I suspect I should have started with the cocoa powder instead of the tablet of Mexican chocolate.

Barely any tubes.  More even texture.
My guest taster liked them all but agreed that the chocolate biscuits were the best.  

My next goal was to determine what recipe would work without having to make all the adjustments.  I wanted to start with cocoa powder (not Mexican chocolate), flour, and powdered sugar.  Then I would add the beaten eggs one at a time until I thought the wet-to-dry ratio was right.  

It turns out that three eggs was just right.  Two made it dry, and three made it a thick batter.  No, I never got a paste.

My Redaction (final attempt)

4 ounces flour
10 ounces powdered sugar
1 ounce cocoa powder
3 eggs

Preheat oven to 350 degrees F.

Set out 10 - 12 paper muffin cups on a baking sheet or in a muffin tin.

Mix dry ingredients together.  Beat the eggs together, then add to the dry mixture.  Stir well.

Ladle or spoon into muffin cups; fill about half full.  Bake for 18-20 minutes, or until a wooden pick inserted into the center comes out clean.

A thick batter

Into the cups.  This is too full.

Notice the smooth tops?

Dense.  Moist.

The Verdict

The smooth tops after baking gave me a hint.  One bite told me the rest.  These are brownies!

Or perhaps proto-brownies.  They weren't as dense and moist as a typical modern brownie, and they weren't "fudgy", but they tasted like chocolate and were enjoyable to eat.  

Comparing them to modern brownies, they did not require butter (which would have made them moister) or baking powder/soda.  They didn't need salt or vanilla.  If I had baked them for about 18 minutes instead of 20, they might have been moister.  

The flavor was chocolate, the sweetness level was just right, and I liked the texture.  They were chewy, too.

Success, finally!

Wednesday, February 1, 2023

Rock Fish in sauce -- a Pinedo recipe

My neighbors, G & T, gave me some dorado filets that G had caught himself.  Wonderful of them to share it with me!  I had to do it an honor by cooking a Pinedo recipe.  (Search this blog under the keyword "Pinedo" to see all of the posts and why she is important to me.)

This recipe is on page 203.

My Translation

Rock fish in sauce.

         Cut the fish into large slices. On the other hand, onion and garlic are fried in butter with salt and pepper, and when the onion is well browned, a glass of claret wine is added.

         Place the fish slices in this sauce, covering the casserole well and letting it cook over a low heat for fifteen minutes.


My Redaction

True confessions:  I made this recipe twice.  The first time was with some store-bought tilapia.  I want to present both versions so you can make choices.  The italicized ingredients are the ones that differ between versions.

First version:

1 pound tilapia

1 large onion, sliced into narrow strips 1 to 2 inches long

2 tablespoons butter

1/4 teaspoon salt

1/2 teaspoon pepper

1 tablespoon chopped garlic

6 ounces cabernet wine  


Second version:

1 pound dorado

1 large onion, sliced into narrow strips 1 to 2 inches long

3 tablespoons butter

1/2 teaspoon salt

1/2 teaspoon pepper

1 tablespoon chopped garlic

6 ounces pinot noir wine

Ingredients with the dorado

Melt the butter in a Dutch oven.  Add the onions and cook over medium heat, stirring occasionally, until they begin to brown.  Add the garlic, salt, and pepper; cook a few minutes longer, stirring continuously to avoid burning the garlic.

Add the wine and stir well.

Add the fish filets.  For the tilapia, I spooned about half of the onion-wine sauce over the top of the fish.  For the dorado, I put the filets in skin side UP and made sure the filets were imbedded in the sauce.

Turn the heat to low.  For the tilapia, I forgot to cover the pan, so it cooked 23 minutes until the meat was flaking.  For the dorado, I covered the pan and cooked it 15 minutes for the meat to be flaky.

Onions just starting to brown, with seasonings added.

The entire sauce.

Note that the filets are pushed down into the sauce for cooking.

Cooked.  One filet was turned over to check on doneness.

The Verdict

I served the filets in a bowl with some of the sauce spooned over the top.  It was good to have the onion mixture already on top of the fish when served.  I didn't include a lot of the liquid into the bowl.  I used a spatula to move the filets to our plates, which included the cooked onions but not the liquid part of the sauce (not much, anyway).

I think some fresh parsley on top would have been pretty.

The meat was, as said, flaky, and very moist.  The flavor was good in both cases, with two differences.

First, the tilapia needed more salt, which is why I increased the salt quantity for the dorado version.  The sauce on the tilapia was bright and tangy, which I thought came from the cabernet (acid and fruity) and the pepper.  I chose cabernet because it is close to claret, which I didn't have on hand.

In contrast, the dorado had just the right amount of salt, but the sauce was not as bright or tangy.  The pinot noir just didn't have the robust flavor of the cabernet, so while it was good, it was not as good.  I wanted that tang on my tongue.

In both versions, my guest taster and I thoroughly enjoyed the fish.  The fact that I didn't overcook them (and I think it would be hard to do it with this technique) made it good, and the sauce with the onions made it even better.  The onions were cooked enough that they added their sweetness, the butter added a good mouthfeel, and the garlic-salt-pepper seasoning was just right.  The garlic flavor was a supporting role:  it didn't stand out but it did add its distinctive flavor to the background.

Success, twice!

I have to say that this recipe is very easy to prepare, and I got a lovely main course out of it.  While everything was cooking, I put together the rest of the meal.  For example. the dorado had a side Caesar salad, a quinoa pilaf, and some cranberry sauce.

A good dinner.


Sunday, January 15, 2023

Valparaíso Fritters -- a Pinedo recipe

Internationalliving.com tells us that 

The seaside city of Valparaíso, Chile has historically been the major port linking the country to the Atlantic and Pacific oceans. ...

Valparaíso is known as the "Jewel of the Pacific" and is one of Chile's most romantic cities.  Before Spanish and European settlers arrived on the continent, Chile was inhabited by the Chango and Picunche Indigenous people.  After the arrival of Spanish settlers, Valparaíso became known for its fishing industry and served as a stop-over port for travelers and Spanish explorers traveling along the coast.

Chile.travel adds

Bohemian and colorful, Valparaíso's maze of hills has long inspired poets and writers.  You'll discover something new at every turn:  a gem of a building, a remarkable art gallery or some little gastronomic 'find'.

During Miss Pinedo's lifetime, Valparaíso was an important stopover port for people traveling to California for the Gold Rush, so it is reasonable for her to have knowledge of it and to possibly have known people who had been there.  She includes a recipe for Valparaíso Fritters on page 39.

(If you are not familiar with my collection of Pinedo recipes, search this blog and the California Food Project for the keyword "Pinedo" to view them.)

My Translation:

Valparaiso Fritters

         Make a dough with two egg yolks and a half tablespoon of salt. The hard dough is made and spread with the rolling pin, immediately cutting it into half-inch squares. These squares will go into very hot fat.

         White sugar syrup will be prepared; an extract or a glass of sherry or marasquino will be added, cinnamon or the juice of a lemon, cleaned and toasted walnuts, and the fritters.

         It is all placed in the confectionery, and it is served.


(Note:  Marasquino is a sweet liqueur made from marasca cherries.)

My Redaction

1 cup sugar
3/4 cup water
1 tablespoon lemon juice
flavoring (I used 2 tablespoons orange blossom water)

2 egg yolks
1/2 tablespoon salt
2 cups flour

oil for frying

walnuts (I used almonds), toasted


My Notes

First I made the syrup by mixing the sugar into the water, bringing it to a boil, then simmering it and stirring it until the liquid was clear (about 2 minutes of simmering).  I added the lemon juice and orange blossom water while it was still hot, then let it cool.

Simmering syrup

I didn't have walnuts available so I substituted almonds.  I toasted them in a hot, dry frypan, stirring them constantly.  They were done when they had some spots of browning, they smelled good, and I heard some popping sounds.  They went into a bowl to cool.

Miss Pinedo does not list flour as a dough ingredient, but I think it is obvious.  What concerned me was how much flour to use, and if I needed any other ingredients to go with it.  I decided that she probably mixed in flour as she saw fit, and my only clue was to make a "hard dough."  I used about 2 cups flour, into which I put the salt and egg yolks.

This the egg yolks were absorbed quickly by the flour, so I kept adding water until I had a "hard dough."  It was a bit dry but not so much that it fell apart when I rolled it.

At this point, I put a vegetable oil in a frypan and started heating it.

Pre-dough

Hard dough

The next challenge was to determine how thick to roll the dough.  My instinct said to make them thin.  I tried about 1/4 inch thick first, and was not surprised that this was too thick.  That is, I rolled the dough, cut off a few little squares, and fried them.  They were too chewy and hard to eat.

1/4 inch is too thick

So I tried about 1/8 inch, and that worked out well.  At least while I was cooking them because they were tender and crisp.  But see my notes at the end of the post.

I found that putting a small handful of squares into the hot oil was a good amount:  they first clumped when cooking, then I stirred them to separate them, which also helped to cook both sides.  Once they were golden brown, I removed and drained them, then placed them on absorbent paper.  


Clumped

Stirred and nearly done

Draining

Once I had the thickness and frying time worked out, I was able to get a routine going of rolling the dough, cutting it into strips then squares, then frying.

Rolled, then cut into strips

Little squares.

The key was to put in just a small handful of squares to cook in each batch.  The time it took for them to cook was about the time it took to cut another batch.

The amount of dough I made turned into a good quantity of little fritters.  I mixed them with the toasted almonds.


I was serving them later, so I didn't pour the syrup over them.  I kept that separate until serving time.

The Verdict

This is what it looked like upon serving:


I included a slotted spoon to drain off the excess syrup.  We ate it approximately 2 hours after I finished frying the fritters.

They sure looked cute.  However, they were tough and no longer crispy.  I could eat them but they weren't enjoyable.  Another problem:  the 1/2 tablespoon of salt was too much.  I could taste the salt and one of my guest tasters, YT, noticed it, too.  

Perhaps the almonds should have been slivered.  But the fritters themselves were not entirely pleasant to eat so it was hard to tell if the almonds should have changed.

The syrup was very tasty, although I think I would use less orange blossom water, like one tablespoon instead of two.  YT commented that it tasted a lot like jasmine tea and enjoyed it.  

So I would call this a failure.  I'm not sure how to make the fritters better unless it means serving them as soon as they were out of the hot oil.  Maybe there is a tweak I could make to the dough to make it stay crispy after they cooled?  

I wondered if letting the fritters soak in the syrup would help.  I let them soak for several days, trying them several times to see if they would soften:  no, they did not.  

By the way, the amount of syrup I made could easily been cut in half and still had plenty to put over the fritters.  However, having extra syrup was wonderful to put on a blueberry Dutch baby pancake for breakfast and sometimes to sweeten a cup of tea.  That part was a success!


Monday, January 2, 2023

Happy New Year Twelve! - Chocolate Mousse Cake to Celebrate (part 2)

Yesterday I posted on how to make the chocolate chiffon layers for my 12th year of food blogging celebration.  Today I show how to assemble the cake.  Click here to see yesterday's post.

I'm using a recipe for Chocolate Mousse Cake as found on pages 134-135 in The Greyston Bakery Cookbook, by Helen Glassman and Susan Postal.

ISBN 0-87773-323-6

It is time to bring all the parts together!


Chocolate Mousse Cake

1 recipe Chocolate Chiffon Layers (2 layers, baked and cooled)

Chocolate Mousse:

3 cups heavy whipping cream

2/3 cup unsweetened cocoa

3/4 cup sugar

Chocolate Water Glaze:

8 ounces semisweet chocolate

1/2 cup water

1/8 cup simple syrup (see directions below)

1/8 cup beaten egg (1/2 egg)

4-ounce semisweet chocolate bar, slightly softened in a warm place

Carefully split cooled cake layers in half.  Place carefully on waxed paper on a flat surface.

Mousse:

Whip cream with sifted cocoa and sugar until quite firm, using an electric mixer.

Place first cake layer cut side down on cake plate.  This prevents cake crumbs from coming loose in the mousse.  Spread top evenly with about 3/4 cup mousse.

Repeat with additional layers, always placing cut side down. 

Frost the entire cake, top and sides, with remaining mousse, covering thinly but completely.  Chill in freezer about 1 hour.

 Chocolate Water Glaze:

Melt semisweet chocolate and water in heavy saucepan over low heat.  Stir well to make a smooth chocolate syrup.

Blend in the 1/8 cup simple syrup, made by boiling 1/2 cup water and 1/2 cup powdered sugar together for 10 minutes.

Remove from heat and allow to cool for 3 - 4 minutes.

Blend in the beaten 1/2 egg and mix thoroughly.

Let glaze cool until it is just a little warmer than body temperature.

To Finish:

Carefully shave warmed chocolate bar with a potato peeler or sharp paring knife.  Use the entire 4-ounce bar.

Pour the warm glaze on the chilled mousse cake, sides first, smoothing with a knife, followed by the top.  The top should be as smooth and even as possible and should be poured on, not spread like a frosting.

Press the chocolate shavings all around the sides, working quickly before the glaze sets.  Keep refrigerated until you are ready to indulge.

Ingredients for the mousse
Ingredients for the water glaze
My Notes

I make the simple syrup before starting on any of the other steps, although you have time to make it during the 1 hour chilling time.  Once the powdered sugar and water mixture comes to a boil, turn the heat down to medium low and simmer.  Stir occasionally.

To split the layers, I prefer to use toothpicks as guides and dental floss or heavy thread to cut.  This keeps everything accurate while making the layers simple to split.  See the pictures below.

If any of the layers break while moving them, just piece them back together in place.  

Chill the mixing bowl and beater before making the whipped cream. 

Plop a spoonful of mousse in the middle of the layer and then work the mousse out to the edges.  This cuts down on crumbs embedding in the mousse, too.  Aim to even it off across the top before the next layer is placed on it. 

I use up all (well, most) of the remaining mousse to frost the entire cake, even if the layer isn't thin.  Then I eat the little bit of mousse that is in the bowl.

Once the sides have mousse on them, make a final pass over them with a clean, slightly damp spreader held vertically.  This smooths the sides.

When mixing the beaten 1/2 egg into the water glaze, whisk the mixture while drizzling in the egg.

Shaving warm chocolate bars is messy!  Chocolate gets all over my hands.  Plan for that mess during the procedure.  I included in the pictures below the difference between the small shavings of a room-temperature bar and the long ones of the warm bar.  I thought some were too long to go on the cake well, so after they cooled to room temperature, I broke them.  That worked well.

I used a ladle to put the glaze on the sides.  Once some was on the sides, I used a lightly buttered spreader to even it out.  The order was:  glaze the sides, then the top, then smooth the sides, then press on the shavings.

I did my best to get the glaze on smooth and evenly, but I did manage to drop a piece of shaved chocolate on the top, which messed up that smoothness.  So I took a spoon and swirled the glaze decoratively around the edges of the top.  That covered the mistake and still looked good.

Here are pictures of the process:

Place 5 or 6 toothpicks at the halfway point of the layer.

Wrap the dental floss around the cake.  Pull the ends to cut the cake.

One half of a layer, neatly split.

The mousse

The first layer with mousse

All layers with mousse.
Ready for the freezer!

Chocolate and water.

Smooth.

Cooling.

Room temperature shavings.

Warmed chocolate shavings.

Glazing the sides.  Spread the glaze upward after the pour.

Glazing the top.

The final cake.  Note I cleaned up around the bottom of the cake, too.

The Verdict

I imagined Paul is in the tent and is judging my creation.  The first step is to critique the portioning of the layers and mousse.


I think Paul Hollywood would say I did a good job in getting the proportions right:  the mousse layers are fairly even in their thickness and are close to (but smaller than) the thickness of the cake layers. The water glaze thickness is consistent across the top of the cake and not too thick on the sides.

Generous but not too much so.  Well, I really don't know what Paul would say, but I'm happy with it!

The next step is to judge the flavor.  I love this cake!  The layers are rich and slightly bitter.  The mousse is light in both flavor and texture, keeping the cake from becoming too heavy.  The water glaze adds a bit of chewiness, which is nice.

But let's not go with just my very-biased opinion.  I shared the cake with several other guest tasters.  Everyone thought it was GOOD.  One guest, AD, noted that she has purchased a similar cake from her favorite bakery, but that mine was better overall and definitely more generous with the chocolate shavings.  

Another guest, FT, put her piece in the freezer until she was ready to eat it.  The book authors suggest this idea and say if you only let it defrost a little, it is like eating an ice cream cake.  FT agrees.

Success!  Again!  I'm labeling this recipe as a Most Favorite and not waiting for the end of the year.  At some point I'll try other cake recipes from the book, or at least I think.  : )

Hint:  the authors give us many variations on the mousse flavors along with ideas on how to use them other than on cake.  You can see some examples on the book cover picture.  Well worth it!

Cookies Consent

This website uses cookies to offer you a better Browsing Experience. By using our website, You agree to the use of Cookies

Learn More