Tuesday, December 15, 2020

Forgotten Cookies -- One of My Most Favorite

I reserve the last post of the year for one of my favorite recipes.  This year I want to record a seasonal favorite:  Forgotten Cookies!

I say "seasonal" because I tend to make them at Christmastime, however they are good any time of the year.  I just know that if I make them, I will eat them, so keeping it to a season is best for my waistline.

Once these are made, they are hard to forget.  They are light, crisp, sweet, and flavorful.  At a time when sweet goodies are in abundance, they are a nice change from the heavier cookies, cakes, and pies.

So why are they Forgotten Cookies?  Because once you prepare their mixture, you put them in the oven and forget about them!  I typically choose to make them at night so they can sit in the oven while I sleep, but you can make them any time you know you won't need your oven for the day.

Please enjoy one of my favorite recipes:

Forgotten Cookies  (30 to 35 cookies)


My handwriting many years ago.
2 large egg whites
2/3 cup sugar
1 teaspoon vanilla
1 cup chocolate chips
1 cup chopped pecans or walnuts


I used vanilla sugar instead of sugar and vanilla.  Works great either way!

Preheat oven to 350 degrees F.  Beat the egg whites to foamy.  Gradually add the sugar and vanilla, and beat until very stiff.  Fold in chocolate chips and nuts.

Put aluminum foil on the cookie sheets then spoon-drop cookies onto the foil.   Never use a greased pan.

Turn off oven.  Put cookies in.  Forget about them until the next morning.  Don't open the oven until ready to take the cookies out.

My Notes

Sometimes I use vanilla sugar and sometimes I use sugar and vanilla, as directed in the recipe.  Either way is fine, especially if your vanilla sugar is highly flavored. If you don't know how to make vanilla sugar, look at this post:  Vanilla Sugar and Grace Firth.

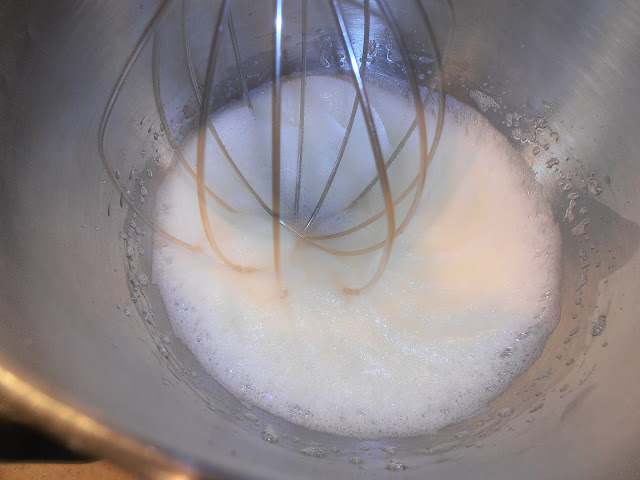
By "foamy", I used to think "as soon as I see a lot of bubbles in the whites."  But putting in the sugar at this stage gives a wetter mixture, so I wait until the bubbles are small and the whites are changing from yellowish to creamy.

Too soon!
Getting closer
Now is a good time to add the sugar.
When I add the sugar and vanilla, I truly just toss in a little at a time while the mixer is beating the whites.  Let them mix in and then toss in some more.  Since your aim is to have the whites "very stiff," you can take your time with their addition.

See the peaks?
Sometimes I use foil and sometimes I use my ceramic-coated cookie pan or my silicone baking sheet.  It helps to have the cookies on a flexible sheet because they like to stick to the surface.  If you are very careful you can use a spatula to get them off a hard pan, but they are delicate and easily broken.  It is easier to just peel them off the foil or silicone sheet.

As for the chocolate chips and nuts additions, I vary it according to my needs and tastes at the time.  Just chocolate chips (as I did for this example) is fabulous.  There is something about the slow bake time that transforms the chips into slightly softer versions of themselves, which is appealing. I used 1 cup chocolate chips for this example and thought the amount was just right.

Sometimes I use just nuts, and sometimes I put in crushed peppermint candies.  The candies are small and intense in flavor, so using 1/2 to 3/4 cup seems about right.  It is also fine to put in both chocolate chips and peppermints!  Whatever your taste buds desire.

When you drop the mixture onto the cookie sheet, pay attention to how big the portions are.  Too big means the heat won't necessarily get through to the middle of the cookie, which leaves a danger of eating uncooked egg white.  They don't have to be huge to be appreciated.

The pictures I have of the cookies here show the cookies being too big.  Not greatly so but there were some that had sticky centers.

These cookies don't spread and only slightly puff, so you can put them very close together on the cookie sheet.

Here is a pan before baking:

Make them a little smaller than this.
And here it is after baking (turned 180 degrees):

They have a rounder, softer look after baking.

The Verdict

These are so good!  You can vary the sugar level to make them less sweet.  The combination of crispy egg white, sweet, vanilla, and creamy chocolate is irresistible.  And they are light, which makes it easy to enjoy them and not feel full.

If your oven is big enough, make several batches at a time.  I did a triple batch after having a lot of whites left over from another recipe.

I have heard that people have piped the cookies for a more uniform, decorative effect.  This is great as long as the additions can fit through the nozzle.

I also know that there is a way to bake them in a low temperature oven, to make them quickly instead of waiting overnight.  Either way, you end up with a scrumptious cookie.

Merry Christmas!

Tuesday, December 1, 2020

Boiled Water Soup

I can see my cookbook collection from where I sit at the dining table, so I often find myself looking over the titles and deciding if there is any one title that is "calling" to me.  This time it was Loaf, Crust, and Crumb by Silvija Davidson.

ISBN 0-7181-3825-2

She starts off her book with a discussion of breadmaking, the ingredients and the history of not only making bread but using bread in cookery.  Then she has this amazing directory of bread types; literally about 130 pages of breads and their descriptions all in alphabetical order.  

The descriptions list where the bread originated, main flavors, uses.  Many I have never heard of!  For example, bara brith is a fruit bread from Wales:

The finest bara brith I have tasted was made in a turn-of-the-century wood-fired brick bakehouse ...  It was richly fruited, dense and chewy, made with organic stoneground whole-wheat flour and imbued with the tang of woodsmoke...  (page 28).

The recipes follow this, but make no mistake:  these are not bread recipes.  They are recipes that use bread in a variety of ways.  There are things to do with breadcrumbs, along with recipes for sandwiches, soups, savory dishes, stuffings, sauces, and desserts.   

The recipe that caught my attention was named Aigo Boulido, which "is the Provencal dialect for eau bouillie - boiled water."  I thought it would be amusing to write a blog post on Boiled Water Soup.

Aigo Boulido  (page 224)

1 3/4 pints water

2 - 6 cloves garlic, crushed

1 bay leaf and/or 4 sage leaves

1 tablespoon extra virgin olive oil

salt and pepper

1 egg yolk (optional)

4 thick chunks country bread, slightly stale


Put the water, garlic, herbs, oil, and a little salt in a large saucepan, bring to the boil and simmer for 15 minutes.  Beat the egg yolk in a large jug and gradually strain on the flavoured water (discarding the herbs), whisking all the time.  Adjust the seasoning, adding pepper if you wish.  The bread can either be grilled, placed in warm soup bowls and the soup ladled over, or torn into chunks and stirred into the thickened soup -- in which case you might whisk the soup into the egg in a warmed tureen, dispensing with the jug.

My Notes

I had some whole wheat bagels, which I cut in half and let sit on the counter for a few hours.  I turned them once to make sure both sides were drying out a little.

I used 5 cloves of garlic, which I crushed with the flat end of my big pestle.  I also chose to use just the bay leaf, and I put in 1/4 teaspoon salt.


Water, not yet boiled

While the broth was simmering, I noticed a funny popping noise, which I thought was the garlic.  

Once the broth was ready, I strained it into a quart measuring cup that had the beaten egg yolk in it.  I poured in a little broth, whisked, added more broth, whisked more, etc. until all the broth was mixed into the egg yolk.

Water, boiled

With egg yolk beaten in

When I tasted the broth to adjust the seasoning, I noticed it was lightly garlicky, subtly bay, and needed more salt (1/2 teaspoon did the trick) and some pepper (1/4 teaspoon).  That gave a nice balance to the delicate flavor of the broth.

The broth had a chance to infuse the pepper while the bagels were prepared.

Two bagel halves went under the broiler until they were golden brown.  I placed them each in a bowl and poured the broth over the top.  I put in enough broth to barely float the bread.


The Verdict

The bagels quickly soaked up the broth and became soft.  I used my knife and fork to cut them into bite-sized pieces, and then used my spoon to eat the soup-with-bread.


I had broth left over when I ate all the bread, so I broke up the other half of a bagel (that had been toasted) and ate the rest of the soup with that.  It was interesting to note that the toasted bagel didn't absorb the soup as quickly as the broiled bagel, and I liked the bit of crunch I got from that.

My guest taster and I both liked what we ate.  We agreed it wasn't hearty enough to be a main dish (although I did serve it that way, with some mashed sweet potatoes that had sauteed apples and onions mixed in), but we thought it would make a good first course soup.

The broth was delicately flavored and the bread gave it some body.  Broth + bread was a good combination!  The whole wheat made it more like a "peasant" soup and I liked that very much.  I was surprised at how much of the garlic and bay flavors came through from just 15 minutes of simmering and it was just right because it wasn't overwhelming.  

Success!  I would consider doing it again, but as a side dish or first course.  The vegetarians would like this, and they could skip the egg yolk.  The yolk made the broth yellow; without it, it would look more like boiled water.

I think I would like to spruce up the look of the served soup with some sort of garnish.  Perhaps a bit of chopped parsley or thinly sliced green onions would be nice on top.  

And there you have it:  boiled water soup!