Showing posts with label cheese. Show all posts

Thursday, January 15, 2026

Huevos con queso - Eggs with Cheese, a Pinedo recipe

It's time for a Pinedo recipe!  If you are new to this blog, I translated Encarnación Pinedo's 1898 cookbook, El Cocinero Español (The Spanish Cook) and am attempting to get it published.  In the meantime, I cook from it and post the attempts here on the 15th of the month.  I also publish them on my Pinedo-only blog, "The Spanish Cook Without Equal", found here:  https://pinedo1898.blogspot.com/ 

Today's recipe is on page 127, "Huevos con queso" or "Eggs with Cheese."


My Translation

Keeping in mind that she was cooking over fire; the idea of browning with a hot fire is equivalent to broiling in an oven.

My Redaction

Per serving:

butter

1 slice bread

1/4 to 1/3 cup shredded cheese

1 egg

ground pepper

ground nutmeg

The butter asked politely to be included.

Melt butter in frying pan.  Add slice of bread, sprinkle most of the shredded cheese on the bread, break open the egg, and gently let it sit on top of the cheese.  Sprinkle the egg with the rest of the cheese and then with pepper and nutmeg to taste.

Set heat to low, cover the pan, let cook for 6 to 10 minutes or until egg is cooked almost to your liking.  When the egg is nearly cooked, place pan under the broiler for a minute or two to finish melting the cheese and brown it a little.

My Notes

She didn't say to use butter on the pan, but I did anyway.

I used mozzarella cheese, although I think a stronger flavored cheese would be good, too.

I tried this twice.  The first time the heat was 2 of 10, I did not cover the pan, and after nearly 45 minutes, the egg was not cooked and the bread was toasted too much.  I put a lid on it and let it cook a few minutes more before broiling it.  The result was an egg that was overcooked (I like runny yolks) and dry toast.  Not exciting.  My guest taster didn't realize that there were any spices on it, and I had trouble tasting them even though I knew they were there.

Build the bread stack in the pan.

Bread and cheese
Bread cheese egg.
Bread cheese egg cheese spices.  Use more spices.
After about 30 minutes of cooking.  The cheese melting but the egg is still uncooked.
After cooking under the lid for about 10 minutes.  Egg is cooked.
Under the broiler for less than two minutes.
Overcooked, in my opinion.

The Verdict

The second time the heat was set a little higher, 4 of 10, and I covered the pan.  After 8 minutes the egg was nearly done but the toast was burnt (ugh).  I didn't broil it because I didn't want to cook the toast any further.

I also used more spices, but not too much.  

What I got was an egg that was cooked just right and toast that was blackened on the bottom and not tasty.  I could taste the spices, which I liked.

Attempt #2, after about 8 minutes cooked under the lid.

Egg is just right.  Toast is burnt.

My conclusion:  use the lower heat and cover the pan.  No one wants to wait 45 minutes or more to eat their egg and toast.

So success?  Almost but I'm not sure I can really count it as such yet.  With a little practice I could get the timing just right and really enjoy it.

I think this would be a good meal to serve a crowd with these modifications:  Heat the oven to 350 degrees F, use a cookie sheet and set up each serving on the sheet so you can cook a bunch at a time.  You might not need to broil them but the broiler is right there if you do.  While one batch is cooking, set up the next.  

This also seems like a good camping recipe, since you get toast and an egg with one pan (and a lid!) and one cooking run.


Thursday, December 1, 2022

Cooking Chicos, a Pinedo recipe

Previously I wrote about making chicos on my other food blog, The California Food Project, in which I described first roasting ears of corn in the oven then hanging them to dry for about a month.  These dried kernels are able to be stored for months, then are rehydrated and cooked.  Click here to see the previous post.  (If you are not familiar with my collection of Pinedo recipes, search on both this blog and the CA Food Project using the keyword Pinedo to see them all.)

Miss Pinedo gives this recipe in her book:


My translation:

I needed some help on how to cook them, so I turned back to Edible New Mexico.    Visit this site to see their work.

They suggest using 2 cups of chicos, which are soaked overnight in 10 cups of cold water.  Then they are cooked all day in a slow-cooker on low, or for three hours at a simmer on the stove.

I chose to use the slow-cooker.

My Redaction

Cooking:

2 cups chicos
10 cups water

About 3 1/2 cups of chicos


Place chicos in the water in a slow-cooker and allow to soak overnight.  Then set the slow-cooker to low and allow to cook all day.

Beginning of the soaking time

End of the soaking time

After the chicos are cooked, I chose to stew them with green chiles (not red).  I used canned Ortega chiles, and included Cotija cheese which was crumbled.  Some of the cheese went into the chicos and some was reserved to sprinkle over the top.


I just added the chiles and cheese to the corn and heated them all together.  

Soaked and cooked chicos

With the addition of chiles and cheese

After heating

The cotija cheese is robust enough that it didn't melt quickly.  There was a certain point where it melted, which I did not like because it was clumping and sticking to the bottom of the pan.  I think heating the chicos with just the chiles first would be better, then adding the cheese at the end and letting it warm up from there.  That way the chicos and chiles would blend their flavors.

Use a slotted serving spoon.

The Verdict

The dried chicos in the container smelled so good!  I love the smell of corn and this was excellent.  Not strong, but the scent was there.

Before soaking, an individual kernel was hard.  After soaking, it was soft, easily squished by my fingers.  It still smelled good.

The cooked chicos with the chiles and cheese also smelled enticing.

I served the result with a piece of baked chicken -- and wine! -- for a simple dinner.

Don't forget the wine.

The flavor was surprisingly good.  I expected it to taste good but I was pleased at how the chiles and chicos blended their flavors and supported each other.  The corn offered a deeper, richer corn flavor than you would get with canned kernels.  The chiles added a more acidic note as well as their distinct flavor.  The cotija cheese added a slight salty kick, a little umami, and a change in texture.

In fact, both my guest taster and I found the dish rather addictive.  We loved the flavor and wanted to have more.  We had several servings each!  The second time I served it, I put a dish of crumbled cotija cheese on the table and we could add more as we felt like it.  I even took a batch that was made without the cheese in it to a potluck, and saw that people liked it, especially the vegetarians.  Again, I put a dish of crumbled cheese nearby for people to use as they pleased.

Success!

I want to try it again using dried red chiles.  I have enough dried chicos left to do this again, and I think it is worthwhile continuing to dry corn for this as a kitchen pantry staple.  I could see using them in stews, soups, and other side dishes.  

I also think that 10 cups of water to 2 cups of chicos is too much water.  I would try it again using 8 cups.  I also would remove a lot of the cooking liquid before mixing in the cheese if I were to serve it as a side dish.  The liquid would probably be good as a soup or stew base.


Thursday, April 15, 2021

Barebottom Cheesecake

What do you think of when you have a huge chunk of cream cheese that is threatening to go bad on you?  Well, I thought of cheesecake.  The next thought was, "Which cheesecake recipe?"  You see, I have a copy of The Joy of Cheesecake by Dana Bovbjerg and Jeremy Iggers, and it gives me many, many luscious options.

ISBN 0-8120-4278-6

What was I in the mood for?  Heavy?  Light?  Custardy?  Marbled?  Flavored with spices or fruit?  

It ended being decided by how much sour cream I had in the house.  With a little less than 2 cups, and not having any heavy cream, I had to limit myself to the recipes that required less than those two.  

I chose the Barebottom Cheesecake on page 84:

We call this one the Barebottom Cheesecake because it works well even without a crust -- great if you are in a hurry or if you don't have any crumbs on hand.  This is one of the cheesecakes we test on the customers of the Sheepshead Cafe in Iowa City.  It proved to be one of the most popular ones ever served there.  

With a recommendation like that, how could I resist?  I chose to skip the crust and make it truly bare bottom.

Barebottom Cheesecake 

1 1/2 pounds cream cheese

1 cup granulated sugar

2 tablespoons all-purpose flour

6 large eggs, separated

2 teaspoons lemon juice

1 teaspoon vanilla extract

1 cup sour cream

That is a big chunk of cream cheese!
1.  Preheat the oven to 325 degrees.

2.  In a large mixing bowl, beat the cream cheese, sugar, and flour until light and fluffy, about 5 minutes.

3.  Add the egg yolks, one at a time, beating thoroughly after each until the mixture is smooth and blended.

4.  Add the lemon juice and the vanilla, then also stir in the sour cream.

5.  Whip the eggs whites until they form soft peaks, then fold into the cream-cheese mixture.

6.  Pour the mixture into the prepared crust or into an ungreased baking pan and bake for 1 hour, 10 minutes, until the center of the cake is firm.

7.  Cool the cake in the oven for 1 hour, with the door cracked open, then cool to room temperature.  Chill.

My Notes

I used my 9-inch springform pan as they recommended.  Since I was not doing a crust, I left it ungreased.

I chose to use vanilla sugar instead of regular sugar because I could.  I still put in the full measure of vanilla extract, though.  I love vanilla!

Before beating

The cream cheese, sugar, and flour were beaten for five minutes because I used a timer.  The mixture looked light and fluffy as required.

After beating

I had put all the yolks into one cup because I didn't read ahead in the instructions, but I used a tablespoon measure to scoop them out for the "one at a time" requirement.  They made the mixture a delightful soft yellow color.

The mixture was moved into a very large mixing bowl and the metal bowl was washed to ready it for the egg whites.  I think I took them to the firm peaks stage (past soft peaks) but I hoped it wouldn't be a problem.

It was a lot of mixture to fold in with the egg whites.  My experience is that it is easy to miss folding in the batter near the sides and especially at the bottom, so I put in extra attention on those areas.  Once it looked like there was no batter anywhere that didn't have egg white in it, I declared it folded.

The quantity of the batter was absolutely perfect for the springform pan.  I was astonished at how well it fit.  

A Perfect Fit!

It went into the oven while I promised myself not to open the door at all until the 1 hour and 10 minutes mark had passed.  It smelled good while it was baking!

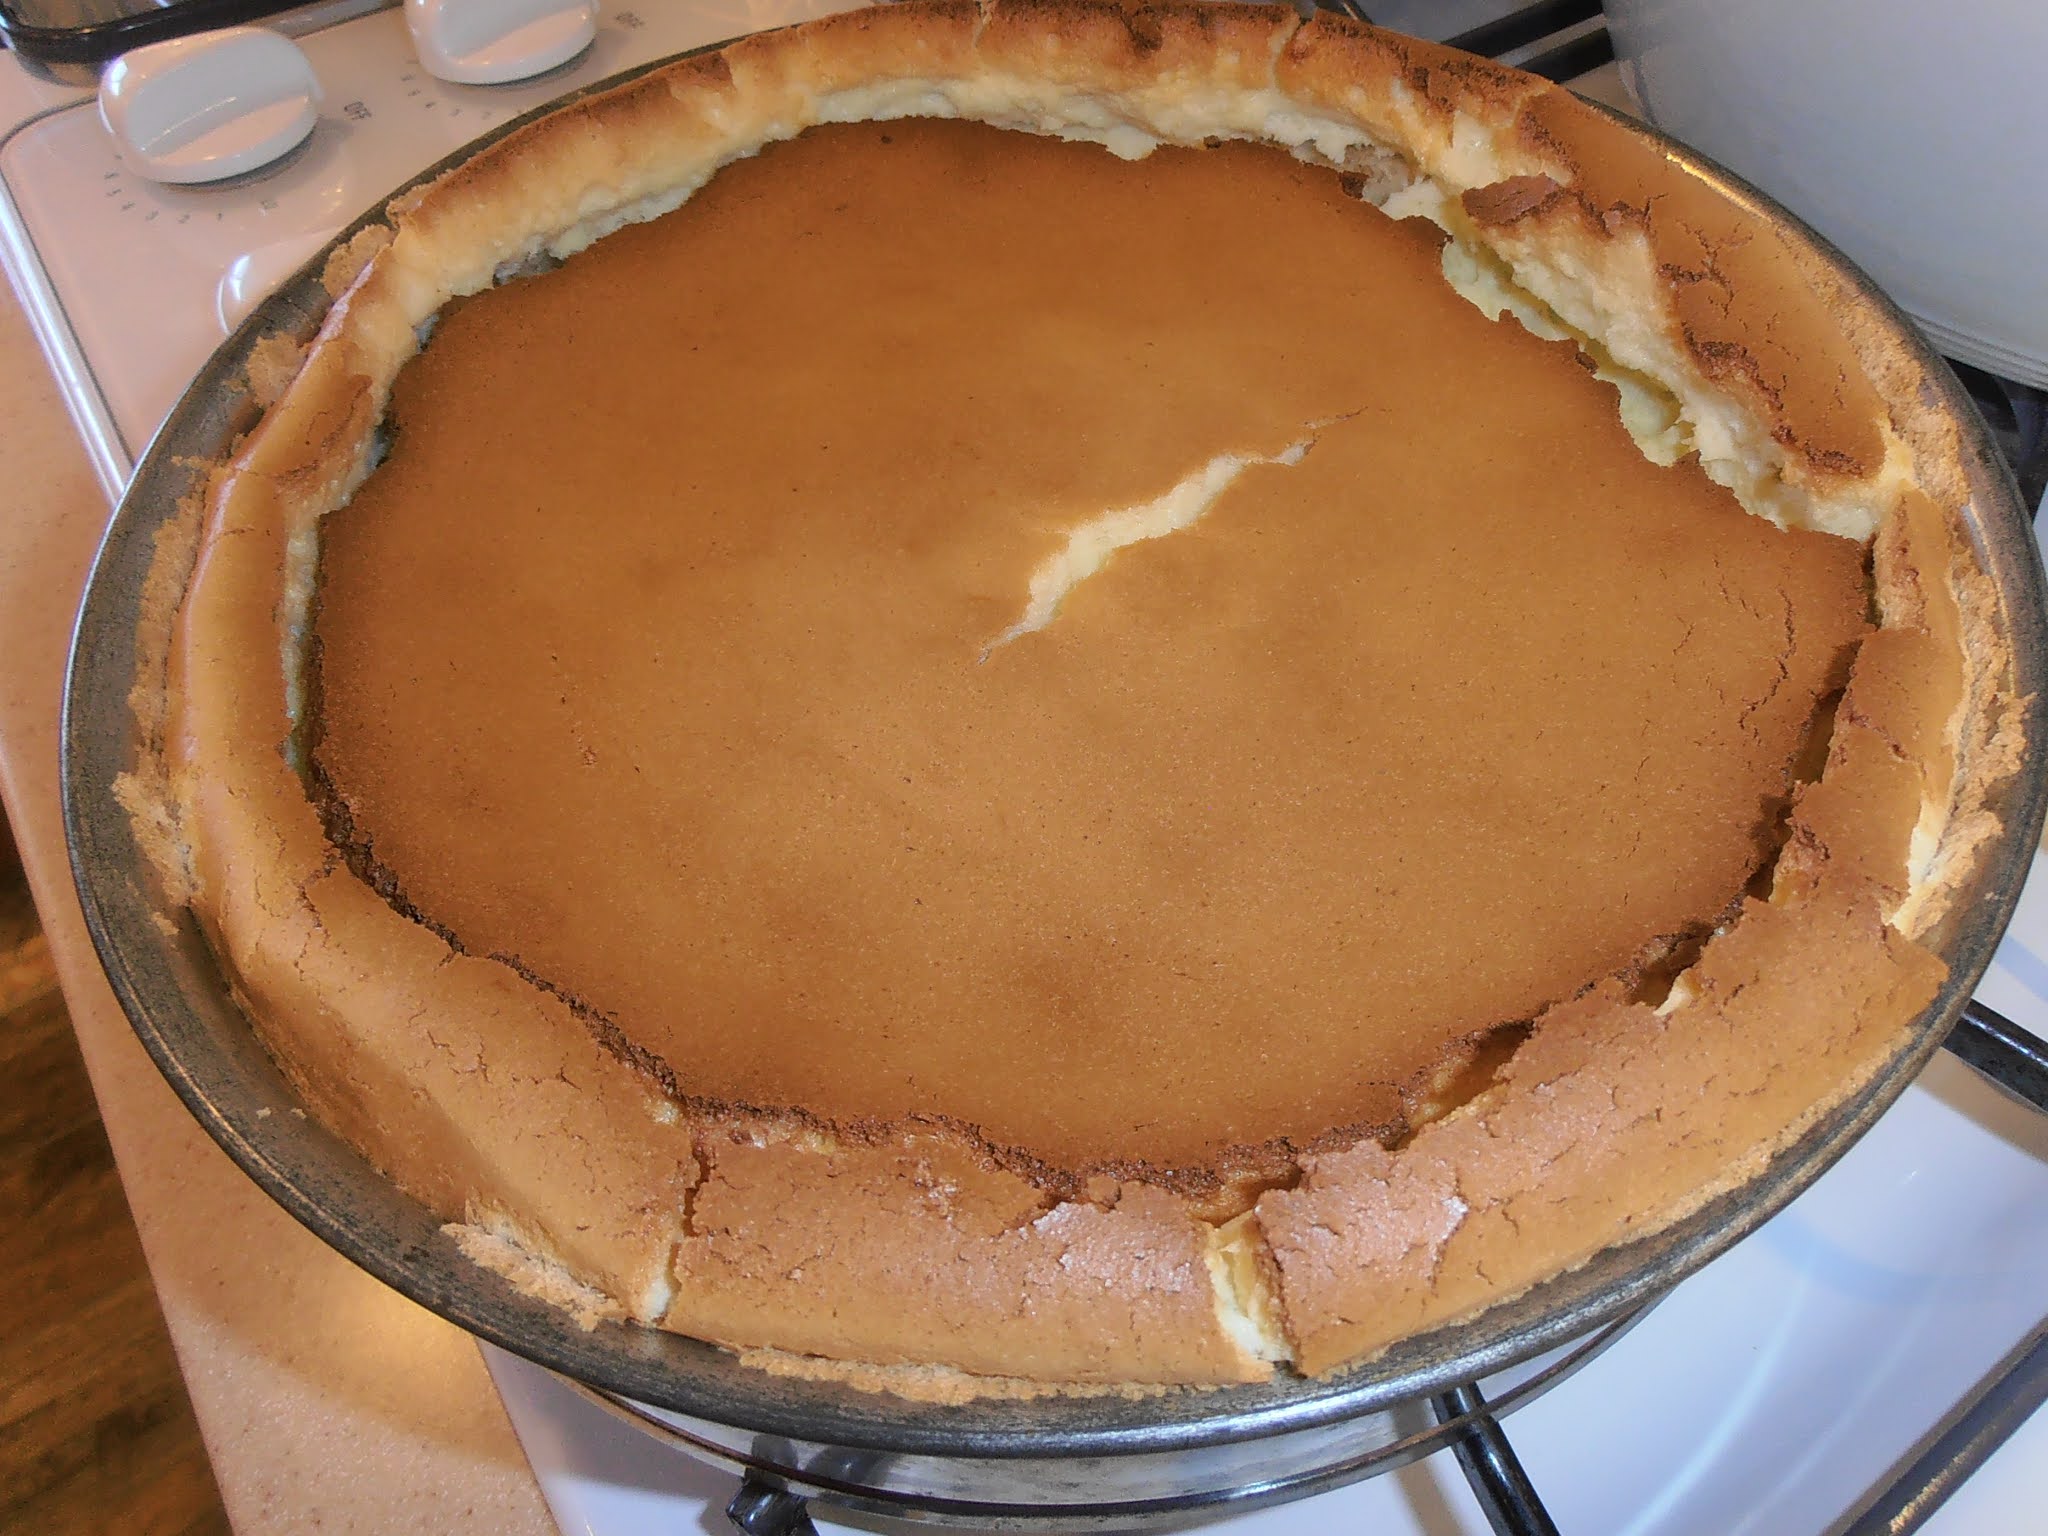
I have to admit that this result is not what I was expecting:

Right after baking.

A very brown top and sides, the uniform tearing around the perimeter.  Well, at least the center was firm!  Perhaps I could have turned off the oven earlier but I wanted to see how this would turn out.

It cooled in the oven for one hour with the door open just wide enough for the handle of a wooden spoon to fit.

And then it sank.

After cooling in the oven for one hour.

I saw it sink more while it was cooling to room temperature.


The Verdict

My guest taster and I tried it without chilling it.  


It was hard to remove a piece without it falling apart, but then again, I didn't take off the springform ring.  So much was stuck to it that I wondered if the cheesecake would hold together or be torn apart if I removed the ring.  Also, I felt I needed to leave it on when it went into the refrigerator.  I will try that after the cheesecake has chilled.

How did it taste?  I was concerned the brown top would taste overcooked, but it didn't.  It was firm and a little toasty in flavor but not burnt or scorched or bad.

The interior texture was smooth, and each bite was so very light and yet was also moist, which we both liked.  It was almost like eating nothing.  One piece did not fill me like some cheesecakes do.

The lemon and vanilla came through, but very subtly.  There was also the cheese flavor but not strongly so.  Honestly, it was like eating light, tasty clouds.

We discussed the idea of adding a topping, like raspberries or a fruit compote, which we thought would be nice but truly not needed.  My guest taster said this was a "stand alone dessert."  I agreed.  It was fine even without a bottom crust.

The parts of the cheesecake that stuck to the sides of the pan were drier and more eggy in flavor.  Not bad, just not as nice as the moist interior.

Would I do this again?  Yes.  I call it a success.  But I would be more careful about getting the egg whites to just soft peak.  Did taking them further cause this to rise and fall so much?  I don't know but the description didn't mention this could happen, so I would guess that was the problem.  I would like to have the whole cake as moist and tender as the center was, and to avoid the drier parts that stuck to the ring.

We had a piece after it had chilled, too.  It was still wonderful and was nicely accompanied by a sherry-based liqueur.


Wednesday, July 15, 2020

Playing with History -- Roman Empire Honey Cheesecake

Yes, we are still in a pandemic and yes, I still need to minimize my trips to the store.  But if I plan ahead well, I can get some ingredients I don't normally keep around the house (although I am not always sure why I don't!) and make historical recipes.  So while I still consider myself in the "Making Do Challenge", I'm going to stop using that phrase in the title of my posts.

Today I was looking at a webpage by another blogger.  She (I don't see her name on the blog) made a recipe from PBS.org and Squidoo Ancient Roman Recipes (which is another blogger site!).   It was for Libum, a sort of cheesecake soaked in honey.  You can view her page here.

I liked the idea of a dessert that is a cross between bread and cake, and it only uses a few ingredients.  At first I thought I would not be making it for this blog, so I made it according to her directions.  It came out just as she directed:  four lovely loaves with a mild cheesy flavor, the scent of bay, and the sweetness of honey.  My guest taster and I both truly enjoyed them after a dinner of a big tossed green salad (which also had some sliced meat and crumbled cheese on it).

We both wanted to have them again, which got me to thinking about what I would do instead of what her instructions said.  And that, my friends, had me decide to write it up for my blog.

Since I am not following the historical directions as closely as I normally would, I decided that "Playing with History" was the best description for my post.  In a way it is an historical upgrade but I see it more as a side step instead.

Libum  (Honey cakes or Honey Cheesecake)

(these are from the PBS.org site)

Ancient Roman Libum Recipe

Libum to be made as follows: 2 pounds cheese well crushed in a mortar; when it is well crushed, add in 1 pound bread-wheat flour or, if you want it to be lighter, just 1/2 a pound, to be mixed with the cheese. Add one egg and mix all together well. Make a loaf of this, with the leaves under it, and cook slowly in a hot fire under a brick.

- from Cato's On Agriculture, reprinted in The Classical Cookbook


Modern Roman Libum Recipe (serves 4)

1 cup plain, all purpose flour
8 ounces ricotta cheese
1 egg, beaten
bay leaves
1/2 cup clear honey

Sift the flour into a bowl. Beat the cheese until its soft and stir it into the flour along with the egg. Form a soft dough and divide into 4. Mold each one into a bun and place them on a greased baking tray with a fresh bay leaf underneath. Heat the oven to 425° F. Cover the cakes with your brick and bake for 35-40 minutes until golden-brown. Warm the honey and place the warm cakes in it so that they absorb it. Allow to stand 30 minutes before serving.

And bay leaves and frontignac.
My Notes

I followed the modern recipe except I first put the ricotta into a bowl, measured the flour over it, then poured the beaten egg over the top.  I mixed it with a spoon until it was barely mixed, then used my hands to finish mixing it.  The spoon came in handy to scrape the dough off the sides of the bowl.

It was a little sticky to work with but came together as a cohesive ball with just a little hand mixing.  I was careful not to overwork it; I kept thinking about how quick breads are best with minimal mixing.

Soft, moist, but not too sticky
Instead of four cakes, I made eight little ones.  Each one sat on half of a bay leaf.


The oven temperature was 375 degrees F and they baked for 30 minutes before they turned lightly golden brown.

They puffed!
I decided that four of them would soak in honey, which I diluted a little with water and warmed on the stove.  The other four would soak in the elderflower syrup, frontignac, which I had written about in a previous post (but did not warm).  (See here for how to make frontignac.)

As soon as the cakes were done, I flipped each one over and peeled off the bay leaf.

Leaf off, leaf on.  I love the leaf imprint!
Then, while they were still very warm, I put them into the honey and the frontignac to soak.  I let them soak an entire hour.
in frontignac
in slightly diluted and warmed honey
The Verdict

The first time I made them, they soaked about 15 minutes in warmed undiluted honey while we ravenously hovered over them and then couldn't wait any longer.  They smelled wonderful!  The bay scents the air and stimulates the appetite.  There was some honey soaked into the cakes, which was tasty.  We sopped up the rest of the honey with the cakes as we were eating them.

This time I managed to control myself and wait the entire hour.

I diluted the honey this time to make it more syrupy than just warming it.  I wanted it to soak into the cakes more.

After soaking for one hour, I noticed that the frontignac appeared to have been absorbed more than the honey but both syrups still had not been completely absorbed.

I flipped the cakes over to put a little glaze on top of each one, then decorated them with borage flowers that were from my garden.

Just too cute!
We had them for dessert, two each.  Both had their syrup soaked into the bottoms and up about 1/4 inch.  Both were tasty and flavorful!  Bay, cheese, honey or elderflower, all in a light bread base.  I liked the honey best and my guest taster liked the frontignac best.  Both were good.

You can see how far the syrup soaked into the cake.
The only difference I noticed between making the small ones and the large ones is that the small ones seemed a little drier in the middle.  Not bad, just a small difference.  We enjoyed them with a homemade fig wine as an aperitif.

Success!  I might make them again and try making six instead of four or eight.  Making the servings a little bigger might keep them moist without making them too big.


Monday, April 8, 2019

Mrs. Fisher's Cheese Pudding

Abby Fisher was born a slave in South Carolina circa 1832.  After she was freed she moved to northern California where she distinguished herself by her cooking skills: 
she had clearly long been steeped in the best traditions of Southern cookery and was a fine practitioner, so recognized in her day.  ... she was awarded medals and diplomas at various fairs in California ... 
So impressive were her skills that a "committee of residents in San Francisco and Oakland <were> responsible for recording her knowledge of the art from dictation."  You see, neither Mrs. Fisher nor her husband were literate.

These quotes, from page 75 of the book What Mrs. Fisher knows about Old Southern Cooking, brings to our attention that her book appears to be the first cookbook written by an African-American that was published in the United States.  It was published in 1881.

ISBN 978-1-55709-403-2
I had the good fortune to recently visit Charleston, SC, where I found this reprint of Mrs. Fisher's book in a gift store.  It didn't take much perusing to decide that this book needed to come home with me.  It contains 160 recipes that address breads, meats, croquettes, cakes and other desserts, pickles, sauces, salads, sherbets, soups, and miscellaneous.

I saw several intriguing recipes I would like to try.  But the first was Cheese Pudding, recipe #159, partly because the ingredients caught my interest and also because we are directed to send it to the table "as a vegetable."  That made me laugh, because my first reading made me think it was a dessert!  However, I think she meant it to be a side dish to cooked meat, which is how I decided to serve it.

Cheese Pudding (159)

Have mild cheese; grate half pound of cheese and half pound of apples, add to this half pint of sweet milk, beat four eggs very light, and add to above.  Before mixing apples with cheese, put to it one tablespoon white sugar; stir all well.  Season with nutmeg, and pour it into a dish and put to bake, putting one tablespoon of butter over it in small pieces.  Twenty minutes will bake it, and send to table as a vegetable.

My Redaction

1/2 pound mild cheddar cheese (I used a mixture of mild and sharp cheddar), shredded
1/2 pound apple, cored and then shredded
1 cup milk
4 eggs
1 tablespoon sugar
ground nutmeg, to taste 
1 tablespoon butter

This is enough for two batches, except for the butter
Preheat oven to 325 degrees Fahrenheit.  Grease a baking dish that has at least four cups capacity.

Put apples and cheese together; mix well.  Add the nutmeg and mix well.
Shredded apples!
Apples and cheese
In a separate bowl, beat the eggs until they lighten in color.  Add the milk and beat again.  Pour this liquid over the apple/cheese mixture and shake the baking dish a little to push out the air bubbles.

Dot the top with the butter and place in the oven.

This is the deeper baking dish
This is the shallower dish
Bake until the center is firm and the surface is lightly browned.  This took much longer than 20 minutes.  See notes.

My Notes

I was preparing to feed seven people with this, so I doubled the recipe.  I baked it in two separate containers, one that was wider than the other which affected the cooking time. 

It was easy to prepare; I was visiting with my company while fixing it and didn't worry that I would make mistakes.

The wider pan cooked for 30 minutes and was almost ready, although still too soft in the middle.  I think it should have cooked at least another 10 to 20 minutes. 

The deeper pan was cooked for a total of 50 minutes and was just right -- lightly browned on the top, puffy, and firm in the middle.

The Verdict

I didn't manage to get a picture of the deeper pan, despite it being cooked just right.  But here is the shallower one:

Close but not quite right yet
We scooped it out using a ladle and that worked well considering how soft it was.  The sides of the pudding were firmer, much closer to what I expected.

This was from the firmer side region of the baking dish
Letting it cool a little before serving helped with the firming up process.  But cooking it further would have been better.

I served it as a side dish to a lovely smoked beef brisket and a tossed green salad.

Three of us had the softer version and four had the firmer version.

First, everyone thought it was delicious!  Basically it was a cheese custard with the sweet flavor but more importantly the slightly crunchy texture of the shredded apples. 

The criticism I would make (and some of the others agreed) was that it was too oily -- perhaps the cheddar cheese was oily enough that I didn't need to put on the butter or that the butter wasn't necessary at all.  If I did this again, I would consider a different cheese that wasn't as oily.  It is hard to tell what would be good considering the cheese has to be firm enough to shred. 

I felt that apples went with cheddar, so that is why I picked it.  I think a good Swiss-style cheese would be good, too.

The apples kept the pudding from being too uniformly a fine-textured custard and the sweet cut through the oily enough to keep it from being heavy.  It was rich so a small serving was appropriate but it was tasty so many of us had second helpings. 

It was definitely not a dessert but I think you could serve it as such, especially if you put some chopped, toasted pecans on the top.  Apples and cheese and nuts all in one dish would certainly make a tasty dessert accompanying a good wine!

If twenty minutes cooked it to firm, then I think Mrs. Fisher used a hotter oven than I did.  350 degrees, maybe?  I'm not sure but it would be interesting to try it at that temperature another time.

So I call it a success.  I enjoyed my small taste of an old Southern recipe. 

Thank you, Abby Fisher, for sharing your well-honed cooking skills with us!


Cookies Consent

This website uses cookies to offer you a better Browsing Experience. By using our website, You agree to the use of Cookies

Learn More