Showing posts with label ladies' group. Show all posts

Friday, November 15, 2024

Eggs Baked in Whole Tomatoes -- a recipe from the The Egg Basket of the World

In 1879 Lyman Byce and Isaac Dias invented the first reliably working incubator for hatching eggs in Petaluma, California.  This sparked the creation of egg ranches in the area and, by 1917, Petaluma was considered the "undisputed" world leader of the chicken and egg industry.

The town embraced this and unabashedly promoted itself and its industry as "The Egg Basket of the World", offering a National Egg Day which included a parade with an Egg Queen and her court of attendant chicks, and decorating the town with giant plaster egg baskets and roosters.  In 1918, Petaluma reported producing 16 million dozen eggs.

In 1927, the Petaluma High School Parent-Teacher Association (PTA) published The Egg Basket Cook Book to help finance the PTA activities as well as promote the industry and share their egg-cooking knowledge.

The book is basically what I call a "ladies' group" cookbook because most (if not all) the recipes were submitted by Petaluma locals.  I value these recipes because no one is going to submit a recipe that they think is subpar, knowing their neighbors might try them.  The recipes are tried and true.

I chose the "Eggs Baked in Whole Tomatoes" recipe in the "From the Egg Basket" section on page 27.  This section also addresses the food value of eggs and methods of cooking them.  What is amusing about the entire book is that no recipe has "eggs" in them -- the word is always written as "EGGS".

Eggs Baked in Whole Tomatoes  -- M.P.

3 tomatoes

3 EGGS

salt and pepper

3 tablespoons buttered crumbs

3 slices of bacon

Breakfast!
Scoop out centers of large ripe tomatoes.  Break an EGG into each, season and cover with crumbs and lay a slice of bacon on each.  Bake in a moderate oven.  Turn bacon once while cooking.  Place under broiler to brown bacon.

My Notes

I noticed the pattern of one egg and one slice of bacon per tomato.  I only needed two servings, so I reduced everything down to enough for two.

The oven was set to 350 degrees F.  

I sliced the top of the tomatoes off with a knife then used a spoon to scoop out the centers.

Each tomato was set in a glass baking dish before I put the egg inside.

I didn't bother with buttered crumbs as I figured the bacon would drop grease onto them.  I cut the bacon slice in half and put the pieces as an "X" over the top.

I baked the tomatoes for 25 minutes.  See comments below.

Halfway through.  Time to turn the bacon.
Done. (Almost)

The Verdict

I served it with toast and juice.

A tidy breakfast.
Twenty-five mintues was not enough time.  The tomato was somewhat cooked, but the egg was raw.  

So I tried again, turning the temperature down to 325 degrees and cooking for 45 minutes.  The tomatoes were cooked through (skin split and the rest was soft) and the eggs were cooked.  But the yolks were solid, and I really wanted runny yolks.

I kept trying through several attempts.  I kept getting either raw eggs (325 degrees and 35 minutes) or solid yolks.

My observation is that the timing depends on the thickness of the tomato.  If the walls are thin, everything cooks quickly.  Thick walls take more time for the heat to get to the egg.  Don't be fooled by the top of the egg looking cooked!

Success, but it took a while.  The last time I tried it was with thick-walled tomatoes.  They cooked for 45 minutes at 325 degrees.  This gave basically soft-cooked eggs.  The whites were cooked but not hard and the yolks were soft but not runny.  The tomato was cooked through and soft.

I served it in bowls because the tomato released a lot of juice when it was cut.  Tasty!

It is not necessary to turn the bacon.  Just broil it for a minute or two at the end of the cooking cycle and it is done.  (I like chewy bacon.)

A large tomato can be scooped out so much that two eggs will fit inside it.  This takes longer to cook.

Make sure the tomato is shaped to stand upright when the stem end is removed.  Roma tomatoes are not very good for this.

If you want to read more about the history of Petaluma, see this book:

Heig, Adair.  History of Petaluma:  A California River Town.  Scottwall Associates.  Petaluma. 1982,

which you can access online by clicking here:  Heig.


Friday, January 15, 2021

Melt in Your Mouth Blueberry Cake

In 1999 I visited Mt. Vernon, the home of George Washington.  It was a good year to go as it was the 200th anniversary of his death and the docents had set up special tours to commemorate President Washington's accomplishments.  There was also a "funeral" tour where we read passages of news articles and accounts of the nation's shock when his death was announced.  I felt like I was there in the moment, and was genuinely moved and saddened.  

While there I also purchased The Mount Vernon Cookbook, which is a collection of recipes from the members of the Mount Vernon Ladies' Association.  All the proceeds from the sale went to restoration and preservation of the estate and gardens.  Well worth it!


This is a ladies' group cookbook, and I love them because the women who contribute send over their best recipes.  There are reputations to maintain!  

I was perusing the book the other day and came across this recipe for a blueberry cake.  My notes said I had made it in July of 2001, and I had added, "This is incredible.  Wonderful.  Wow."  My thought was that it had been much too long since I had made it!  It needed to be documented in my blog.

It is in the dessert section, but to me, blueberry cake just shouts that it is a coffee cake and could be served as part of a brunch.  Don't tell my guest taster that I served cake for breakfast!  

Melt in Your Mouth Blueberry Cake

2 eggs, separated

1 cup sugar

1/4 teaspoon salt

8 tablespoons margarine, softened

1 teaspoon vanilla

1 1/2 cups sifted flour

1 teaspoon baking powder

1/3 cup milk

1 1/2 cups fresh blueberries

Sugar to sprinkle on batter


Beat egg whites until stiff, adding about 1/4 cup of the sugar called for in the receipt.  Set aside.  Cream margarine; add salt and vanilla.  Add remaining sugar gradually.  Add unbeaten egg yolks and beat until mixture is light and creamy.  Sift 1 1/4 cups of flour and baking powder together.  Add to creamed mixture alternately with the milk.  Fold in beaten egg whites.  Fold in fresh blueberries, which have been gently shaken in 1/4 cup flour so they won't settle.  Turn into greased 8-inch pan.  Sprinkle granulated sugar on top.  Bake at 350 degrees for 50 to 60 minutes.

My Notes

Start preheating the oven.  Choose your pan -- I used a rectangular pan instead of an 8-inch round.  It was glass, so I lowered the temperature to 325 degrees.

This recipe used a lot of bowls!  At least the way I mixed it; I had to do some planning.  

Also, note that the sugar is divided into 1/4 cup and 3/4 cups, and the flour is divided into 1 1/4 cups and 1/4 cups.  

I chose to use butter instead of margarine.

My notes from 2001 suggested putting a "good layer" of sugar on top of the batter.  I had a vague recollection that it formed a crust that was tasty.

I used the mixer to beat the egg whites.  All the rest of the mixing I did by hand.  The pictures show the sequencing as I worked my way through the steps.  The captions help you see the connections.

Bowl #1:  Whipped egg whites with the sugar.

Bowl #2:  Creamed butter with salt and vanilla.

Creamed butter mixture with the yolks mixed in.  (Bowl #3 held the yolks)

Now the flour and milk have been added.  (Bowl #4 held the sifted flour and baking powder)

The whipped egg whites have been folded in.

Bowl #5:  I love how flour acts as little anchors on the blueberries!

Blueberries have been folded in.  I did not add the excess dusting flour.

Gently spread in the pan.


This looks like a good layer.

It went into the oven for 50 minutes.  I checked it at 40 minutes and it was browning but didn't look cooked enough.  At 50 minutes, it was golden brown and a pick inserted into the middle came out clean.  I let it cool about 15 minutes before cutting and serving.

The Verdict

Beautiful to put on the table for serving!


I called it "coffee cake" and served it with fried eggs, coffee, and juice.  

The blueberries were marvelous:  giant, flavorful, and juicy.  They cooked up beautifully.  They made each bite luscious.  


The cake itself was truly melt in your mouth:  delicate, moist, lightly sweet, with a soft vanilla scent.  It was strong enough to support the berries, and tender enough to be a joy to eat.  The sugar crust was good and added a bit of crunch to whole experience.

My guest taster declared that he was considering adding "gluttony" as a new hobby!  

Yes, it was that good.  We managed to restrain ourselves and not eat the whole thing.  We are looking forward to having it again for breakfast.  

I recommend it highly.  Try it!  Plan your bowls and decide if you want to use a mixer for the batter after using it for the whites.  

You can serve this as a dessert, too!  I think it would be a surprising flavor to give to guests.  Not everyone expects blueberry cake for dessert.

I also think it would be good with raspberries or blackberries or cherries.  If you try them, drop me a note!

Success, again!  Good to know it worked then and now, nearly 20 years later.


P.S.
I have written of two other recipes from this book:

Easy Spoon Bread


Saturday, April 20, 2019

Onion Shortcake

My cookbooks reside on shelves in my dining room, which I can easily see from my place at the table.  Sometimes a book just seems to be vying for my attention, by catching my eye over and over again.  This time the book was River Road Recipes.  I have had it for a while but I never really looked it over.  So I gave into its siren song and pulled it off the shelf.

Published by the Junior League of Baton Rouge, Inc.
The cover says it is a Louisiana #1 Best Seller, and looking inside the front cover tells me why.  The original copyright, for the first printing, is 1959.  My copy is from the fifty-eighth printing, in October 1983.  At 10,000 copies for each of the first twenty printings (200,000 copies!) and 20,000 copies for each of the rest (760,000 copies), this book clocks in at over 1,000,000 copies -- and that was 36 years ago.

I looked around the Internet and saw one copy boasting the 80th printing and the total number of copies at 1.2 million.

I am impressed, and the Junior League of Baton Rouge, Louisiana, should be very proud. 

I also found it amusing that my copy was inscribed:  "Won by Mildred Cyran on Delta Queen."  My book has been on the Delta Queen!

So what called to me from this book?  I looked through it and saw many recipes of the category I call "Ladies' Group":  recipes submitted by women (and some men) to build a fund-raiser cookbook.  Examples are:  "Hot Stuffed Tomatoes", "Baked Lasagna", "Cheese and Walnut Balls", and "Eggs Benedict."   Those are fine and lovely recipes, but I wanted to see something unusual, intriguing, or new.

Enter page 45, in the Hot Breads section.  At the top of the page was "Onion Shortcake" and I was intrigued.

Onion Shortcake

2 cups flour
4 teaspoons baking powder
1/2 teaspoon salt
4 tablespoons shortening
1/2 to 2/3 cup milk
2 tablespoon butter
2 1/2 cups sliced onions
1 egg
1/2 cup top milk
1 teaspoon salt

I used just one onion for the 2 1/2 cups
Sift together flour, baking powder, and 1/2 teaspoon salt.  Cut in shortening.  Add milk and knead dough slightly.  Flatten into a greased casserole. 

Melt butter in a skillet; add onions and brown.  Cool and spread over dough.

Beat egg, milk, and salt and pour over onions.  Bake in a 400 degree oven for 15 - 20 minutes.  Good with roast beef, and also nice when you have no gravy.

-- Mrs. D. C. Johnston, Lindsay, La.

My Notes

Preheat the oven to 400 degrees.

I decided to start the onions first since they would take longer to cook than it would take to make the dough.  I didn't let them cool before using.

I sliced the onions into thin half-rounds while the butter melted in the skillet.  Then I cooked them over medium-low heat, stirring occasionally, until they were mostly browned.

Thin!


I used 2/3 cup milk in the dough.  This gave me a fairly dry dough that still stuck to itself more than the bowl.

The dough was patted into a 2 liter casserole dish that had been coated with non-stick cooking spray.


Once the onions were cooked, I spread them evenly over the dough.


"Top milk" is the milk-and-cream mixture that you get in unhomogenized milk.  I didn't have any cream available but I didn't worry about it because the butter in the onions would probably make it rich enough.


I declared the dish ready after 20 minutes of baking and the milk-egg mixture was slightly browned, puffy, and looked set in the middle.


The Verdict

I served the onion shortcake as a side dish to a lovely Tahiti squash soup. 

The shortcake is basically a biscuit with a topping of onions in a savory custard.  And it was tasty!


The biscuit portion was tender and fluffy.  The onion/custard topping was moist and flavorful and tied the whole dish together.  Overall, the experience was a savory bread with enough substance to stand up to roast beef.

My guest taster and I both enjoyed it and I thought it was a good pairing with the soup.  Success!

If I were to make it again, I would use a slightly bigger pan to spread the dough out more and not make the biscuit part quite so thick.  My guest taster disagreed as he liked how much biscuit was there.  We both agreed that more onions in the topping would be better.  I would like almost twice as much, I think.

My guest taster thought the shortcake was rich, and I thought it was just right.

I recommend the book based on this one recipe and on how many interesting recipes there are in it.  There is a Game recipe section and even one called "How Men Cook":  "We give to you their recipes -- untouched -- just as they gave them to us.  To standardize would have wasted their wording; to edit would have lost their charm.  To change them in any way would be unfair, and so the wording, the methods, as well as the recipes themselves are how men cook!"


Saturday, December 15, 2018

Chile Relleno Souffle -- one of my Most Favorites

I always reserve the last post of the year for one of my favorite recipes.  This year I am sharing with you a recipe I have been making since the early 1980s!  It is quick and easy to assemble, and tastes great.

This particular recipe isn't the specific one I've used because I seem to have the habit of acquiring a recipe for it, then losing it, then acquiring another one and losing it, again and again.  I'm not sure why this keeps happening, but it never mattered because every one of them has been good!

A thick book with about 600 recipes, I'd estimate
This recipe I found in one of my Ladies' Group cookbooks; that is, one published as a fund-raiser for the group.  My aunt JS gave this book to me from her collection; it is from the Volunteer League of San Fernando Valley, published in 1976.  It is called "More of Our Best" because their first edition was published in 1968.  From the Foreword:

It contains recipes selected from hundreds of favorites submitted by Volunteer League members, their families and friends.  Over a 4-year period, members of the League tested all recipes so that we could present to you what are, in our opinion, the very best of the lot.
Most of the recipes in our collection are easy to prepare.  Because Volunteer League members are busy being wives, mothers and homemakers as well as active participants in community activities -- and in some cases also students or wage earners -- we appreciate the shortcuts to good cooking that mixes and prepared foods provide.

This is what I love about the ladies' group cookbooks:  They all contribute and they only contribute their best.  In this case, they also tested their best to find the best of the best!  You can rely on their recipes to be good.  My aunt was one of those wives, mothers, homemakers, and wage earners.  She also did community service.  I don't know if she was a member of the League or not, but she would have appreciated the recipes no matter what, and she loved San Fernando Valley.

The versions of the souffle I've made over the years had some different ingredients, like a bit of baking powder to fluff it or salt-and-pepper, and they had different ratios of the ingredients.  But still, they were all very tasty!

Chile Relleno Souffle (page 211)

"Can be served hot or cold (we like it hot best) as an appetizer, or cut in larger squares and served for lunch or as an addition to a Mexican dinner."

2 small cans diced green chilies
1/2 lb grated Jack cheese
1/2 lb grated Cheddar cheese
4 eggs
1 small can evaporated milk
Four ingredients, if you count all the cheese as one.
Grease bottom and sides of an 8 inch square pan.  Spread chilies on the bottom and sprinkle cheese over chilies.  Beat eggs with milk and pour over casserole.  Do not stir.  Bake at 350 degrees F for 30 minutes or until knife inserted in center comes out clean.  This dish will puff up and be golden brown on top.  Cut into squares.  Serves 8 as an appetizer or 4 as a main dish.  -- Mrs. Patrick C. Ross


My Notes

Drain the chilies, even if there is only a little liquid in the can with them.  These chilies are often labeled as "Ortega chilies."

Spread those chilies across the bottom.
I had a block of mixed Jack and Cheddar cheese, but it wasn't quite a pound so I included some more Cheddar, too.

The cheese filled the deep dish pan!
Beat the eggs well before adding the milk.  I used a 12 ounce can of evaporated milk.  This is probably bigger than what the recipe is calling for; it is okay to put in two more eggs to make sure it firms up well.  I used four eggs this time.

One pound of cheese is A LOT of shredded cheese!  I used a deep dish pie pan and then pushed the cheese down into the egg mixture before baking.

With the egg and milk mixture poured over it, and pressed down a little.
This made a very moist souffle, so it took 40 minutes to bake it to a clean knife.  I let it sit and cool a bit before I cut it to serve it so it could solidify.  There was still liquid around the edges of the souffle.

If I cooked it any more, it might have burned or been over-cooked.
I served it with some salsa and sour cream over the top.

The Verdict

This is so very good, always, and this particular recipe has more cheese in it than most.  If that bothers you, I think it would be fine to use less.

The cheese makes it rich, the chilies (which are not spicy hot) give it an exotic twist, and the milk-and-egg mixture, which cooked like a custard, ties everything together and yet also adds a depth of savory flavor, probably from the milk being condensed.  The salsa and sour cream just bring the flavor combinations to a peak, especially with the coolness of the sour cream as a counterpoint to the hot souffle.

It is rich, so a small piece can be very satisfying.  However, the taste is so good, you will probably want a second piece.  The leftovers are good, too!

A close up of the cut-away view.
I made this for a party appetizer once, so I used a bigger pan -- this makes it thinner -- and 6 eggs to make sure it was firm and more like a fritatta.  Once cool, I cut it into small squares so that the party guests could get two or three bites from each piece as a taste.  I served it with a salsa-and-sour cream mixture they could spoon over the top.  It worked well.

The extra liquid is sometimes worrisome, so I have drained it off before serving the souffle.  This is especially helpful when serving it at a party -- cut the pieces and let them drain a bit, then put them on a serving platter.  That makes it easy (not sloppy) to serve.

Reheated, with toppings.  Not soggy; firm and easy to serve
Success, as always!  I hope you try and enjoy one of my Most Favorite recipes.


Monday, December 4, 2017

Honey Balls -- A Ladies' Group Christmas Cookie

In the early 1980s, a friend gave me this book:

Well loved, and published in 1971
My Internet searches tell me that "The Open Line" was a radio show in Iowa, Minnesota, Wisconsin, Illinois, and Missouri.  Jim Loyd was the host and listeners would send in their recipes.  From that, the radio station published bulletins and, later, cookbooks containing those recipes:
The first Open Line Cookbook, "The Best of the Open Line", was offered in 1969 and included Open Line recipes collected over the first six years of a daily radio telephone program on WMT Radio called "The Open Line", first airing in 1963.  From the very beginning, recipes and questions and answers on cooking dominated the whole hour, indicating the popularity of favorite family recipes passed along for others to share and enjoy.  In the first cookbook, reluctantly, some recipes had to be passed by because a 250 page cookbook will only accommodate so many recipes.  A second cookbook called "The Rest of the Best of the Open Line" was offered in 1971, including some of the omitted recipes and new recipes received in the two years between the first and second cookbooks.  (Source:  http://www.openline.bplaced.net/book3.html)
You can find some of their bulletins here:  http://www.openline.bplaced.net/index.html  It is an old website, at least it looks that way from the formatting.  If you explore more of their links, you can find the cookbook I used for this recipe here.

The reason I categorize the recipe under "Ladies' Groups" is this quote from the back page of this book:
Open Line recipes have a special something in common.  They are all a favorite in somebody's family, and are offered in the hope that someone else will share the joy of discovering a way to please their own cookie eaters...
Many of them could have become forgotten recipes, the pride of a past generation.  Passing them along now will perhaps keep them alive and busy, to be enjoyed by generations to come, that remember how good Grandmother's Christmas baking always was, and now can be again in the floured hands of today's Mothers, and tomorrow's Grandmothers.
To me, these are the same thoughts and motivations the Ladies' Groups have for publishing their recipes.  The only difference is that these recipes don't have a name and location attributed to them.  In a way, that makes me sad.

So here is to all the ladies (and gentlemen) who contributed recipes to Mr. Loyd's show and thus to his books.  You are unnamed but your recipes are not forgotten!

Honey Balls
(page 43)

1 cup shortening
1/4 cup honey
2 cups sifted flour
1/2 teaspoon salt
2 teaspoons vanilla
1 cup chopped nuts

And powdered sugar!
Cream shortening, add honey and cream well.  Add dry ingredients, then vanilla and chopped nuts.  Roll in balls the size of hickory nuts and bake on ungreased cookie sheet.  Bake for 30 to 40 minutes in a 300 degree (F) oven.  While hot, roll in powdered sugar.  Roll in powdered sugar again when cool.

My Notes

Notice these don't use eggs or any sort of leavening!  I suspect it is either an old recipe or was created during a World War when foods were rationed.

I chose a dark honey for a rich flavor.  I used almonds which I chopped and lightly toasted.

After the shortening was beaten well all by itself, I added the honey and beat it some more.  It was definitely creamed well!


The dough came together easily and wasn't sticky at all.  Then I chilled it for about 20 minutes while the oven heated and I ate lunch.


I had to look up the approximate size of hickory nuts and settled on about 1 inch diameter.  When I placed them on the cookie sheet, I wasn't sure if they would spread or not.  Sure, the recipe says they are "balls" but with all that shortening I wondered if they would spread.  So I spaced them widely apart.  The rest of the dough went back into the refrigerator.

Being cautious
The recipe called for baking them for 30 to 40 minutes and my oven tends to cook things quickly, so I chose 30 minutes.  They smelled heavenly while they were baking!  You can see they didn't spread at all.

Room to play
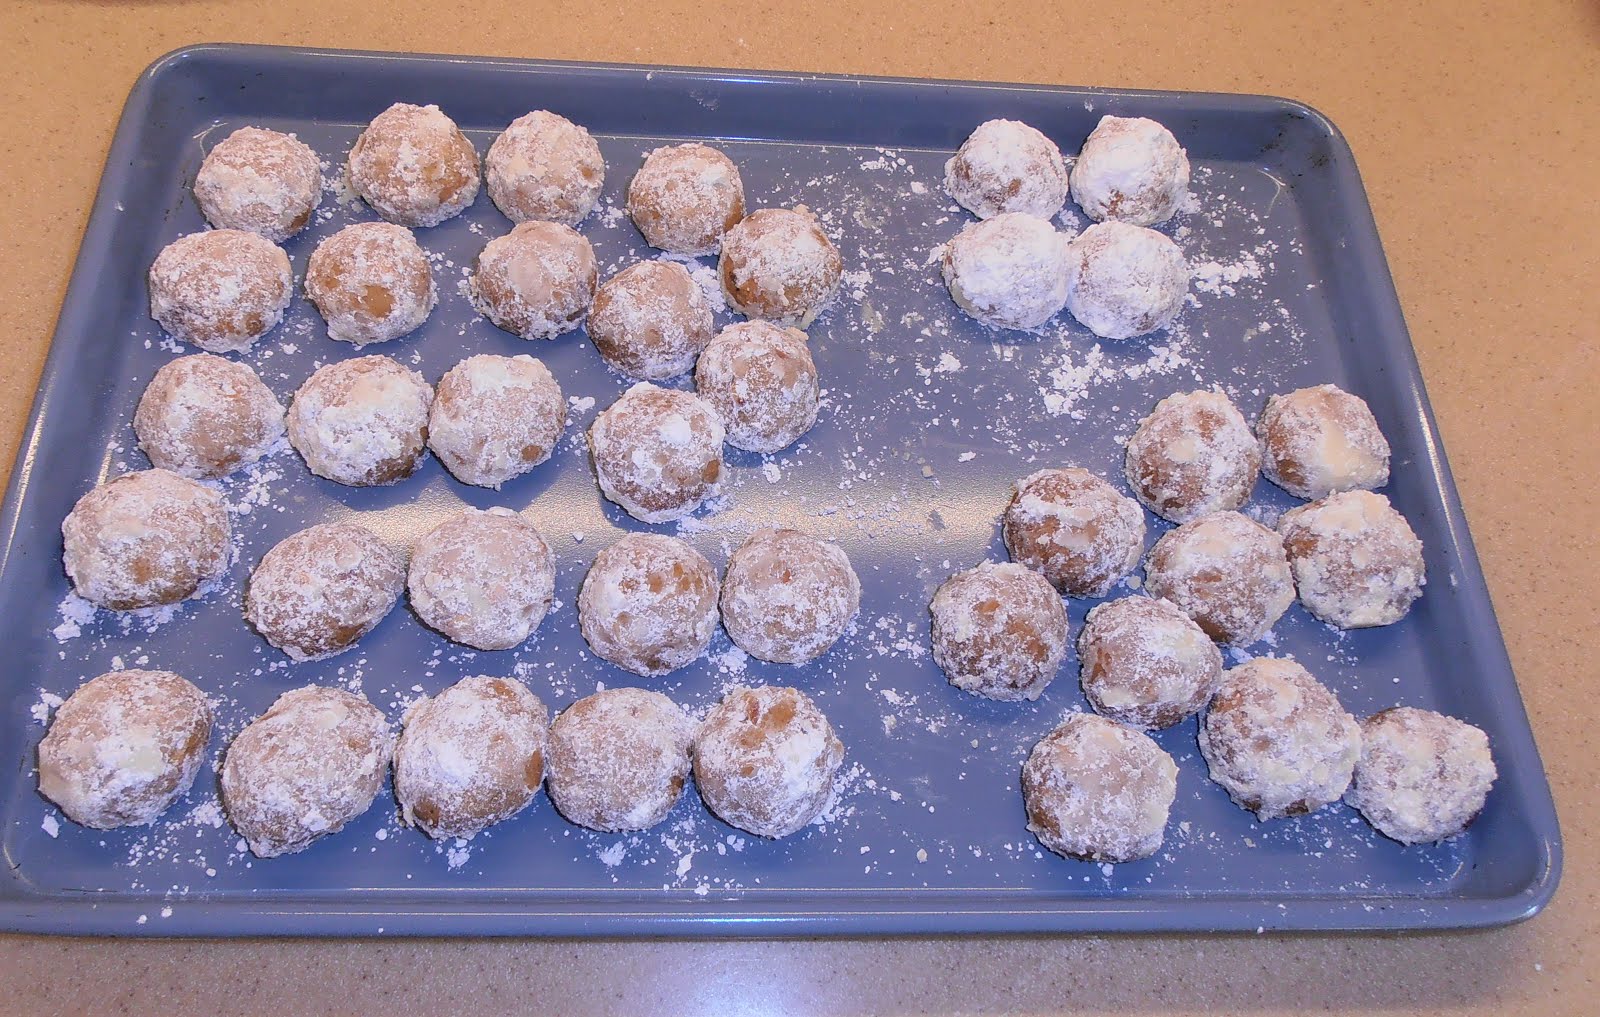
I rolled them in powdered sugar when they were right out of the oven.  I was surprised at how much sugar stuck to them.  In some areas, it was thick.


It was time for the second batch.  I spaced them closer together.  In taste testing the first batch, I thought they were cooked too much.  They weren't burnt but I wanted them to be softer.  So I cooked the second batch for 25 minutes.

Batch #2, closer and cooked 5 min. less
So much sugar stuck to both batches from the first roll that I wondered why I should roll them twice.  I tried four of them and noticed that they were prettier after the second roll.

The twice rolled four are in the upper right corner.
The Verdict

Several of us tested them.  We found that the honey flavor was detected after we had been chewing the cookie for a little while.  It wasn't dominant but it was there.  Mostly I tasted the nuts.

The first batch was good but a bit too dry for my tastes.  The second batch, cooked five minutes less, were better but I still think they should be cooked for only 15 to 20 minutes in my oven. 

They were good cookies!  Nutty, very slightly sweet, crunchy.  The second roll in the powdered sugar only enhanced the look and did not make the cookies any sweeter.  I think people who normally don't like sweet cookies would like these.  I also think they would go well with coffee or tea. 

Now that I know they don't spread when cooked, I would put the entire batch on one cookie sheet if I could. 

Success!  A handy cookie any time of year.  I suspect the dough would freeze well -- and maybe would be good to shape into a log and sliced.  Then the cookies would bake very quickly.  It is worth a try some day.

Saturday, November 1, 2014

Creamy Sweet Onions -- Tapping into the experiences of others

One category of cookbooks is the fundraiser book, where the members of a group contribute their favorite recipes.  This compilation is bound and sold to raise money for the group.  Quite often the group is a women's club or church organization.

I have several of these in my collection and I prize them for three reasons:  some have the names of people I know, some have recipes I've loved and lost in the past, and every one of them contains tried-and-true recipes.  Consider that these people know each other and tend to buy the books for themselves, too.  No one is going to submit a recipe that isn't proven wonderful!

The style of recipes depends on the age of the book.  You can see the shift in ingredient preferences over the decades, from canned soup casseroles to gelatin desserts to gluten-free anything.  You'll often find "throwbacks"; these are recipes that have been handed down over several generations of cooks and cherished despite current taste or health trends.

I also like the variations on recipes with which I am familiar, like three-bean salad and seven layer dip.  It is fun to see what others have done to substitute ingredients they were missing or just to enjoy a twist in the usual flavor.

I was attending a neighborhood potluck barbecue and felt like bringing something different, so I turned to my ladies' group collection.  I chose the Washington Stars Quilt Guild 10th Anniversary Cookbook, published in 2009 out of Olympia, Washington.  Are these recipes historical?  Probably not but I think this qualifies as General Foodie Fun (salute!).

See www.washingtonstars.net
The hosts were providing the burgers and hot dogs with condiments.  I knew many people would bring desserts and potato chips, so I focused on a side dish.  My choice was submitted by Pat Umino with an end note, "It was very popular at our potlucks."  How could I go wrong?

Creamy Sweet Onions (page 67)

5 large onions, white (sweet)
2 1/4 cups sugar
1 1/2 cups cider vinegar
1 1/2 cups water
4 teaspoons salt
1 cup sour cream
3 tablespoons mayonnaise
1/4 teaspoon celery salt *
salt and pepper to taste

*The body of the recipe calls for celery seed, which is what I used.

I switched to celery seed after I took this picture.
Thinly slice the onions and place in a large bowl.  In a saucepan combine the sugar, cider vinegar, water, and salt.  Bring to a boil and then pour over the sliced onions.  Cover and refrigerate overnight.  Drain onions, discarding the liquid.  In a bowl combine the sour cream, mayonnaise, celery seed, salt and pepper, mix well.  Add the drained onions and toss to coat.

My Notes

My onions must have been very large because three of them sliced filled my large bowl.  I stopped there.  Mine were designated as white onions but not labeled as "sweet".  That did not turn out to be a problem.

Boiling the vinegar mix made an onion-scented kitchen smell very strong indeed.  I let the bowl of onions with liquid cool a bit before I covered it and placed it in the refrigerator.  Basically you are pickling the onions!

The next day, a few hours before the party, I drained the onions, mixed the sauce, and loved the contrast of the celery seeds against the white onions and white sauce.

Just before stirring
The Verdict

Yes, it was a hit!  I noticed that the people who like peppers, chilies, and other strong-flavored foods liked it the most.  One woman said she put it on top of her hamburger patty as a condiment.  I didn't label what it was so people were guessing a noodle salad at first, then they thought coleslaw, and then they realized it was onions.


I would put this in the category of "onion coleslaw".  The creamy sauce mixes with the little bit of vinegar pickling liquid that clings to the drained onions.  Adding the celery seed just pushes that creamy-sweet-sour mixture right into the coleslaw range.  The onion flavor became milder with the pickling process yet still retained some crunchiness that made it exciting to eat.

I liked it!  It isn't my favorite because it was a stronger onion taste than I usually seek out but I would eat it again.  If I were to make it more for me, I would use half onions and half cabbage.  Of course I like sauerkraut and pickled red cabbage, too, so that would be a bonus for me.

Success!  Tasty!  Give it a try!

Cookies Consent

This website uses cookies to offer you a better Browsing Experience. By using our website, You agree to the use of Cookies

Learn More