Showing posts with label bread. Show all posts

Wednesday, January 1, 2025

Saffron Buns to Celebrate a Happy New Year 2025

This post begins my 14th year of food blogging.  Sometimes I can't believe that is true!  Researching, cooking, and writing up my experiences has become part of my regular routine: since I need to cook to eat, why not do something different for fun?  When I review my posts and recall what I did and liked (and didn't like!), I get a sense of wonder at how many different types of food and cultures I have explored.  

The conclusion of 2024 showed that this blog has 316 posts with over 188,000 page views from people from all over the world.  I'm feeling rather proud of this.

My life and focus are turning harder to food history, especially California food history, although not exclusively so.  My other blog, "The Spanish Cook Without Equal" found here: pinedo1898.blogspot.com, is growing along with this blog.  In it I explore the recipes of Encarnación Pinedo's El Cocinero Español, published in 1898, which I translated.  Those posts appear in both blogs, but the other blog is only her recipes.  I hope you find time to peruse it, too.

Lately I have been reading and researching the history of the immigrants from Cornwall, England, to northern California around the time of the Gold Rush.  The descendents from those immigrants still retain many of the "Cornish" eating habits, such as eating pasties (handpies with meat and potatoes) and celebrating special events with "revel buns", also known as saffron buns.

In 1998, Shirley Ewart with Harold T. George published The Cornish of Grass Valley California 1854 – 1954.  They documented the memories of the early Cornish families of the region, and Ms. Ewart included some recipes from her grandmother, who ran a hotel in Cornwall for many years.  

I chose to celebrate my 14th year of food blogging by making saffron "revel" buns using her grandmother's recipe on page 171.

Saffron Buns

1 package yeast (2 teaspoons)

1/4 cup warm water

1 cup milk

1/4 cup sugar

1 teaspoon salt

1/4 cup shortening

4 cups flours

3/4 cups currants

1/8 teaspoon saffron threads

Scald milk.  Add all by 1/2 teaspoon sugar, and the shortening, salt, and saffron.  Cool to lukewarm.

Put 1/2 teaspoon sugar in lukewarm water.  Add yeast.  Stir and leave for 5 minutes.

Add the yeast to the milk.

Add 1 1/2 cups flour.  Beat vigorously for 1 minute.  Cover.  Let rise in warm place until very light.

Add the rest of the flour and the fruit, kneading until the bowl is clean and you have a smooth ball of dough.

Put in a greased bowl.  Grease the top of the dough.  Cover with a clean towel.  Let rise until double.

Make 24 smooth little balls.  Set on greased cookie sheets.  Cover and let stand about 15 minutes.

Bake 15 - 20 minutes at 375 degrees F.

My Notes

My reading showed that saffron buns might contain just currants, as specified in this recipe, or a mixture of currants, sultanas (golden raisins), raisins, and/or mixed candied citrus peel.   I love golden raisins, so I used 3/4 cups fruit that was a pretty even mix of currants and sultanas.

Also, I doubled the amount of saffron to 1/4 teaspoon, as my reading also showed that amount could be up to 1 teaspoon.  I wanted to make sure the saffron flavor would shine through.

It was amusing to watch the yeast and sugar water mixture proof for 5 minutes.  I knew my yeast was active because it foamed up quickly!

Notice how much of the measuring spoon is covered.

After five minutes.

As typical in bread-making, I needed to add more water to make the dough come together in a moist (not dry) mass.  Always be willing to adjust the water amount to make the dough work right.

The yeasted flour mixture became "very light" after an hour of rising.  I poked it with my finger and found it was a fluffy mass.  

Yeast mixture and some of the flour

After 1 hour of rising.  
This is "very light."

The completed dough rose for one hour to achieve doubling.  

I got 22 little balls.  It was challenging to figure out how to form them to have smooth tops with all the dried fruit in them.  What I learned was that I stretched the dough to get a part that didn't have fruit in it, then fold that part to become the top surface.  The rest of the dough (with fruit) was tucked in under it, and then the bottoms were pinched closed.  I had to rework a few balls from the initial attempts once I figured it out.

I baked them for 18 minutes to make them golden brown.

Reasonably smooth balls.

As golden brown as I could get them, without overbaking (I hoped).

The Verdict

The buns were roughly two inches in diameter.  A nice size so the consumer wasn't overwhelmed with a bread-eating committment. 

The fruit amount was just right.  I could get the taste of it in every bite, which was a nice blast of sweetness with the bread.
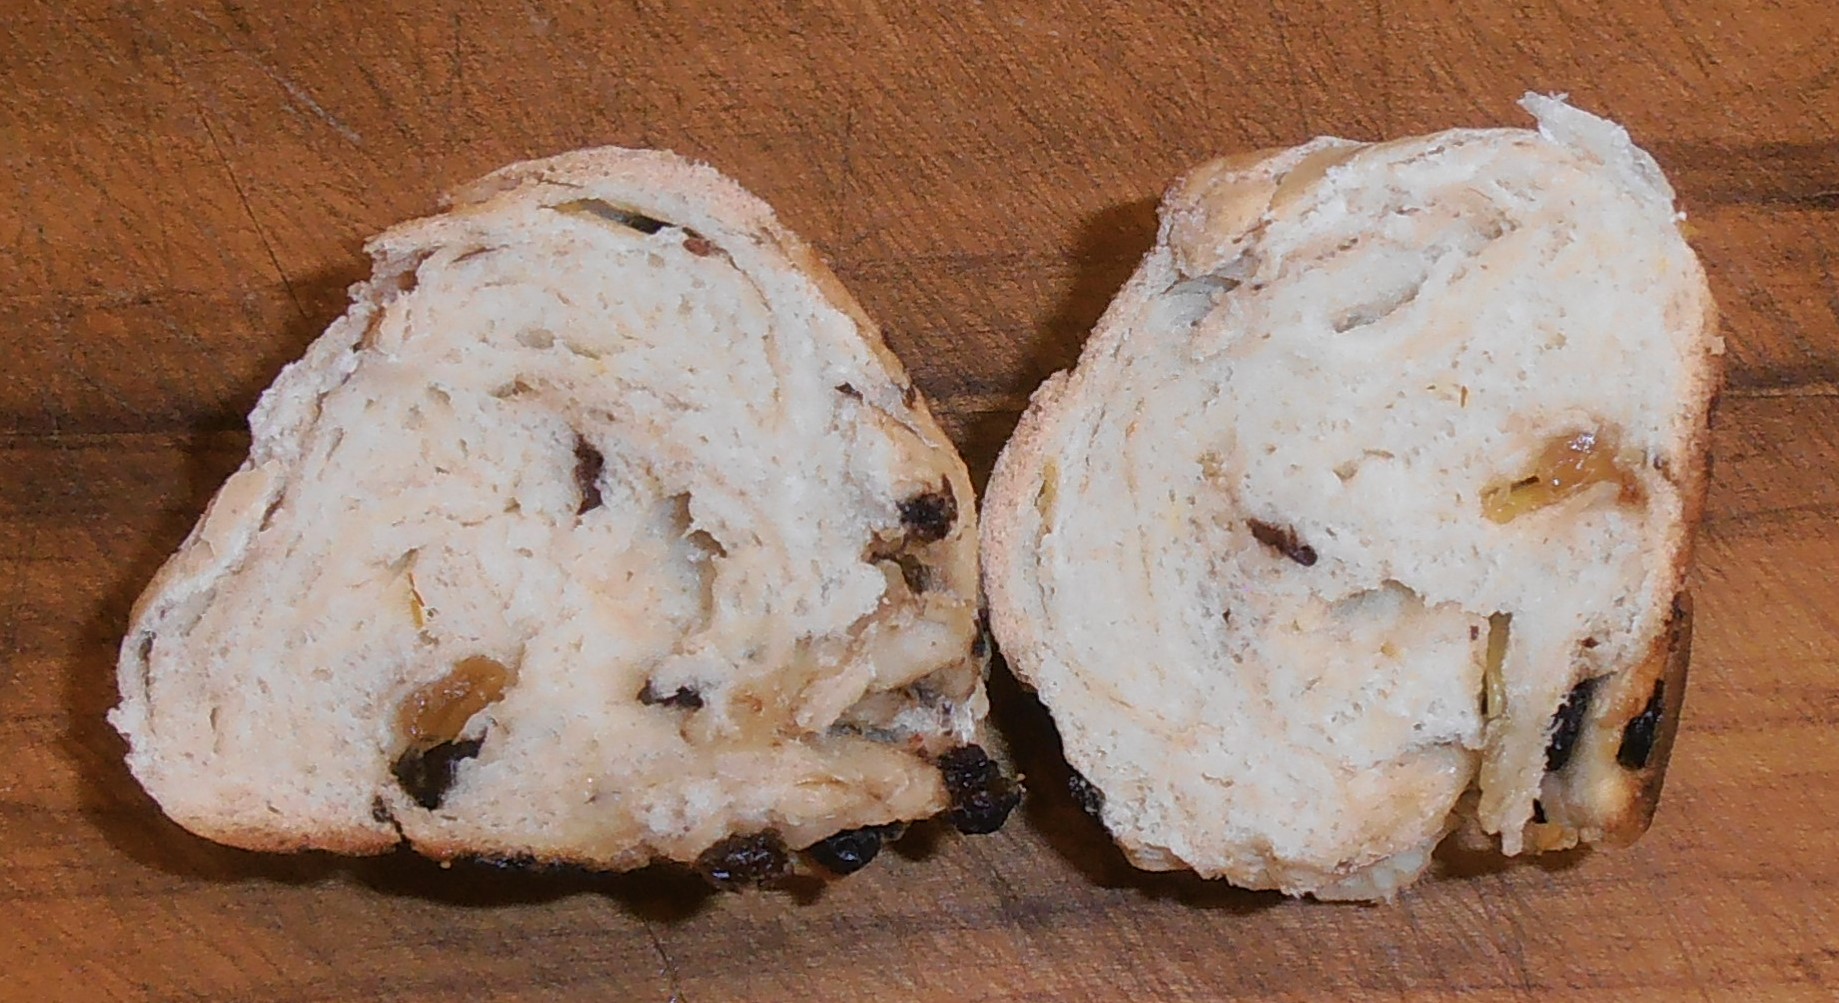
The saffron flavor was there and distinctive, but not overwhelming.  It has been described as "earthy" and "astringent", and I agree with that.  I expected "herbal" but that isn't a good description.  It is a unique flavor, hard to put into words, but really good with the bread and fruit.  

I expected the buns to be colored yellow from the saffron.  They weren't yellow at all, which was disappointing.  I suspect the technique of putting the saffron in the milk with the shortening was the culprit.  The shortening melted and spread across the surface of the milk, engulfing the floating saffron threads.  If the shortening was added after the saffron had time to infuse in the milk, I think I would have seen more yellow.

Some books suggest using yellow food coloring to boost the color, given that saffron is expensive.  I didn't try that.

I took most of the buns to share at work, and the feedback was very positive.  Most people had never tasted saffron before, but they liked it.  The buns weren't too sweet, which many appreciated.  

Success!  

If I were to do this again, I would put some sort of glaze over the tops to make them shiny or browner.


Tuesday, October 15, 2024

Indian Cake, a frugal recipe from 1800s US

I own a reprint of Lydia Maria Child's The American Frugal Housewife, 12th edition, originally published in 1833.  You can view a digital copy of the 1832 edition through Project Gutenberg by clicking here. What's impressive is that the book was originally published in 1828 - yes, it was that popular.  I also found the 27th edition, published in 1841 at archive.org.

ISBN 978-0-918222-98-5
Mrs. Child was, according to Wikipedia, "an American abolitionist, women's rights activist, Native American rights activist, novelist, journalist, and opponent of American expansionism."  She was a prolific author and kept busy until the end of her life in 1880.  Truly an accomplished woman, especially for that century.

I recently participated in a Civil War Reenactment where I was cooking period-appropriate recipes from both the North and the South.  Mrs. Child's book was a valuable resource for me, considering that wartime often requires frugality.  I had several of her receipts (recipes) ready to prepare if the timing allowed.

One that I had hoped to do but didn't get to (this happens often in historical cooking -- I always overprepare just in case) was from page 75:


Indian meal is corn meal, and the first recipe is frugal in that it does not call for eggs, milk, or leavening of any sort.  In my mind, not having eggs or milk could be expected when you are traveling with the armies as it is hard to keep eggs whole during bumpy travels and keep milk fresh without refrigeration.  

At first glance, the frugal version looks like it could be cornbread.  However, since it doesn't have leavening, you can't expect it to be puffed and soft like a typical cornbread.  Also, in the South, white corn meal is preferred, and yellow in the North.  I couldn't acquire white corn meal.

My Frugal Redaction

4 cups cornmeal
2 tablespoons molasses
2 tablespoons solid shortening
2 teaspoons salt
1/2 cup cooked pumpkin (from a can)
3 cups boiling water

The water was boiling while the picture was taken.
Put all the ingredients except the water in a bowl.  Add the boiling water and stir until well-blended, especially watch to have the shortening melted and mixed thoroughly.  I found it easiest to stir with a spoon.  

You might need to adjust the amount of water depending on how the cornmeal absorbs it.  My mix was moist but not wet or runny.  

At the reenactment, I had planned on cooking the cake in a frypan over the fire or frying it in small patties.  At home I baked half of it in the oven and the fried the rest as patties.

Just add boiling water, and stir.

The batter:  moist but still thick, not runny.
Method 1 - In the oven.

The oven was preheated to 350 degrees F.  I greased a cast iron skillet with shortening.  Half of the batter was spread in the skillet and baked for 20 minutes, uncovered.  I noticed that the layer was about 1/2 inch thick or a little less.  After 20 minutes, it looked baked on the top and was firm to the touch.

Ready to bake.

Baked.
Method 2 - Fried patties

I preheated the greased cast iron skillet over medium heat (4 or 5 out of 10).  I spooned enough batter to spread into a patty about 3 to 4 inches in diameter and patted it to about 1/2 inch thickness or less.  After about 5 minutes of cooking on one side, I flipped it to brown the other side.  I removed the patty when it looked toasted, was a golden yellow (not bright yellow like the meal), and was firm to the touch.  I cooked them in batches, regreasing the pan as needed to keep them from sticking.

You can see the color difference between cooked and raw.

The Verdict

The baked didn't get toasted golden but it was cooked all the way through.  It easily came out of the pan to be served on a plate.  I cut it in wedges to serve.  

Wedge on edge to show that it is cooked through.
The patties were served as a pile on a plate.  They were cooked all the way through, too.

Visually more interesting than the baked version.
Also cooked through.
Both types were thin, dense pieces of bread, but not too chewy or hard.  I saw moisture in the middle of both.

My guest taster and I liked both versions.  The flavor was mild, which didn't conflict with the sausage and veggie stew I served with them.  In fact, they were a good accompaniment to the stew, both plain and buttered.  We also had a piece with butter and mulberry jam on it for dessert.

I could not taste the pumpkin but my guest taster thought he could.  There was a slight bitter flavor, not unpleasant, which I attributed to the molasses.  It had enough salt, was only mildly sweet, and the corn flavor was pleasing.  

My guest taster liked them both equally.  I preferred the fried patties because they had a bit of cornmeal crunch that the baked version didn't offer.  

Success!

It felt like the fried patties were cornmeal pancakes or something from my childhood, fried mush.  This was a good thing!  I used to put butter and maple syrup on the fried mush, which would be good here, too.

Keep in mind that if you do this and bake the entire amount of batter, you will get a thicker cake that will take longer to bake.  You will want to add more boiling water to make a pourable batter.  Adjust accordingly.

Mrs. Child suggested ways to be less frugal by adding milk or buttermilk, eggs, more sweetener, leavening, and spices.  I would suggest adding bacon bits, chives, or maybe topping it with shredded cheese once it is cooked. 

I have since found that the leftovers are good reheated.  Once I broke up a patty into pieces and mixed them into the stew.  That was good, too.

Sunday, February 4, 2024

Bath or Bitumen - a Pinedo recipe

I finally had a batch of roscas that I wanted to decorate like it was for Rosca de Reyes.  Not a big ring as is traditional, but a batch of 16 individual rolls or buns.  Click here to see that post.

I wanted to try Miss Pinedo's recipe of Bath or Bitumen -- a sugar and egg white icing.  She offers three recipes on pages 27-8.


My Translation


I was, at first, confused by the word "betum", but then I realized it was probably meant to be "bitún", which translates to "bitumen".  That is a glaze or icing that will bathe the biscuits, which is what these recipes describe.  A "pucha" is a sweet bread from Oaxaca.

I chose to use the third recipe, "Ditto", because I could make it with only one egg white.  I felt that would be plenty of icing.  I recognize it as a version of Royal Icing, with the exception of using granulated sugar and not powdered sugar.  It is possible Miss Pinedo intended the reader to use powdered sugar, but since she did not specify it, I used regular granulated sugar.

My Redaction

1 egg white
1 pound sugar
the juice from 1/2 of a lemon


Beat the egg white until stiff, then add in the sugar gradually while still beating.  If (when!) the mixture starts seeming dry because there is so much sugar, add the lemon juice.  I did about half and then waited to see if it needed more later.  It did.

Starting to look dry

Done.  Moist, not dry.

The Verdict

Once the bitumen was done, I put some into a decorator bag while trying out various tips, just for fun.
I expected to decorate a few roscas with dried fruit, nuts, and candied pineapple, but not very many.  So I just played with the bitumen.

The first try.  The icing stuck well.

Play time!


I tasted just the bitumen.  It was sweet but gritty because of the sugar crystals.  I could taste the lemon, and it was an excellent flavor in the mix.  I had no trouble using the various tips, so the bitumen flowed out of them nicely.

The decorations are raisins, dried cranberries, dried apricots (sliced), and glacéed pineapple that I made by simmering chunks of canned pineapple in a syrup made of pineapple juice and some sugar until the chunks were translucent.  

After the roscas were decorated, they dried on the counter for a few hours.  The bitumen firmed and dried, and then I tasted a rosca.

The bitumen was a good addition to the rosca.  It made it a sweet bread, more like a dessert than a dinner roll.  The bitumen was still gritty, but that was not a textural problem.   I could have tried her technique in the first recipe, which required dissolving the sugar into the egg whites and a little water before beating the mix.

One problem I did have was that the bitumen didn't stick to the bread much after it dried.  So taking a bite through the icing and the bread meant that most of the icing fell off.  Perhaps it would have stuck better if I had smeared it on (using a feather or not!) instead of setting it on with the decorating tip.  Oh well, that made it fun to eat -- picking up the pieces of icing with my fingers as I was taking a bite of the bread.  It felt like I was a kid again.

Also, the leftover icing that went into the refrigerator softened even more, almost to the point of being fluffy.  I spread it on some cookies -- thickly! -- which was also very tasty.  The roscas that were stored in a covered container also had their bitumen soften, which was fine as it didn't fall off any more.  It was like having a thin, lemony sprinkling of sugar on top.  

Success!  

This has been an adventure, but I'm so glad it ended with a successful food item.  I would use the dough again (with the addition of the orange) to make a true ring shape for Roscas de Reyes, and I would try this bitumen recipe with powdered sugar for the decoration.  

It was fun to experience what Miss Pinedo might have done 120 years ago!


Saturday, February 3, 2024

Another Rosca -- a Pinedo recipe

Miss Pinedo's recipe for Orange Roscas did not work for me -- I failed at making a tasty, fluffy bread.  Click here to see that post.

There were a variety of reasons I suspect made it fail.  I wanted to make roscas that worked, so I tried her third recipe under the Roscas section, titled "Other."  (Page 234)


My Translation


My Redaction & Notes

For the dough:
2 cups of yeast water (see note below)
4 well-beaten eggs
1/2 cup butter, melted and cooled
1 cup scalded milk (heated to about 180 degrees F then cooled to room temperature)
1 teaspoon salt
2 1/2 pounds bread flour, plus extra to use while shaping the dough

For the "smear":
1/4 cup milk
2 tablespoons sugar

And the yeast water
To make the yeast water, mix 2 cups of warm water with 1/2 cup flour, 2 tablespoons sugar, and 2 teaspoons dried yeast.  Let it proof for 1 hour in a warm location.  Stir well before adding to the dough.

Mix all dough ingredients other than the flour together in a big bowl.  Add flour one pound at a time, mixing well, then the last 1/2 pound (or so) to get a dough that is soft and sticky.  (Note that I chose bread flour this time.)

Knead well.  I used a mixer with a kneading hook and worked the dough until it was not as sticky and was holding together well.  It was still "loose" and sticky, just not as much as it was before I kneaded it.

Grease your hands with butter and use a knife or scissors to cut off chunks of dough.  From the wording in Miss Pinedo's recipe, I decided these should be individual rolls instead of a large ring.  Most of the balls of dough weighed about 5 ounces; this made 18 rolls (see "The Verdict" below).  Shape them and place them on greased baking sheets.

Let the rolls rise for about 30 to 45 minutes or until doubled.  Preheat the oven to 400 degrees F. while they are rising.  Mix the sugar and milk well to make the smear, then let stand while the rolls rise.

When the rolls are ready, brush each gently with the smear mixture.

Bake 15 to 20 minutes or until the top is golden brown and the rolls sound hollow when tapped.  At the 10 minute mark, I switched the pans top-to-bottom to help them brown evenly.

Remove from oven, place rolls on racks to cool.

The dough is nearly ready for kneading.

About 4 ounces by weight each

Five ounces by weight each

Risen and smeared 1

Risen and smeared 2

I checked them at 15 minutes by pulling the pans out of the oven then quickly taking one rosca and cutting it down the middle.  The center looked a little moist, so I decided to put the pans back in for another 5 minutes, making it 20 minutes total.

Still a tiny bit moist in the middle.
Here they are at the 20 minute mark.  Beautiful!


No cracks!


The Verdict

I cut a rosca in half and was very happy to see the delicate crumb, the good-sized and well-distributed holes, and how the center's moisture looked just right.  The roll was light, fluffy, and sprang back when lightly pressed.  The crust was even and a golden brown.

Perfectly baked.  I am astonished.

I tasted it and found it to be good.  If anything, it could have had more salt, however my guest taster (who is a salt lover) thought it was just right.  I did wish for the orange flavoring of the previous rosca; perhaps I will add orange juice and zest to this recipe if I do it again.  

One guest taster said it reminded her of brioche, and I think that assessment is spot on.  All the guest tasters enjoyed the flavor of the bread as it was, without butter or any other addition.

Success!  Now I am more convinced that a kettle cup (una taza caldera) is a pint, or 16 ounces in volume.  I've been trying to figure that out for months.  

It is not a sweet bread.  There is no sugar in the dough other than what I included in the yeast water.  Overall, I would call it a very good dinner roll, and it is also good for a sandwich.  With that in mind, I think the 5 ounce weight of dough made dinner rolls that were too big.  Three or four ounces would have been better so as not to overwhelm the eater with so much bread.  However, we felt the 5 ounce size would be good for a hamburger bun.  

I still want it to be iced and decorated, just like a Rosca de Reyes, so I decided to give that a try with a Pinedo recipe for the icing.  Come back tomorrow for that post.

Friday, February 2, 2024

Roscas de Naranjas -- a Pinedo recipe

At Christmas, I was reminded of a Mexican tradition, Día de Los Reyes; in English it is the Three Kings Day or Epiphany.  In my home, it is called Twelfth Night.

In Mexico, it often celebrated by eating a Rosca de Reyes, a King Cake.  This is a sweet bread shaped in a ring and decorated with dried and candied fruit, icing, and sometimes nuts.  

In the Pinedo cookbook on pages 233-4, she has a section labeled as "Roscas" and gives three variations for them.  None are labeled as specifically for de Reyes, and none of the recipes direct us to decorate the bread.  

I wanted to try the first recipe she listed, "Roscas de naranja", for several reasons.  First, the dough is flavored with oranges, while the others are not.  Next, it called for fifteen (15!!!) eggs.  Finally, it contains tequesquite, and I wanted to try it as a leavening agent.  Click here for the previous post with more information on tequesquite.


My Translation


Notice that she specifies using yeast as well as the tequesquite, and that the yeast is not really acting as a leavening agent.  I'm assuming it does a little and that it also adds flavor along with liquid.

I wasn't going to just toss in some dried yeast in powdered form.  Throughout the book, Miss Pinedo appears to be working with yeast in liquid form.  On page 149, she gives directions on how to make a liquid yeast in a crock to be available daily for bread making.  I decided to make a liquid yeast that was proofed before using in the dough.  

I took 1 teaspoon of dried bread yeast and mixed it into 2 cups of warm water, 2 tablespoons sugar, and 1/2 cup flour.  I left it to proof in a warm location for about 2 hours.  I stirred it well before using it in the dough.
Proofed and ready to go

My Redaction

15 eggs
the juice of 2 small oranges (1/4 cup) and the zest of one
1 cup butter, melted
1/2 pound sugar
1 1/2 cups proofed yeast 
1/4 teaspoon salt
1/4 cup settled tequesquite water
5 1/2 pounds of all purpose flour, with some extra to dust the counter while kneading


Preheat the oven to 350 degrees F.

Put eggs, juice, zest, sugar, salt, and tequesquite water into a large bowl or pan.  (I used a 6 quart kettle.)

Mix well.  Add one pound of flour.  Mix well.

Add the butter, stirring while pouring it in so it does not scramble the eggs.  Add the rest of the flour (I added it one pound at a time, mixing each batch in as I went.) and mix well to form a soft, sticky dough.

Put it onto a floured surface and knead until it forms a body that sticks to itself more than your hands, but still is somewhat sticky.

It is ready to shape and bake. 

Nearly enough flour (5 pounds here)

The ball of dough after kneading

My Notes

I wasn't sure what the right temperature was for baking this.  Modern rosca recipes suggest 400 degrees F., so I first set my oven to that.  I took a small piece of dough for a test bake.  I left it in for 13 minutes; that is when it developed a little browning on the outside.

About the size of the small orange

Baked after 13 minutes

Interior needed more time, exterior more browning

The interior looked very moist and I felt it needed more baking time.  The outside should have been browner.  So I lowered the temperature to 375 degrees F for my next test batch.

I took half of the remaining dough and shaped it into a ball.  Once it was on the baking sheet, I poked a hole in the middle with my fingers and started pulling it into a ring shape.


My goal was to get the thickness of the dough reasonably the same all around to help it bake evenly.  The dough had the tendency to pull back to a smaller ring than what I pulled it to.  I got it as best as I could and put it into the oven for 35 minutes.

It was nicely browned and sounded hollow when tapped.  I did not like the cracking on top, which I attribute to how I shaped the ball -- I didn't tuck the dough to make a smooth surface when I prepared to put it on the baking sheet.


I let it cool and then sliced it.  The interior looked damp, almost like it wasn't baked enough, although it had formed a small crumb and there were some bubbles.  The crust was fine; crispy and lightly brown.  The orange flavor came through without being too much.  It might have been better with more salt.  It is not a sweet bread, but considering how much sugar goes on it (icing and/or powdered sugar), I think that is acceptable.  


I wondered if the interior was that moist-looking because of 15 egg yolks and 1 cup of butter.  That seems like a lot of fat for bread.  

I believe the orange juice serves two purposes.  It adds flavor, but probably not as much flavor as the zest, which seemed to be the orange flavor I tasted.  But it is an acid, and I think it would react with the alkaline in the tequesquite water to make bubbles.  Perhaps I needed more tequesquite water or more orange juice to make the bread better.

The other half of the dough was also shaped into a ring.  This time I turned the dough to form a smooth top as I was making the ball.  Then I formed the ring and baked it a 350 degrees F for 45 minutes.


The top didn't crack, so I think I was right about that.  It seemed puffier, too.

But it, too, was disappointing.  The interior was a little more cooked-looking than the previous batch and it had more bubbles.  But it was still dense.  Don't get me wrong; the flavor was good as the orange came through well.  It just didn't seem like bread, or at least not the lighter, fluffy bread I was expecting.


I can't really call this a success.  I will label it as a failure.  We still saved it, though, as it wasn't so bad that I wanted to throw it out.  I sliced it into individual serving pieces and froze most of it.  It was fine to eat when heated or toasted, so I will have a sturdy bread to serve with a soup or stew.  It might do well in a bread pudding some day, too.

So where did it all go wrong?  I don't know for sure, but my sense tells me I didn't have enough tequesquite water (or strong enough water) to make all that dough rise.  I also think I could have kneaded it more.  Or I could have ignored the directions to not let it ferment and let the second batch rise.  And did it really need all those eggs?  One aspect I neglected to consider is that the eggs of yesteryear may have been a lot smaller, so I did not need that many eggs of the large size.  Maybe five would have been better.  That is just a guess.

I was not deterred.  I decided to try another of Miss Pinedo's rosca recipes.  Check back for tomorrow's post to see the results.


Cookies Consent

This website uses cookies to offer you a better Browsing Experience. By using our website, You agree to the use of Cookies

Learn More
