Monday, May 16, 2016

Sugar Smoking -- A Technique from Hong Kong/Kowloon

My mom is at the age where she really doesn't want to cook much any more.  I don't blame her -- she has spent a lot of her life cooking and I think she has earned a break.  Of course this means she doesn't want many of her cookbooks, so I took the opportunity to abscond with, um, ask her politely for one book that has intrigued me for a while.  It is titled How the World Cooks Chicken, by H. J. Muessen.  Published in 1980, her book no longer had the dust jacket, so I found an image of it on the web:
ISBN 978-0812861952
The chapters are divided up into regions of the world, like "The Pacific", "The Orient", "Asia", "Africa", and so on.  Many of the recipes look intriguing, although the ones from Africa would be a challenge for me since I am not fond of spicy food.  Nearly every recipe in that chapter is spicy!

The recipe that caught my attention was on page 40, from the Hong Kong/Kowloon area.  Mr. Muessen says,
The Chinese use hickory, walnut, or other woods in smoking their meats just as we do, but another method, which gives an entirely different taste, is sugar smoking.  This is best done in an outdoor covered barbecue, but it can be done in your oven, although one should have the exhaust fan on throughout.
Sugar-Smoked Duck (or Chicken)

1 4-pound duck (or 3 pound chicken)
1 quart water
1 onion, quartered
Salt
10 peppercorns
1/2 cup brown sugar

Bird and first cooking ingredients
Marinade
6 tablespoons peanut oil
1/4 teaspoon anise seed powder
1 clove garlic, minced
6 tablespoons soy sauce
3 tablespoons sherry

Marinade and smoking ingredients
Place the bird in the water in a large kettle and bring to the boil.  Reduce heat, skim off the scum, then add the onion, salt, and peppercorns.  Cover, and cook slowly (duck 1 1/2 hours, chicken 1 hour).  Now cut the bird into individual servings or into 16 pieces if you wish.  (See page 35.)

Premarinated.
Mix together the marinade ingredients and stir to blend thoroughly.  Pour the marinade over the chicken pieces in a large bowl, turning to coat each piece.  Let stand, covered, for 1 hour.

When the meat is ready, preheat the oven to 375 degrees F.  Line the bottom of a large, ovenproof pot with foil and place a small rack inside.  Add 1/2 of the sugar.  Place the meat on the rack and cover the kettle with foil, then place a lid on tightly, forming a seal. Put the kettle in the oven for 10 minutes, and allow the sugar to burn and thus smoke.

Now remove the kettle and reline the pan if necessary, and add the remaining sugar.  Reline the top of the kettle, and return to the oven to smoke for another 10 minutes.  The meat should turn a rich mahogany color, and the sugar-smoke taste will have permeated the meat.  Brush lightly with a little peanut oil and serve.  Serves 4 - 6.

My Notes

I used a chicken and let the bird slowly cook for about 1 hour, 30 minutes over the lowest heat my stove top could give.

It came out of the liquid (which was later turned into lentil soup!) and into a bowl where it cooled to the point where I could handle it.  I cut it into twelve pieces total and that seemed just fine.  Then the pieces went into a flat-bottom dish.

For the marinade I used freshly ground star anise seeds, canola oil, sweet cream sherry, fresh garlic, and low sodium soy sauce.  I poured it over the meat, then turned the pieces over and started the timer.  After 30 minutes I turned the pieces over again to marinate for another 30 minutes.

Once the hour marinating time was up, I drained off the marinade and put the meat into the refrigerator.

My neighbor had kindly agreed to get his barbecue hot for my grand experiment.  He used lump charcoal and heated the barbecue to 375 degrees F.

In the meantime I formed two trays out of foil, putting in about 1/4 cup (unpacked) of brown sugar into the bottom of each one.


We smoked the meat this way:  I put the chicken on the grills, he pushed the grills apart to expose the coals, and I put the foil tray directly on the coals.  Then he slid the grills together, closed the lid, and vented the top just a little bit.

First smoking, preturning.
It took a few minutes for the smoke to start showing but then it did and we opened the lid when the smoke levels dropped.  At that point he turned the meat over, slid apart the grills, and took out the first foil tray.  I put in the second tray and he got the lid closed again.

First smoking, some turned.
First smoking, nearly all turned
In both cases it took less than 10 minutes for the smoke to start up and then die down.  It made both of us think of teriyaki chicken.

While the second smoking was going on, we looked at the first tray.  The sugar had completely carbonized and was nearly odorless and tasteless.  Yes, we tasted it and found no flavor but there was a texture that made me think I was eating dirt.  Ugh!  I don't recommend it.

Do not eat this at home.  Or anywhere else!
The final result was a beautiful mahogany color.  The chicken smelled so good we could hardly wait to taste it.  I served it with hot bread and a simple green salad.

Beautiful in looks and in taste.
The Verdict

Let's put it this way:  I tentatively nibbled the first piece (I was worried it would have a burnt flavor) and then enthusiastically devoured it.  And a few more pieces.  Oh yes, I remembered to eat the salad and bread, too!

The flavor was amazing.  I couldn't say exactly what part was the sugar smoking and what part was the marinade but the overall taste combination was excellent.  I had hints of the anise, some lovely bitter from the soy and sherry, and a rich umami in every bite.  The meat was moist, even the breast meat which I usually dislike because it tends to be dry.

I would do it again and my taste testers agreed they would enjoy it again, too.  After the meat is cooked and marinated, it was very easy and quick to get it smoked.

As I was wolfing it down enjoying my meal, it occurred to me that this marinating and smoking combination might be good to use on salmon.  I wouldn't cook it first but just marinate it and smoke it, being careful to not let it overcook.

Success!  Oh my yes, success.  Excellent and flavorful and a great, fun, and intriguing food to serve at a party.

Sunday, May 1, 2016

How to Pickle Mushrooms

I was enjoying the book Dining with William Shakespeare by Madge Lorwin, which I wrote about in a previous post, "My Salmon is Soused..." when I came across (on page 18) a recipe called "How to Pickle Mushrooms."  

The original recipe was cited as from William Rabisha's The whole Body of Cookery Dissected.

Actually the full title of the book is The Whole Body of Cookery Dissected, Taught and Fully Manifested, Methodically, Artificially, and According to the Best Tradition of the English, French, Italian, Dutch, &c., Or, A Sympathy of All Varieties in Natural Compounds in that Mysterie, which amuses me to no end.  I think today we would use the word "artfully" instead of "artificially".  

You can download a PDF of this book consisting of scanned images at
http://lcweb2.loc.gov/service/rbc/rbc0001/2013/2013pennell28918/2013pennell28918.pdf.


Image taken from the Library of Congress Rare Books Collection
This is the 1673 edition.  The first edition arrived in 1661 and four more editions were published over the next 20 years.  You can purchase facsimile print copies, mostly of the 1682 edition.  Once I had downloaded the Library of Congress file of the 1673 version, I found the recipe on page 2 of Book I, right after "How to Pickle Cowcumbers."

Mr. Rabisha presents himself as a person who was raised right and was trained in the art of cooking. He was a master cook in England and in foreign places to ambassadors and nobles alike.  He wished to share his "small endeavors" with the public in hopes of assisting the young "Practitioners" of the art.

What I really love is the poem "In Commendation of the Author" (first stanza):

Cooks burn your Books, and vail your empty brains; 
Put off your feigned Aprons, view the strains
Of this new piece, whose Author doth display
The bravest dish, and shew the nearest way
T' inform the lowest Cook how he may dress,
And make the meanest meat the highest mess;
To please the Fancy of the daintiest Dame,
And sute her palate that she may praise the same.
Give him return of worth, (besides due wages)
And recommend his book to future ages.
Let it be know Rabisha here hath hit,
The fairest passage that hath dared it.
     But read his Book, and judge his Pains,
     His is the labour, yours the gains.

This poem goes on for two pages, describing the contents of the different parts (books) and the high quality of the recipes.

So let us take advantage of William Rabisha's labours and see what gains we get.

How to Pickle Mushrooms

Original version:

Take a bushell of Mushrooms, blanch them over the crown, barm them beneath; if they are new, they look red as a Cherry; if old, black; this being done, through them into a pan of boyling water, then take them forth and let them drain; when they are cold, put them up into your Pot or Glass, puth thereto Cloves, Mace, Ginger, Nutmeggs, whole Pepper; Then take white wine, a little Vinegar, with a little quantity of salt, so pour the Liquour into your Mushrooms, and stope them close for your use all the year.

Ms. Lorwin's "working version":

1/2 pound fresh young mushrooms, about 1 inch in diameter
2 cups water
1 teaspoon salt
1 teaspoon peppercorns
2 cloves
1 large piece of whole mace
1 thin slice fresh ginger
1/2 nutmeg, broken up
3/4 cup white wine
1 tablespoon vinegar

Wash the mushrooms under cool running water.  Slice off the stems to within 1/2 inch of the caps.  Put the water, 1/2 teaspoon of salt, and the mushrooms into a saucepan and bring to a rapid boil.  Drain the mushrooms immediately and put them into a half-pint, screw-top jar with the spices and the rest of the salt.  Pour the wine and the vinegar over them--if there is not enough liquid to cover the mushrooms, add more wine vinegar.

Cover the jar with a piece of plastic before screwing on the top--otherwise the vinegar will corrode the metal.  Turn the jar upside down several times to distribute the seasonings.  Store in a cool place (but do not refrigerate) for three or four days before using.

My Notes

I couldn't get all small mushrooms but instead halved or quartered the ones I could get.

I used cubebs instead of peppercorns because I could.  I don't have whole mace so I used 1/4 teaspoon of ground mace.  Instead of fresh ginger I used one large slice (halved) of candied ginger.  I used a dry Chardonnay and apple cider vinegar.

The spices
I called it a "rapid boil" when the water was foaming around the mushrooms.

It truly seemed like the mushrooms wouldn't fit in a half pint jar, so I cleaned and microwave-sterilized a pint jar.  This was too big and I hoped the extra air in the jar wouldn't make difference in the flavor.

It didn't seem like the amount of liquid called for was enough so I added some more cider vinegar.  It might have been too much because the mushrooms started floating above the bottom of the jar.

It filled more than half of the jar
Overall the preparation was very easy and I would be willing to do it again and in greater quantities. Assuming it tastes good!

The finished jar was labeled and placed in a storage cupboard for a few days.

The Verdict

We waited four days to taste the mushrooms.  All three of us enjoyed it.  I didn't put in too much cider vinegar after all, although I think it would still taste fine without as much.  If I do this again, I think I will just barely blanch the mushrooms -- they were cooked more than I thought they would be.

Overall, the taste was slightly sour from the vinegar, a little sweet (from the wine?  from the candied ginger?), and the spices were present and interesting but not particularly dominant.  Just right, I would say.

Success!

Ms. Lorwin notes that
Pickled mushrooms were used as "salad" appetizers both when mushrooms were in season and during the cold months to add some zest to usually heavy meals.
Sounds good to me!

I would like to close with the final few lines of the "In Commendation of the Author" poem:

Therefore brave Book, into the world be gone,
Thou vindicates thy Author; fearing none
That ever was, or is, or e're shall be,
Able to find the parallel to thee.

Friday, April 15, 2016

Corn Sticks - Playing with a Kitchen Gadget

I had made a chicken stew with a Mexican flair:  chunks of chicken thighs with diced tomatoes, carrots, onions, black olives, black beans, chicken broth, and garlic, which was spiced with cumin, oregano, coriander, salt, and pepper.  It was all cooked in one big pan over a very slow fire and the flavors came together into a fragrant blend.

For one breakfast it was heated and put in a burrito-size flour tortilla with scrambled eggs, salsa (mild, because I am a wimp), and shredded Jack cheese.  But for this particular dinner I offered up a bowl full of hot stew topped with shredded Cheddar cheese.  I wanted something like corn bread to go with it.

One of the lovely parts of cornbread is the crispy crust.  I realized that there was no better way to maximize that crust than to make corn sticks in my old, cast iron corn stick pan.

My inherited beauty
It is lovely.  The individual sticks look like ears of corn and, because you put the batter into the cups when the pan is very hot, even the part touching the pan turns out crispy.

My old friend, Betty Crocker's Picture Cookbook, came in handy for the right recipe.


In the section called "Quick Breads" I found a recipe called "Canary Corn Sticks"  (page 70).

Canary Corn Sticks
from Ohio

Beat 1 egg.

Beat in 1 1/2 cups buttermilk
             1/2 tsp soda
             1/2 cup sifted Gold Medal flour
             1 1/2 cups corn meal
             1 tsp. sugar
             3 tsp. baking powder
             1 tsp. salt
             1/4 cup soft shortening


Pour or spoon into buttered hot square pan, muffin cups, or corn stick pans (see Betty's notes, below).  Bake just until set.  Serve piping hot with butter.  

Temperature:  450 degrees F (hot oven).

Time: Bake 10 to 15 minutes for corn sticks.  

Betty's Notes

Beat egg.  Beat in with rotary beater milk, dry ingredients, soft shortening (bacon fat is good). Beat just until smooth.

Generously butter 12 corn stick pans ... Heat in oven while mixing batter.

Pour batter into hot pans until almost full.

My Notes

I keep dried, sweet cream buttermilk around so I reconstituted it with water and mixed it into the beaten egg in a big bowl.  Then I mixed the dry ingredients together in another bowl until they were well mixed.

Once the dry and wet ingredients were put into the same bowl, I used a vegetable shortening and cut it through the mixture while stirring.  This still left small bits of shortening in the batter.


The corn stick pan was oiled (not buttered) and, when removed from the oven, was very hot and the oil was smoking a little.  The batter sizzled when I spooned it in.

First batch cooked.
After 10 minutes they were ready.  I made a second batch, too, which looked better than the first.

Second batch, overfilled.
But they turned out to be beautiful!
The Verdict

The first batch wasn't as fluffy as the second and had holes in it.  I think the oil on the pan fried the batter whereas in the second batch, it just kept the pan from being sticky.  But still they were both tasty!

I love the color assortment.
They were an excellent accompaniment to the stew in both flavor and having a crispy crust.  Some were soaked and dunked in the stew, others were buttered and eaten without the stew on them.  The corn taste made up for the lack of corn kernels I wanted to put in the stew but didn't have handy.

Success!

I ate more than this one stick.

Friday, April 1, 2016

Cold Spiced Chicken - A Relish

The cover of this book, Seven Centuries of English Cooking by Maxime de la Falaise is charming.

ISBN 0-8021-3296-0
Spend time looking at all the designs in the lady's hair and gown. They simply and creatively represent "English food from medieval times to the present."

Ms. de la Falaise's reasons for writing the book are straightforward:
First, I should like to give Anglo-Saxon people a feeling for the flavours, spices and typical dishes of the progressing centuries, enable them to recognize in themselves not only the family nose or red hair, the voice or mannerism, but their inherited attraction towards saffron, mace, nutmeg, cinnamon, anchovies, mushrooms, sharp sauces, citrus tastes, puddings cream, butter, jam, pickles, dripping, bread and butter and boiled eggs that is also part of their nature and history.  Second, the book should enable readers, in a romantic way, to feel history through one of the senses:  taste. Once you have it in your power to cook the rudiments of a medieval royal banquet, an Elizabethan nursery breakfast, an eighteenth-century tavern lunch, or a savoury ice, you begin to see the people, their clothes, their furniture; you can almost hear their conversations as you eat their food. Pastures, crops, herds, great halls and palaces, boats bearing luxuries on rivers and seas, town houses and tea dances -- all become as clear as a film.
I have to say I agree with her.  The more I cook recipes from different eras and places, the more I feel the presence of their histories and the better appreciation I have for the people and their cultures.  It is what gives me so much pleasure in exploring my cookbook collection and maintaining this blog.

Ms. de la Falaise did her homework.  She spent time in both New York and England researching manuscripts and studying rare books.  She tries the recipes and redacts them for the modern kitchen. Her chapter, "From the Fourteenth to the Sixteenth Century", reviews the history of foodstuffs in England -- how and when they arrive, including the first sweet potato from the New World in 1564.  "These potatoes be the most delicate rootes that may be eaten, and doe farre exceed our passeneps or carets.  Their pines be of the bignes of two fists . .  and the inside eateth like an apple, but it is more delicious than any sweet apple sugared."  (Quoted from Richard Hakluyt in his Principall Navigations ... of the English Nation.)

I have read elsewhere that the sweet potatoes were rare and very expensive for about 100 years and were considered potent aphrodisiacs.

Once the time period had been covered, the chapter offers up recipes, often with the original recipe and its source cited as well.  My only criticism of her work is that sometimes she uses non-period foodstuffs in her redactions.  One example is on page 25 where for the "Soup in Three Colors" she uses a potato soup as the base.  I can understand her reasoning but I had hoped she would have found a recipe for a white soup and used that instead.

But never mind that.  I wanted to make her recipe on page 35, called

Cold Spiced Chicken
or Vyaund de Ciprysse Ryalle

This dish was served at the coronation feast of Henry IV at Westminster on 13 October 1399.  It is a delicious relish, rather like a chutney, and should be eaten as a garnish for roast chicken rather then as a dish by itself.
She cites the original source as Two Fifteenth-century Cookery Books, which I found as a free PDF download here:  edited by Thomas Austin and published in 1888.  (You can find more books here:  Medieval Cookery - Online Cookbooks/England.)

Serves 4
1/2 pint (1 cup) white wine
4 oz (1/2 cup) sugar
6 oz (1/2 cup) honey
1 tsp ground cloves
1 oz (1/4 cup) raisins
1 tsp grated lemon peel
3 egg yolks
1 1/4 lb (2 1/2 cups) cooked chicken, finely chopped
2 egg whites (optional)


Make a syrup of the wine and sugar and boil for 10 minutes, until thickened.  Reserve 4 tablespoons (1/4 cup).  Add the honey, cloves, raisins and lemon peel, then bring to the boil and simmer for 2 minutes.  Beat the egg yolks in a bowl and stir in the syrup.  Pour back into the saucepan and cook, stirring over low heat, without boiling, until thickened.  Stir in the chicken.  Pour into a 3-pint dish and pour the reserved syrup over the top.  Chill thoroughly. 

If you prefer a fluffier texture, fold in 2 whipped egg whites at the end, before pouring into the dish.

My Notes

I used a dry Chardonnay.

The chicken was boneless, skinless thighs that had been baked without any spices or herbs.  I used the food processor to get them "finely chopped" and was not entirely pleased with the resulting mealy texture of the meat.  I hoped the little round balls of chicken weren't going to be too weird in the final product.

Strange looking.
While the wine and sugar syrup was boiling, I measured out the honey and raisins, shredded the lemon peel (it took two of the small Meyers to get 1 teaspoon), and separated the eggs.  I decided that I did not want to fold in the egg whites to make it fluffier.

The wine syrup reduced quite a bit but there was plenty left after I reserved the 1/4 cup.  It was definitely thicker and syrupy.  Once the egg yolks were mixed in I could see the liquid was getting thicker but wasn't sure where to stop it.  How thick should it get?  I took it off the heat when it looked creamy.

Well, in the picture it doesn't look creamy.
There seemed to be a lot of sauce for the meat but not so much that I worried.  The only concern I had was that the chicken mixture was soft (unchilled) so when I poured the reserved syrup over it, some of it sank into the mixture.  I had thought it would be stiffer and the syrup would spread out.

Honest, it is NOT oatmeal.
I tasted some of the syrup that remained in the sauce pan and it was good!

The dish went into the refrigerator to chill.

The Verdict

We tasted it a two days later (it has been a busy time!).  I served it spread on plain crackers.

The first bite made me think of chutney, with the spicy zing of the cloves and the tartness of the wine and the sweetness of the honey and sugar.  The chicken flavor was really just an afterthought.  After a few bites I mostly tasted the cloves only.  I love cloves but I wanted more than just a sugared cloves flavor.

One guest taster thought the clove taste was too strong; the second guest taster thought it was just right.  I found that I liked the flavors best if there was a raisin in the mouthful and if the relish was spread thinly on the cracker.  "Thinly" is a relative term because I was really spreading it on thick at first. Just don't put so much on as to overwhelm your taste buds.

This is thinly in my book
We all liked it better when, instead of crackers, we spread the relish on a chunk of sharp cheddar cheese.  This conjured up ideas of how else to serve the relish:  yes, as a side condiment to roast chicken as given to Henry IV; as a side condiment to a side dish of sauteed apples and onions; or even as a topper to a cheddar cheese-and-apple tart.

Another guest taster wanted to try the relish with some black pepper sprinkled on top.  That was particularly good, especially to my taste buds.  I want to do that every time I eat it.

I noticed that the entire dish seemed too wet, even after being chilled for two days.  I think the syrup-to-chicken ratio was off.

If I were to make it again I would reduce the cloves amount a little (maybe 1/2 to 3/4 teaspoon) and I would cook the syrup down more or increase the amount of chicken used so that the resulting relish was firmer before chilling.  Perhaps then I could form it into a ball or loaf shape and pour the reserved syrup over the top.  I would also be tempted to chop the chicken up by hand to get more of a flake look to the meat, instead of the little balls.

But I would call this a success.  I would love to serve it to others and I think they would enjoy it.

You can read about Maxime de la Falaise's life and career in an amusing Wikipedia article here.  She was a model, an actress, a food writer, and a designer who was considered to be very chic.  You can also see her obituary, which is interesting on its own.

Tuesday, March 15, 2016

My Salmon is Soused...

I had fresh salmon fillets and wanted something different to do with them.  Many of my historical recipes don't deal with salmon (it was protected and regulated and thus was expensive during the Elizabethan era) but I did find something intriguing in my copy of Dining with William Shakespeare, by Madge Lorwin.

ISBN 0-689-10731-5
On page 99, in the chapter labeled "A Feast for Beatrice and Benedick", there is a recipe titled

To Marrinate Salmon to be Eaten Hot or Cold.

The original recipe, taken from Robert May's The Accomplisht Cook, is:

Take a Salmon, cut it into joles and rands, and fry them in good sweet sallet oyl or clarified butter, then set them by in a charger, and have some white or claret-wine, and wine-vinegar as much as will cover it, and put the wine and vinegar into a pipkin with all manner of sweet herbs bound up in a bundle, as rosemary, tyme, sweet marjoram, parsley, winter savory, bay-leaves, sorrel, and sage, as much of one as the other, large mace, slic't ginger, gross pepper, slic't nutmeg, whole cloves, and salt; being well boild together, pour it on the fish, spices and all, being cold, then lay on slic't lemons and lemon-peel, and cover it up close; so keep it for present spending, and serve it hot or cold with the same liquor it is soust in, with the spices, herbs, and lemons on it.

You can view Robert May's book through Project Gutenberg here:  The Accomplisht Cook.  It was published in 1685 and was "Approved by the fifty five Years Experience and Industry of ROBERT MAY; in his Attendance on several Persons of great Honour."

Ms. Lorwin's adapted version is:

One 1 1/2-pound piece of thick salmon fillet
4 tablespoons butter
1/4 cup minced parsley
1 teaspoon grated fresh ginger
1 teaspoon salt
1/2 teaspoon peppercorns
4 cloves
1 bay leaf
1/2 nutmeg, broken up
1 large piece of whole mace
1/4 teaspoon thyme
1/4 teaspoon rosemary
1/4 teaspoon marjoram
1/4 teaspoon savory
1/4 teaspoon sage
6 tablespoons wine vinegar
1 1/4 cups claret
1 lemon, sliced thin and seeded


I love all the spices!
Rinse the salmon fillet under cold running water and pat it dry with paper towels or a clean white cloth.  Cut into approximately 2 1/2-inch squares.  Melt the butter in a skillet large enough to hold all the fish in a single layer.  Arrange the fish pieces in the skillet and saute' over low heat only until the flesh is no longer translucent, turning once -- about four minutes on each side.  Remove the skillet from the heat and set aside, covered, until the sousing liquid is ready.


Beginning to cook
Turned once
Add the herbs, spices, and wine vinegar to the claret and bring the mixture to a boil.  Lower the heat to simmer and cook ten minutes.


Looks a bit muddy but smells good
Layer the pieces of salmon in a small, deep bowl -- a 1 1/2-quart stainless steel or glass bowl is a good size.  Pour the hot marinade, including the seasonings, over the salmon.  Arrange the lemon slices over the top, pushing a few down into the liquid at the sides of the bowl.  Cover and set aside until the marinade has cooled.  


I used one lemon, not two
Refrigerate until needed.  Serve the salmon cold with some of the marinade poured over it.

This dish keeps well for a week to ten days; after that the fish begins to toughen.  But if you plan to keep it that long, peel the lemon before slicing it, since the peel tends to give the fish a slightly bitter taste if left more than a day or two in the marinade.

We preferred the salmon cold, but if you wish to serve it warm, reheat it in the marinade in the top of a double boiler.

My Notes

I was out of parsley and fresh ginger (and dried ginger) so I skipped the parsley and used dried, ground galingale in place of the ginger.  About 1/4 teaspoon of the galingale.  Also I used cubebs instead of peppercorns, just because I could.

My sage and mace were ground.  The nutmeg was broken up by pounding it a bit in the mortar.  Oh my, it smelled good.

The rosemary and thyme were fresh from the garden.  I used about a teaspoon of each.

I used white wine vinegar and chardonnay for the wine.  "Claret" used to mean clear wine and I felt that white wine was the best choice here.  And yes, my lemon was a Meyer lemon! The tree still has some fruit on it.

The salmon cooked for almost exactly four minutes on a side but wasn't "no longer translucent".  I didn't worry about it because I set the skillet aside as Ms. Lorwin instructed and the residual heat finished cooking the fish.

I was concerned about the spices being poured on the salmon.  This seemed appropriate to get them to infuse their flavors in the meat but I really didn't want to take a bite of it and crunch into a whole cubeb or chunk of nutmeg.  My hope was that I could somehow rinse off the big bits of herbs and spices before serving.

It took about an hour before I felt the marinade had cooled enough to refrigerate.  Then the whole dish cooled for about four hours before eating.

The Verdict

I served the salmon cold alongside a tossed salad with a variety of vegetables.  It was easy to brush off the big pieces of spices so that turned out to be not a worry at all.  I poured a little of the marinade on each piece but put it through a fine mesh sieve first, to remove the chunks.

This was really good.  I am not super fond of fish but like it well enough.  This was cooked thoroughly, did not smell "fishy", and the marinade have enough acid bite (just a little) to make the fish and the spices blend together well. The flesh was firm and moist.

The spices were not overwhelming nor were they dominated by any particular flavor.  Just a balanced blend with occasional little dashes of flavor on your tongue.

My two guest tasters both liked it, enough to ask for seconds.  We all agreed that serving it cold seemed the better choice to let the flavor of the marinade shine through.

Success!  Easy!  Give it a try!

Wednesday, March 2, 2016

Playing with Fire -- Cooking on My Hearth (part 2)

The success of cooking shish kabobs in my home's hearth emboldened me to try out my Dutch oven again, this time by making bread.

After the fire was burning for a while and producing coals, I started the dough for a simple wheat with rosemary in the bread machine.

I wanted a loaf shape so I planned on using a metal loaf pan sitting on a trivet in the Dutch oven.

Nifty blacksmith-made trivet!
When the dough was ready, I put it into the Dutch oven which had been sitting near the fire.  This was a lovely place to let the dough do its last rise:  comfortably warm and completely draft free.  Be sure to put on the lid.

Ready to rise
There was a nice pile of coals waiting for me when the dough was ready to bake.


There weren't many flames in the rest of the fire place but the coals seemed like enough, so I set up the oven with coals underneath and more above.

The flash hides the glow.
But it turned out not to be enough coals or enough heat after all.  I think with the charcoal I use in my public demonstrations it would have been but it appears that burning firewood does not produce the same amount of heat for the same length of time and I completely misjudged my fire.

I didn't take a picture of the bread in the Dutch oven but here is a worded image:  The risen dough had risen a little more and was dry on top but had not baked at all.  I finished it by baking it in the regular oven and it came out fine although a little flat on the top where it fell.


So the next night I tried again, this time with a raisin bread recipe.

I started the dough as soon as I started the fire.  I loaded the fire up with extra wood because my goal was to have a good set of coals and extra flame with more coals being produced while the bread was baking.  Just in case!

Again I used the Dutch oven sitting outside the fire place as a warm spot for the dough to rise.

Before rising
It has risen!
I had a good supply of coals for the top and the bottom and also some off to the side in reserve.

The glow is intense enough to show up despite the flash.
Without the flash
This seemed just fine.  After about 30 minutes I could not smell bread baking and I worried that the coals on top had died down too much to be effective.  So I took a small piece of burning wood and put it on top of the oven.


Once the 45 minutes of baking time was up, I lifted the lid to see how the bread was doing.  *I didn't lift it previously because everything I have read about baking in a Dutch oven warns us that lifting the lid releases the heat inside and can ruin your baking.

What did I find?  That extra piece of wood was completely unnecessary:

This time being "upper crust" is not an advantage.
The loaf sounded hollow so I removed the pan from the Dutch oven and tipped the loaf out to cool.
Then I sliced it to see how the baking went.

Nearly done.
The loaf was pretty and mostly cooked correctly.  It was too moist overall and almost doughy at the bottom.  Of course there was that burnt top, too.

This tells me I should have had more coals beneath the oven and fewer on top.

Still, the bread was tasty once I cut off the burnt part, and I was saved from tasting the burnt raisins on the top, a flavor I despise.

And then I discovered the bread was even better once it was lightly toasted.

Yum.  
What I Learned

As in Part 1, I learned that fire management is very important.  I had to pay attention to how fast the wood was being consumed, how fast the coals gave up their heat, and to add more wood to keep up my heat supply.

The second baking attempt had enough heat to actually bake the bread but then I messed up the balance between the top and the bottom of the Dutch oven so that the top burned and the bottom was not baked enough. I didn't not experiment with using my hand held over the coals to test their heat but now I see how crucial that can be for the balance.

I suppose the air space formed by the trivet makes a difference in how much heat needs to be beneath the oven. I used the trivet to allow air to circulate around the loaf pan.  Perhaps it didn't need to be raised at all.

I have seen bread baked without a pan in a Dutch oven.  It was just set down on the greased bottom of the oven. I wanted a loaf shape but I also got the benefit of being able to pull the first, failed loaf out of the oven to finish baking it in the electric oven.  It was easier to remove the pan with the successful loaf without having to move the Dutch oven out of the fire place, helpful considering the weight of the oven and all the ash.  My tiles stayed cleaner.

There is a difference between cooking over a fire pit with coals and cooking beside a fire place.  It is harder to see into the fire place and lifting heavy pots from the side is a challenge.  I used my lid-lifter to look into the Dutch oven while the coals were still on it but I had to make sure I lifted straight up to keep the ashes out of the food.  So I also had to make sure I didn't scrape my hands on the hot chimney while lifting.

None of this makes the job impossible.  I hope I can have more fires so I can practice more cooking on my hearth!

Tuesday, March 1, 2016

Playing with Fire -- Cooking on my hearth (part 1)

I live in California and we are experiencing an El Nino winter:  wet and cold.  I know this is really nothing compared to the places that are being buried in snow and all that, but this is unusual weather for us.  The upside is that my yard is being watered regularly (hooray for the rain) and it has been cold enough for me to build a fire in my hearth and actually enjoy the heat it puts out.  It has been several years since this has happened!

I've built several fires in the last few weeks.  One day when I was watching one and wishing I had marshmallows to toast, it occurred to me that I could practice my demonstration cooking.  Why not?  I always need more practice and this would be using wood and embers instead of the charcoal I normally work with.  Also cooking in the enclosed fire place is different than an open pit.

The last time I tried this was in 2012 when I made Boston Baked Beans in my Dutch oven using charcoal.  You can read about it here:   Boston Baked Beans.

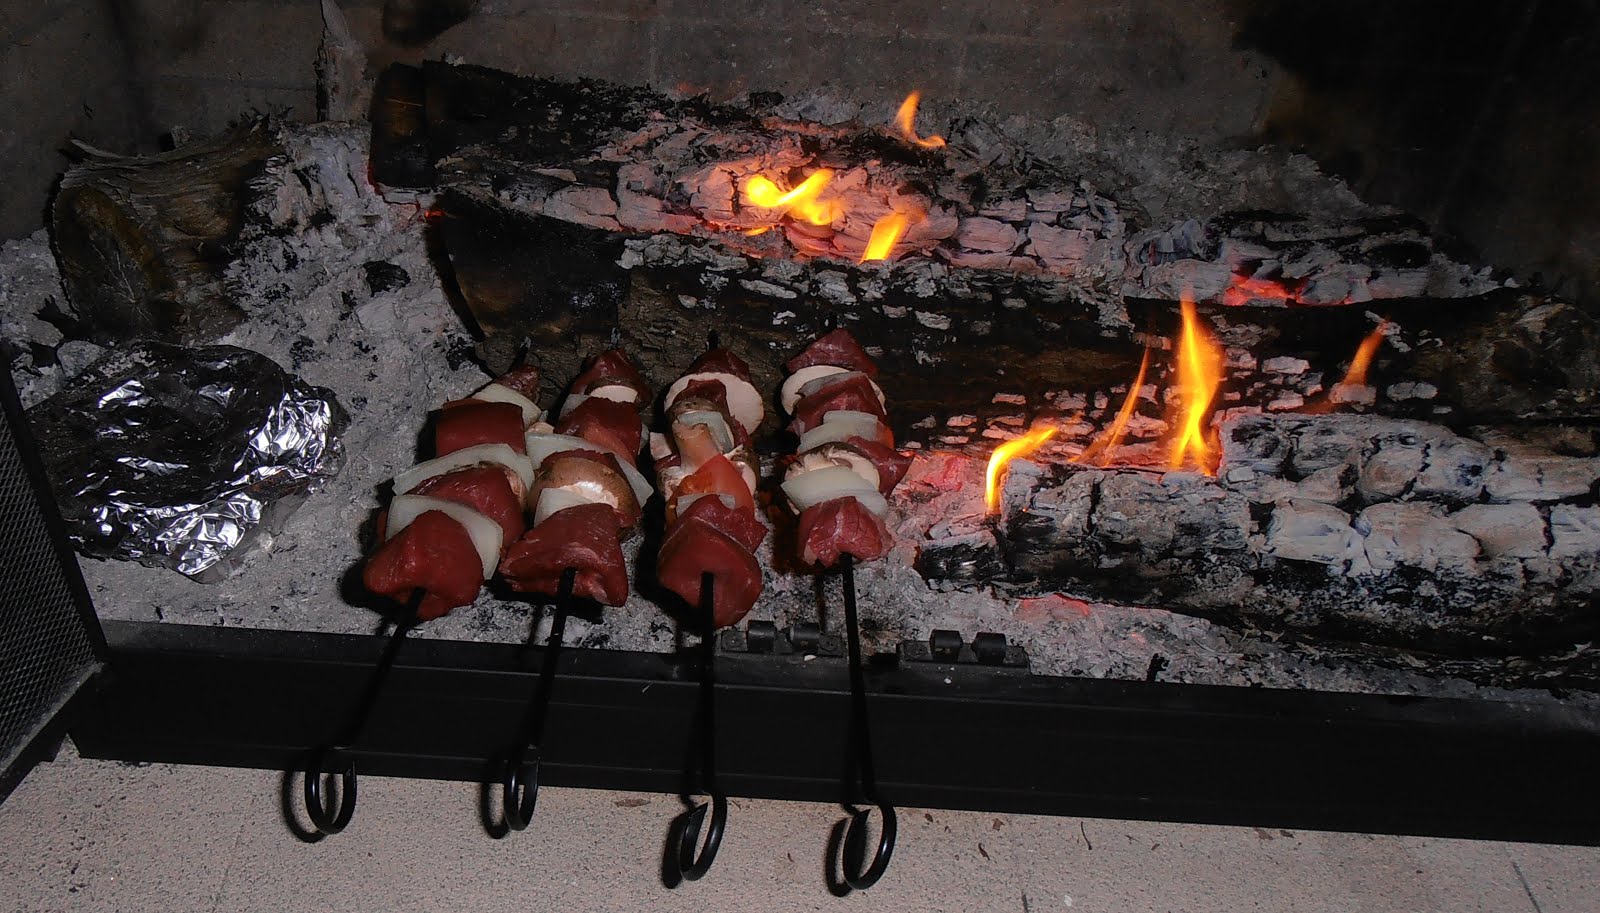
My first attempt was with a lovely piece of beef which I cut up to make shish kabobs.  These are chunks of meat and vegetables put on a skewer and cooked near the flames or over glowing embers.

I used the beef, big pieces of onion, thickly sliced mushrooms, and chunks of tomato.  Once the food was cooked (or close to it), I brushed the kabob with a honey-ginger sauce to give it some extra flavor and cooked it a few minutes more.

To add to the fun, I took several slices of sourdough bread, buttered and sprinkled with garlic powder, and wrapped them in foil.  This I put on some coolish embers to the side of the fire and turned it a few times while the kebabs cooked.


What I Learned

My primary experience in cooking shish kabobs is at the beach, working near a bonfire.  There is so much heat spread out in a big space that it is easy to cook the whole thing just by propping the skewer up against a rock and using the sand to keep it from tipping over.

So for my hearth I had to plan on where the skewer was going to be:  the tip needed to rest on something, the handle needed to rest on something where I could reach it easily for turning, and I needed to know where the heat was in order to cook things evenly.  These had to be sturdy locations because letting the food fall into the ashes and embers is not a tasty choice.

I also had to plan on where to place the skewer before it went into the fire and where to place it when it came out.  Also where I would hold the skewer to brush on the sauce.  This was drippy and messy and I really didn't want sauce all over the tiles in front of the fire.  So I had a bunch of platters handy and decided in advance which was going to do what job.

So I figured out to use a log that was not burning too much to hold the tip of the skewer and was pleasantly surprised to find the fire place screen was a good place to rest the handles.  That left a good open space in which to place the heat.

See the foil packet?
*Important:  When you put the food on the skewer, plan to leave several inches between it and the tip and it and the handle so the food is not touching the places that are supporting the skewer.

My first mistake was not spreading the hot embers out evenly beneath the skewers.  Most of the heat was near the tip and that meat cooked quickly and scorched a little.  The meat near the handle barely cooked and the veggies didn't cook much at all.  The onion was too raw for my taste, even with turning the skewers regularly to cook them on all sides and rotating their order to get each one near to the heat.

Looks good, but...
...some of the meat was too rare, while...
... the rest was just right.
What I realized is that I had planned on reversing the skewers at some point, which is silly because then the handles would have gotten too hot.

When I spread the heat out evenly, the meat along the whole skewer cooked at the same rate.  The veggies got cooked more but still the onions were too raw.  I think the next time I try this I will cut the onions smaller and perhaps brush the onions and mushrooms with oil before they get put on the skewer.

This had the heat spread better beneath the entire skewer.
See?
The sauce still splashed some and I got drips on the tiles but they cleaned up easily.

The Verdict

The meal was good despite the raw onions.  Once I got the embers distributed correctly, the food cooked better and was tasty. The butter had melted on the bread.   I declare it a success in flavor and in experience.

Much, much better.
What is really important is managing the heat, paying attention to where the flames are and how hot the coals are.  I am so used to a gas stove and an electric oven that I don't have to think about the heat distribution!

Another aspect of fire management is keeping the flames that you are not using for cooking low enough that it is not uncomfortable to sit near while you work.  Since the weather was cold I was happy but if the fire had been bigger, I would have been sweating and feeling like I was cooking, too.

Cookies Consent

This website uses cookies to offer you a better Browsing Experience. By using our website, You agree to the use of Cookies

Learn More