Thursday, December 15, 2016

Freezer Cheese Ball -- A Most Favorite

I reserve the last post of the year for a recipe (old or not) that I consider to be one of my favorites.  This one, a cheese ball that can be made in advance and stored in the freezer, is one I have been using since 1989.  Nearly 30 years!  My notes don't say where I originally got the recipe.  It is hand-written in the little green book that I started filling out in 1986, with just my favorite recipes.  (I am pretty sure my daughter covets it!)

Pretty and good to eat.
This cheese ball is simple and easy to make and tasty, too.  The important part is to have the ingredients at room temperature so they are soft.

Freezer Cheese Ball

8 ounces shredded sharp cheddar cheese
8 ounces cream cheese or Neufchâtel cheese
4 ounces blue cheese, crumbled (about 1/3 cup)
1/4 cup butter
1 clove of garlic, minced or pressed
2/3 cup coarsely chopped pecans (almonds are good, too)

And your choice of nuts, when needed.
Allow cheeses and butter to stand at room temperature until soft.

Put cheeses and butter into the food processor or a mixer.  Mix until blended.

Add garlic and beat until creamy.

Cover and chill about 3 hours or until firm enough to shape into balls.  Divide into halves and shape each half into a smooth ball about 3 inches in diameter.

Wrap air tight in plastic wrap, place in a plastic bag, and refrigerate or freeze until needed.

When needed, allow to come to room temperature (about 3 to 4 hours).  Roll in 1/3 cup of nuts.  

Serve with crackers.


My Notes

Pre-mixing.

Pre-garlic
The size of the garlic clove you choose is important.  Remember that mincing or pressing it (and running it through the food processor!) makes the garlic flavor more intense, so you need to decide how much you want the garlic to stand out.  If you prefer to taste more of the cheeses, pick a small clove.

This is creamy.
I don't always wait "3 hours or until firm enough to shape into balls."  Sometimes I just put half of the cheese mixture onto plastic wrap and use the wrap to help shape it.  It helps to use two spoons to scoop the mixture, so one spoon can be pushed against the other to remove the soft cheese.

Shaped but not yet chilled.
It is important to let the ball sit for a few hours at least before serving so the flavors blend and develop.  I like it better the next day.

As mentioned in the ingredients list, pecans and almonds are both good to use.  Sometimes I even use walnuts.  You can use toasted or raw nuts.  Just make sure the pieces are not too big!

I like to serve it with a little dried parsley sprinkled on the top.  It just looks prettier to my eye.

Wrapped and ready to travel.  
The Verdict

Recently I made a batch for a work potluck and it was well-received.  Of course that was just one ball.  I contemplated freezing the other but we had a dinner that needed a good cheese ball and that was just right.

This recipe is a favorite for a reason.  It is tasty!  It is easy to make!  And you can make it ahead of time to avoid the holiday cooking rush!

It has always been a success.  I haven't tried variations on the cheese flavors because it is so good as it is.  I get the sharpest cheddar I can find.

Thursday, December 1, 2016

EASY Chocolate Pots de Crème

Chocolate chips.  Lovely little morsels of semi-sweet chocolate that are so easy to eat by themselves and make amazing fudge and cookies.  But, it turns out, they are also very versatile in other recipes.  This book, In The Chips, was published in 1985 by Peggy Mellody and Linda Rosenbloom.

ISBN: 0-89256-288-9
It has sections on breads, cakes, candy, cookies, desserts like cheesecake and tortes, pies, beverages, and a special section just for Christmas goodies.

In that dessert section I found a recipe called "Easy Chocolate Pots de Crème" which was exactly what I needed for a quick yet scrumptious dessert for a special dinner guest.  It also fit the description of what I needed for a later-in-the-week dessert I was to take to dinner at a friend's house:  "a small chocolate something."

What was appealing about the recipe was the simplicity, that it could be made in advance, and that it was set up with small, individual servings.

Easy Chocolate Pots de Crème  (pg 168)

1 1/4 cups light cream
1 cup semi-sweet chocolate chips
2 egg yolks, at room temperature
3 tablespoons brandy


Scald light cream in a small heavy saucepan over medium-low heat.  Meanwhile, combine the chocolate chips, egg yolks, and brandy in a blender.  Pour scalded cream into blender, and blend until chocolate is melted and smooth.  Pour mixture into crème pots or demitasse cups.  Cover and chill for at least three hours.

Note:  Dark rum or liqueurs may be substituted for brandy if desired.

My Notes

I used half-and-half for my light cream.  For the first time I made it, I used the three tablespoons of brandy.  The second time I used three tablespoons of brandy-flavoring as the friend does not use alcohol at all.

I wasn't exactly sure what the requirements were for scalding so a quick trip to The Joy of Cooking helped me out.  The original idea for scalding was to kill off germs but we don't need that with pasteurized milk products.  In this case it was to get the cream hot enough to melt the chocolate and lightly cook the yolks.  So the J of C book said to heat it until small bubbles appeared around the edges of the pan.

Bubbles from pouring in the cream

Bubbles at scalding
So while the cream was getting scalded, I put the other ingredients into the blender.

Once I added the cream, I clamped on the blender's lid and started the blender.  Big mistake!  The hot liquid quickly expanded and, despite my best (desperate) efforts, lifted the lid and squirted out.  My face, glasses, hair, shirt, and parts of the kitchen were drenched with warm, sticky chocolate mix!  Not hot enough to burn but very startling.

As it turned out the splash was more droplets than fountain, so I didn't lose too much to make the dessert.  But I did have to wash up afterwards and change my shirt.

The second time I made it I put the mixture into my food processor.  This time only a little liquid squirted out and, fortunately, not on me.


In both cases I blended until the mixture was evenly brown throughout.  This made it foamy but not in a bad way.


Then I poured the mixture into six individual glass bowls, covered them each with plastic wrap, and put them into the refrigerator.


In both attempts the pots de crème was firmly set up after about three hours of chilling.  I served it with a dab of whipped cream on top.

The Verdict

I loved it.  The foam firmed up on top and underneath was a very pudding-like chocolate dessert.  The whipped cream was a good touch although I am a big fan of lots of whipped cream with pudding.


The texture was smooth, the flavor was chocolate without being very sweet (notice:  no extra sugar added!), and I liked the brandy undertones.  I even liked the brandy flavoring undertones.

Guest taster reactions were mixed.  Everyone ate it but I did not sense that many were impressed or excited about it.  It was a small portion, as intended, so maybe it would have been better to serve some thin vanilla cookies with it.

So I would call it a success but maybe only to pudding fans.  It certainly was light while being rich enough to satisfy chocolate cravings.

I would make it again but maybe just for myself!

Tuesday, November 15, 2016

Pear Patina -- A Roman Empire Dessert Custard

I have acquired several Roman Empire recipe books over the years but the one I am attracted to the most was purchased in England and written by Sally Grainger.

ISBN 1-903018-44-7
I first wrote about it here, where I tried her recipe for modern day liquamen, a fish sauce used in many, many Roman dishes.  I stand behind my previous statement that the recipes she redacts are reasonable for the modern kitchen and the modern palate.  This recipe, a "fruit-based egg custard flavored with cumin" made me doubt that just a little, although her comments assured me that this "has been one of my more popular dishes at dinner parties and at reenactment demonstrations".

You may wonder why I doubted.  The answer is
the addition of fish sauce to a dessert always causes consternation until it is tasted.  Anyone who saw the television series What the Romans did for us with Adam Hart-Davies may possibly remember it was called a 'fishy custard.'  They gave it this name because they couldn't get past the fish sauce and see how delicious the other ingredients (honey, raisin wine) could be.
So I put my trust in Ms. Grainger and went ahead with the patina.

Pear patina, Apicius 4, 2, 35

1 1/2 lb Conference pears
200 ml red wine
50 ml passum  (see my notes, below)
2 tbsp clear honey
1 tbsp olive oil
1 - 2 tbsp fish sauce
4 eggs
1 tsp cumin
generous freshly ground black pepper

Fish sauce on the right
Peel and core the pears and chop them roughly.  Cook them till soft in the wine and passum.  Pass the whole mixture through a sieve or process it until smooth.  Add the honey, olive oil, fish sauce and 4 eggs and beat smooth again.  Dry-roast the cumin and grind to a fine powder.  Add it to the custard, then season with black pepper.  Pour into a greased casserole dish and bake for 20 minutes, or until it sets, in a moderate oven (375 degrees F, 190 degrees C, mark 5).  Serve warm with a final sprinkling of freshly ground black pepper.

My Notes

I did not have passum, which she describes as
a dessert or raisin wine made with grapes that were either allowed to shrivel on the vine or dried on rush mats.  More sweet must, from other grapes that had not been dried, was used to aid the pressing of the fruit. ... It is not a process we can duplicate but there are modern varieties of sweet wine that correspond to this. ... Any very sweet dessert wine such as a heavy muscat or a heavier Sauternes will also do.  Passum could either be dark or pale as long as it has that raisin flavour.
I had looked around for something like that but wasn't certain that I was getting the right type.  My flash of insight was to use a sweet Chardonnay (but not too sweet; I knew my dinner guests!) and to add dried raisins to simmer with the pears.

My latest visit to the local farmers market provided me with some very bumpy but lovely Bartlett pears. I used two (not both pictured) to get to 1 1/2 pounds.


The fish sauce was my latest rendition of reduced grape juice and dark fish sauce in a 1-to-2 ratio.  Yes, it tasted fishy on its own but I trusted the recipe and even used two full tablespoons.

The soft pears, raisins, and wine mix were pureed in my blender.  They were still hot from the cooking so I worried a bit about putting in the eggs and having them cooked right there.  However I didn't waste any time getting the eggs, honey, olive oil, and fish sauce put into the blender and processing the mixture until smooth.

I'm very glad I roasted the cumin seeds and ground them.  They smelled good.

A word of caution:  my blender jar holds five cups and it was very full.  I put the lid on and held it tight while processing the whole mix.  If I hadn't, there would have been patina mix all over the kitchen!   For the cumin and pepper, I mostly stirred it with a spoon and then lightly tapped the button to complete the mixing.  I probably should have put it into my food processor instead.

Too full!  Hang on tight!
I used a large casserole dish so the resulting patina was thin.

A pretty pink puddle
The custard was set after the recommended 20 minutes.  I let it cool a little while we ate dinner.

The surface looks almost bread-like
The Verdict

I served small pieces to my three guest tasters because it was so different.  Everyone liked it, including the person who does not normally eat desserts.

Visually it was pink (from the red wine) and lightly bumpy in texture, and it smelled spicy and sweet.

Looks like a pink brownie.
Each bite was a complex taste experience.  The cumin and pepper were there and needed to be there but did not announce themselves as distinct flavors.  Just a lovely spicy note.  I could taste the honey very clearly but my guest tasters didn't without thinking about it.  The pear flavor was dominant for me and I was glad.  The custard part came across as the right base to present the other flavors and stayed in the background.  No, none of us tasted anything fishy.  Just very, very good.

Fruity, spicy, creamy (with the crunch that pears bring), with just the right amount of umami to make the flavor deep.  I loved it!

One guest thought I should have used a smaller casserole dish, to make the patina thicker.  I agree although the thin version was certainly lovely.

Another guest told me he did not like the texture.  He does not like creamy foods much (like ice cream, and yet we are still friends) but prefers the creamy to have chewy or crunchy with it.  So we discussed options and agreed that a topping of chopped, toasted almonds would have been a stellar addition.  I would serve a bowl of the nuts on the side to allow my guests to choose.

There were leftovers, which I tried rewarmed -- very good, almost better than the first time -- and cold, which was also lovely.  Sometimes I put pepper on top and sometimes not.  Still very excellent.

Yes, success.  I would do it again.  An intriguing flavor mix with just enough fruity pear flavor to make it seem like a dessert.

Tuesday, November 1, 2016

I Love Olives (But not like this!)

So I found this neat book, Lost Arts, A Cook's Guide to Making Vinegar, Curing Olives, Crafting Fresh Goat Cheese and Simple Mustards, Baking Bread and Growing Herbs.

ISBN 0-89815-674-2
The author is Lynn Alley and in the introduction she tells of her childhood realization of "any connection between the food on my table and the land from which it came."  After that she discovered a love of gardening and an "interest in the 'lost arts.'"  While pursuing those interests she began to teach others and, in the process, wrote this book.

Chapter 1 is titled "The Old Bat, or How I Came to Make the Best Olives Ever", which made me laugh!  The first paragraph is,
For centuries, humans have been curing and enjoying olives.  I have to wonder why.  If you've ever tasted a raw olive, you've got to marvel at the imagination of the first person to pursue the matter!  Was he starving?  Or crazy?
She goes on to tell the tale of a
rather opinionated friend of a friend who, during a discussion on the subject of curing olives, supplied just the kick in the seat of the pants I needed by insisting that she knew how to make olives better than anyone else.  Her smug assertion prompted me to go home and make the best batch of olives ever.
How?  My understanding was that all olives had to be cured in lye, which I have no problem handling (I have made soap) but was a little unsure I wanted to use it on my food.  She does describe how to use a lye solution and the benefit: "it does the job of leaching the bitter glucosides out of the olive more quickly and more thoroughly than anything else can."

She also describes a dry salt cure, which sounded interesting to me, but what really caught my attention was the brine cure.
The brine cure is simple and safe, and it offers the most plausible response to my question about who first discovered that the olive was, give the right circumstances, edible.  I suppose it's possible that, long ago, some olives fell into a saltwater tide pool and stayed there undisturbed for a considerable length of time.  Then one day someone, perhaps a housewife or fisherman, happened by and decided to give one a try.  Much to her delight, the olives had become pleasantly salty and quite edible.
Ms. Alley says "People still cure olives today in some Greek islands by dipping a basket of olives daily in the sea for 10 days.  When the inner flesh is dark brown, the olives are ready to eat."

Well, this year I planted two olive trees and one of them supplied me with actual olives!

I strained my back carrying them up the slope.  ; )
I know, but it was the first crop and I was excited to give curing a try.

Her Process (page 12)
To begin the brine processing, place your clean olives in cold water and change the water each day for 10 days.  ... Weight the olives down with a plate so they all stay submerged.  No need to cover at this point.  This will start leaching the bitter glucosides out of the olives.  Notice the change in both the color and the aroma of the olives.  At the end of the 10-day period, you can make a more permanent brine solution to continue the process.  Add 1 cup of non-iodized salt to each gallon of water.  Use enough of this brine to cover the olives.  Change this solution weekly for four weeks.  At the end of four weeks, transfer the olives to a weaker brine solution until you are ready to use them.  The solution should contain 1/2 cup of non-iodized salt to each gallon of water.
Just how long it will take for your olives to become edible, I cannot say.  Mine seem to take about two or three months to really develop a rich, olivey flavor.  The best piece of equipment you have for assessing when your olives are done is located between your nose and your chin.  It doesn't cost much to maintain (outside of your biannual dental checkups), so use it!
Store your olives in the weaker brine in a fairly cool, dark place and keep them covered.  A scum may form on the top of the olives, but according to my mother's Italian neighbors, this simply adds to the flavor of the olives! ... Toss out the scum and use any olives that look unspoiled.  (A squishy olive is a spoiled olive.)
My Attempt

First I washed my harvest.  Then I put it in a clean container and amply covered it with cold water.  I didn't have any sort of plate that could hold the olives down (everything I had was too big) so I used a clean cloth to push the olives under the surface.

I think it is pretty.
I changed the water nearly every day for the prescribed ten days.  Each time I rinsed the olives and cleaned the container and wrung out the cloth.  Everything looked great and the colors were changing, becoming more uniform. At some point the olives remained submerged on their own.

This was taken about half way through the ten-day process.
On the tenth day...
I realized that I didn't need to mix up an entire gallon of brine for my olives, so I reduced the quantity accordingly.  1 cup of salt to 1 gallon of water reduced to 1/4 cup of salt to 1 quart of water.  Plus I threw in a little extra salt just to be sure.

Salty brine.
I rinsed the olives and thoroughly washed the container before use.  The container had a lid but did not seal air tight.  I stored it in a cupboard so it was in a cool, dark place.  I marked the calendar to remind me to change the brine each Wednesday.  The extra brine was stored in the refrigerator.

First day of brining.
After a week in the brine, the olives looked like this:


Notice there is one missing.  It was squishy and broken so I threw it out.  I rinsed the olives and washed the container before refreshing the brine.

At the end of the second week, this is what I found:

See the mold?
Ick!  But was this the scum Ms. Alley mentioned?  I was uneasy but I dutifully rinsed off each olive, washed the container, and refreshed the brine.  Another olive was thrown away.

At the end of the third week, it was worse.

Double ick.
Each olive was surrounded by a haze of slimy, fungal filaments.  The brine was discolored.  Nothing was appealing.  I threw out the whole thing and called the experiment a failure.

What did I do wrong?  I wonder if I didn't make the brine salty enough.  Other sites I looked at said the brine should be strong enough to float an egg.  I didn't check this because I was following the book's directions.  Or maybe my set up wasn't clean enough?  I was trying to be thorough without sterilizing since that seemed more authentic.

I was discouraged but not totally put off.  Maybe I can find some wayward olives around my town and try again.  Or I can wait until next year if my trees produce again.

I am pleased I gave it a good try and also that I didn't invest a lot of time or money into this failure.

Saturday, October 1, 2016

Churrasco Rebosado - Spanish-style Fried Fillet Steak in Batter

Steak was in the refrigerator and needed to be cooked.  I did not want to broil or grill or cook it in any of the usual ways.  What to do?

I returned to a book I used once before in this blog:  The Epicure's Book of Steak and Beef Dishes.

ISBN 0-89535-035-1
It does have some interesting ways of serving beef!

Today my attention focused on page 60, in the chapter titled "Steak".

Churrasco Rebosado

fillet steak: 1 1/2 pounds
salt and pepper:  to taste

for the batter
flour:  1/2 cup
eggs:  3
milk:  1/2 to 2/3 cup
onion:  1 small
chopped chives:  1 teaspoon

for frying
oil:  generous 1/2 cup

to garnish
watercress: to taste
tomatoes:  4 to 5


1.  Cut the beef into narrow strips; these should be no more than 1/2 inch in thickness.  Sprinkle with a little salt and pepper; cover and leave in the refrigerator for an hour.

2.  Sieve the flour into a large mixing bowl, separate the eggs, and beat the egg yolks and the milk into the flour until you have a smooth batter.

3.  Peel and grate the onion, add to the batter together with the chives and a little salt and pepper.

4.  Whisk the egg whites until stiff, fold into the batter; this should not be done until just before the steak is about to be cooked.

5.  Drop the steak into the batter and turn gently, so that it is evenly coated.

6.  Heat the oil in a large, heavy frying pan; to test if this is the right heat, put in a cube of day-old bread and it should turn golden within 30 seconds.

7.  Spoon the steak into the hot oil, fry quickly until golden brown; this takes about 2 minutes.  Turn and cook on the second side for the same time.

8.  Lower the heat and continue cooking for another 3-8 minutes, depending upon how well done you like the meat.

9.  Lift the batter-coated steak onto absorbent paper to drain.

To serve:  Garnish with the watercress and thinly sliced tomatoes.  

My Notes

The directions were simple and easy to follow.

I suspect, after having completed the recipe, that I should have cut the beef strips longways down the middle, to make them more like sticks.

Thin but not narrow.
I liked the look of the batter with the onions and chives in it.

Colorful!  Appealing!
When I folded in the egg whites, I left it with little clumps of white in the batter.  Maybe that wasn't right but I was worried that I would over mix the batter.

Lumpy.
We like our meat pretty rare so I did not cook the steak much longer after the two minutes on each side.

First side cooking.
Also, I didn't crowd the pieces in the pan so it took several batches to get them all done.

Second side cooking.  
The batter didn't stick to the pieces entirely but that didn't become a problem.  I like the way the batter puffed up when cooked.

I tried not to stack the pieces on the plate while they were draining so the batter wouldn't get soggy.  I wasn't entirely successful but it worked out.


The Verdict

I served them as the main dish, accompanied by some cooked, shredded potatoes and sliced tomatoes.  (Sorry, no watercress available at the time!)

This was just my first helping.
We ate them using knives and forks but I really wanted to just pick them up with my fingers to eat them.

The texture was excellent:  the meat was tender, the coating was crispy and light.

The flavor was excellent:  the onion added a nice little zing to each bite that almost tasted like vinegar.  I didn't pick up on the chives at all but they added visual interest to the dish.

Overall it reminded me of some really good tempura or onion rings that I have had.  I'm guessing the batter is similar with the whipped egg whites in it.  I was pleased, too, that I had gotten the right temperature for the oil and managed to keep it that way throughout the cooking process.  That bread trick worked well!

Success!  I could do better next time, I think, but we all enjoyed it and I liked the (few remaining) leftovers, too, when they were cold.  They might also be good with a little malt vinegar sprinkled on.

Ms. Patten did not mention any sort of background for this dish so I looked around the web a bit.  I find it is listed as Argentinian, which is famous for its beef.  I'm not surprised!  The recipe I found found had chilis added to the batter and had some more herbs mixed in.  They described it as a "rich dish" and needed to be served with light sides like salad and rice.  Source:  Argentina Cooks!

I also had the impression that this is a lot like an Elizabethan recipe called Bacon Froize.  Basically cooked bacon cooked again in a batter.

Thursday, September 15, 2016

Chippewa "Bannock" Bread

I have always thought of bannock bread as something from the British Isles.  A look around the 'net tells me I was right, because I found this tidbit when looking up "bannock history."
"Bannock" is a Northern English and Scottish word of Celtic origin.  The Oxford English Dictionary states the term stems from panicium, a Latin word for "baked dough", or from panis, meaning bread.  Its first cited use was in 1000, and its first cited definition in 1562.
But I also found, in "Bannock:  a brief history",   
The Inuit call it 'palauga,' it's 'luskinikn' to the Mi'kmaq, while the Ojibway call it 'ba `wezhiganag.'  Whatever they call it, from north to south and coast to coast, just about every indigenous nation across North America has some version of bannock.
Other sites make the point that "bannock" could refer to the cooking style (frying or baking next to the fire) or the loaf itself:  "Bannock is a variety of flat quick bread or any large, round article baked or cooked from grain."  (Wikipedia)  Native American bannocks are often called "frybreads."

In the book, Spirit of the Harvest,

ISBN 1-55670-186-1
the recipe for Chippewa Bannock brings up this point:
Chippewa bannock is closely related to cornmeal johnny-cakes, ash cakes, and corn pones.  All of these cakes, though best when eaten hot, were a practical food to take along when the tribe was on the move or warriors were out hunting.

 Chippewa Bannock (page 74)

1 1/2 cups cornmeal
1/2 cup water
4 tablespoons hazelnut oil, melted butter, or bacon drippings.
4 tablespoons maple syrup or honey
1/2 teaspoon salt (optional)
3 to 4 tablespoons cooking oil for frying

And water.
In a mixing bowl, combine cornmeal, water, hazelnut oil, syrup, and salt.

In a large skillet, heat 2 tablespoons oil over medium-high heat.  Drop batter by tablespoonfuls into hot oil.  Flatten with spatula and fry cakes until crisp and browned on both sides.  Add more oil as needed.  Serves 4 to 6.

My Notes

I used melted butter and maple syrup and the salt.

This was very easy to mix together and I fried it in my cast iron skillet in several batches so as not to crowd them.
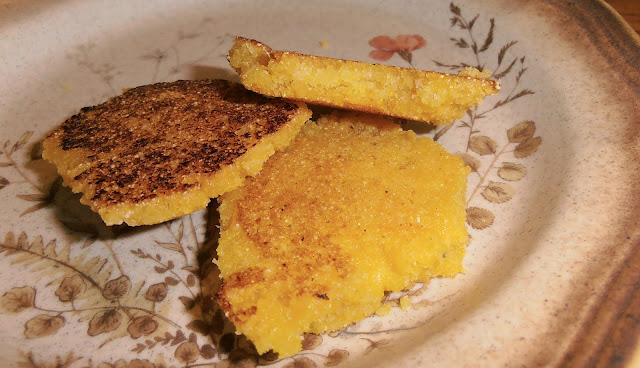
Pretty easy!
I wanted to make the cakes thick enough to be more than just fried crisps but not too thick that the middle wouldn't cook through.  I noticed that pressing them with the spatula pushed out the gaps and dents to make it a patty.  When they were brown on one side, I flipped them.
After the flip.
The batch was a good size.  I had three for dinner and it was plenty along with giving me left overs.


The Verdict

As mentioned in the previous post, I served this with Salmon Chowder.  It was a good accompaniment.

The flavor was slightly sweet (hooray for maple syrup!) with a lovely corn flavor.  The outside was crunchy and the inside was soft (but thoroughly cooked).  I am glad I put in the salt and it did not need any more.

It was fun to pick it up with my fingers!  It was not greasy or oily to the touch but the butter flavor shown through.

I think the thickness I picked was just right:

At most 1/2 inch thick.
Success!  I would love to have it again.  I think it would be good with other foods mixed in, like fresh corn, currants, or pine nuts.  And I would always recommend the maple syrup.  

I will confirm that they were better hot but still tasty cold.

Thursday, September 1, 2016

Native American Salmon Chowder

Okay, I'll admit it.  I have a cookbook addiction.  There!  I said it!  A friend was telling me about a neat book she wanted to get and, while I was looking for it online, I found several other interesting books, too.  One of them was The Spirit of the Harvest, North American Indian Cooking, by Beverly Cox and Martin Jacobs.

ISBN 1-55670-186-1
I typically shy away from these sorts of books because they usually present modern recipes that are somewhat like what the mentioned culture might have done.  When I see recipes that include the trendy ingredient-of-the-day, (applewood smoked bacon, Greek yogurt, acai berries, etc.) then I put the book down and walk away.

This book promised "authentic recipes, glorious photographs, and an informative text".  In fact, it says on the inside cover,
A specially created map places the tribes and their principal foods in geographical context.  Each chapter is introduced by an expert on the Indians of the region, and discusses the cultures of major tribal groups, their diets, their ceremonial use of food, and the historical dishes they developed.
Two recipes caught my attention.  The first is from the Northwest region of North America:  The coast from Alaska down to northern California.  This is the land of the salmon!  I chose:

Pacific Salmon Chowder  (pg 205)

1 tablespoon butter or vegetable oil
4 potatoes, peeled and diced
1 cup green onions, sliced
1/4 teaspoon dill seed
6 cups milk
1 pound fresh salmon, cut into chunks
Salt and pepper to taste
Dill sprigs, for garnish


Melt butter in a large saucepan over medium heat.  Add potatoes, green onions, and dill seed, and saute for 2 to 3 minutes.  Add milk and simmer over low heat for 40 minutes.  Add fresh salmon and simmer for 10 minutes more.  Season with salt and pepper.  Garnish individual servings with dill sprigs.  Serves 6 to 8.

My Notes

I used 1% milk; it may be the authors expected whole milk.  The amount of salmon I had was a little under a pound.  I cut it into small, bite-sized chunks.


Instead of butter, I used olive oil.

Potatoes and green onions.
The simmering of the potatoes in the milk was not really what I call a simmer.  That implies a very slow boil and I never let the milk even start bubbling.  But it did get steaming hot with tiny bubbles around the edges, and that was enough to cook the potatoes through in the 40 minutes and the salmon in the extra 10 minutes.  It is a very gentle way to cook salmon, which did not get dry or overcooked.

Tiny bubbles!
The Verdict

I served the chowder with grapes and Chippewa Bannock bread, a feature for the next post.  I had salted the chowder before serving and it tasted right but after it cooled in my bowl a little, I felt that it needed a lot more salt.  My guest tasters agreed.

With dill weed as a garnish.
Success!  My mouth wants thick soups and chowders and this was not thick, making me wish I had crushed some of the potatoes before adding the salmon.  But it was a good soup, full of salmon flavor.  The dill seed was very subtle and the potatoes and green onions give it interest.  I would do it again but I would make sure I had the full pound of salmon or more just so that each bite had more salmon as compared to potato.