Tuesday, March 15, 2016

My Salmon is Soused...

I had fresh salmon fillets and wanted something different to do with them.  Many of my historical recipes don't deal with salmon (it was protected and regulated and thus was expensive during the Elizabethan era) but I did find something intriguing in my copy of Dining with William Shakespeare, by Madge Lorwin.

ISBN 0-689-10731-5
On page 99, in the chapter labeled "A Feast for Beatrice and Benedick", there is a recipe titled

To Marrinate Salmon to be Eaten Hot or Cold.

The original recipe, taken from Robert May's The Accomplisht Cook, is:

Take a Salmon, cut it into joles and rands, and fry them in good sweet sallet oyl or clarified butter, then set them by in a charger, and have some white or claret-wine, and wine-vinegar as much as will cover it, and put the wine and vinegar into a pipkin with all manner of sweet herbs bound up in a bundle, as rosemary, tyme, sweet marjoram, parsley, winter savory, bay-leaves, sorrel, and sage, as much of one as the other, large mace, slic't ginger, gross pepper, slic't nutmeg, whole cloves, and salt; being well boild together, pour it on the fish, spices and all, being cold, then lay on slic't lemons and lemon-peel, and cover it up close; so keep it for present spending, and serve it hot or cold with the same liquor it is soust in, with the spices, herbs, and lemons on it.

You can view Robert May's book through Project Gutenberg here:  The Accomplisht Cook.  It was published in 1685 and was "Approved by the fifty five Years Experience and Industry of ROBERT MAY; in his Attendance on several Persons of great Honour."

Ms. Lorwin's adapted version is:

One 1 1/2-pound piece of thick salmon fillet
4 tablespoons butter
1/4 cup minced parsley
1 teaspoon grated fresh ginger
1 teaspoon salt
1/2 teaspoon peppercorns
4 cloves
1 bay leaf
1/2 nutmeg, broken up
1 large piece of whole mace
1/4 teaspoon thyme
1/4 teaspoon rosemary
1/4 teaspoon marjoram
1/4 teaspoon savory
1/4 teaspoon sage
6 tablespoons wine vinegar
1 1/4 cups claret
1 lemon, sliced thin and seeded


I love all the spices!
Rinse the salmon fillet under cold running water and pat it dry with paper towels or a clean white cloth.  Cut into approximately 2 1/2-inch squares.  Melt the butter in a skillet large enough to hold all the fish in a single layer.  Arrange the fish pieces in the skillet and saute' over low heat only until the flesh is no longer translucent, turning once -- about four minutes on each side.  Remove the skillet from the heat and set aside, covered, until the sousing liquid is ready.


Beginning to cook
Turned once
Add the herbs, spices, and wine vinegar to the claret and bring the mixture to a boil.  Lower the heat to simmer and cook ten minutes.


Looks a bit muddy but smells good
Layer the pieces of salmon in a small, deep bowl -- a 1 1/2-quart stainless steel or glass bowl is a good size.  Pour the hot marinade, including the seasonings, over the salmon.  Arrange the lemon slices over the top, pushing a few down into the liquid at the sides of the bowl.  Cover and set aside until the marinade has cooled.  


I used one lemon, not two
Refrigerate until needed.  Serve the salmon cold with some of the marinade poured over it.

This dish keeps well for a week to ten days; after that the fish begins to toughen.  But if you plan to keep it that long, peel the lemon before slicing it, since the peel tends to give the fish a slightly bitter taste if left more than a day or two in the marinade.

We preferred the salmon cold, but if you wish to serve it warm, reheat it in the marinade in the top of a double boiler.

My Notes

I was out of parsley and fresh ginger (and dried ginger) so I skipped the parsley and used dried, ground galingale in place of the ginger.  About 1/4 teaspoon of the galingale.  Also I used cubebs instead of peppercorns, just because I could.

My sage and mace were ground.  The nutmeg was broken up by pounding it a bit in the mortar.  Oh my, it smelled good.

The rosemary and thyme were fresh from the garden.  I used about a teaspoon of each.

I used white wine vinegar and chardonnay for the wine.  "Claret" used to mean clear wine and I felt that white wine was the best choice here.  And yes, my lemon was a Meyer lemon! The tree still has some fruit on it.

The salmon cooked for almost exactly four minutes on a side but wasn't "no longer translucent".  I didn't worry about it because I set the skillet aside as Ms. Lorwin instructed and the residual heat finished cooking the fish.

I was concerned about the spices being poured on the salmon.  This seemed appropriate to get them to infuse their flavors in the meat but I really didn't want to take a bite of it and crunch into a whole cubeb or chunk of nutmeg.  My hope was that I could somehow rinse off the big bits of herbs and spices before serving.

It took about an hour before I felt the marinade had cooled enough to refrigerate.  Then the whole dish cooled for about four hours before eating.

The Verdict

I served the salmon cold alongside a tossed salad with a variety of vegetables.  It was easy to brush off the big pieces of spices so that turned out to be not a worry at all.  I poured a little of the marinade on each piece but put it through a fine mesh sieve first, to remove the chunks.

This was really good.  I am not super fond of fish but like it well enough.  This was cooked thoroughly, did not smell "fishy", and the marinade have enough acid bite (just a little) to make the fish and the spices blend together well. The flesh was firm and moist.

The spices were not overwhelming nor were they dominated by any particular flavor.  Just a balanced blend with occasional little dashes of flavor on your tongue.

My two guest tasters both liked it, enough to ask for seconds.  We all agreed that serving it cold seemed the better choice to let the flavor of the marinade shine through.

Success!  Easy!  Give it a try!

Wednesday, March 2, 2016

Playing with Fire -- Cooking on My Hearth (part 2)

The success of cooking shish kabobs in my home's hearth emboldened me to try out my Dutch oven again, this time by making bread.

After the fire was burning for a while and producing coals, I started the dough for a simple wheat with rosemary in the bread machine.

I wanted a loaf shape so I planned on using a metal loaf pan sitting on a trivet in the Dutch oven.

Nifty blacksmith-made trivet!
When the dough was ready, I put it into the Dutch oven which had been sitting near the fire.  This was a lovely place to let the dough do its last rise:  comfortably warm and completely draft free.  Be sure to put on the lid.

Ready to rise
There was a nice pile of coals waiting for me when the dough was ready to bake.


There weren't many flames in the rest of the fire place but the coals seemed like enough, so I set up the oven with coals underneath and more above.

The flash hides the glow.
But it turned out not to be enough coals or enough heat after all.  I think with the charcoal I use in my public demonstrations it would have been but it appears that burning firewood does not produce the same amount of heat for the same length of time and I completely misjudged my fire.

I didn't take a picture of the bread in the Dutch oven but here is a worded image:  The risen dough had risen a little more and was dry on top but had not baked at all.  I finished it by baking it in the regular oven and it came out fine although a little flat on the top where it fell.


So the next night I tried again, this time with a raisin bread recipe.

I started the dough as soon as I started the fire.  I loaded the fire up with extra wood because my goal was to have a good set of coals and extra flame with more coals being produced while the bread was baking.  Just in case!

Again I used the Dutch oven sitting outside the fire place as a warm spot for the dough to rise.

Before rising
It has risen!
I had a good supply of coals for the top and the bottom and also some off to the side in reserve.

The glow is intense enough to show up despite the flash.
Without the flash
This seemed just fine.  After about 30 minutes I could not smell bread baking and I worried that the coals on top had died down too much to be effective.  So I took a small piece of burning wood and put it on top of the oven.


Once the 45 minutes of baking time was up, I lifted the lid to see how the bread was doing.  *I didn't lift it previously because everything I have read about baking in a Dutch oven warns us that lifting the lid releases the heat inside and can ruin your baking.

What did I find?  That extra piece of wood was completely unnecessary:

This time being "upper crust" is not an advantage.
The loaf sounded hollow so I removed the pan from the Dutch oven and tipped the loaf out to cool.
Then I sliced it to see how the baking went.

Nearly done.
The loaf was pretty and mostly cooked correctly.  It was too moist overall and almost doughy at the bottom.  Of course there was that burnt top, too.

This tells me I should have had more coals beneath the oven and fewer on top.

Still, the bread was tasty once I cut off the burnt part, and I was saved from tasting the burnt raisins on the top, a flavor I despise.

And then I discovered the bread was even better once it was lightly toasted.

Yum.  
What I Learned

As in Part 1, I learned that fire management is very important.  I had to pay attention to how fast the wood was being consumed, how fast the coals gave up their heat, and to add more wood to keep up my heat supply.

The second baking attempt had enough heat to actually bake the bread but then I messed up the balance between the top and the bottom of the Dutch oven so that the top burned and the bottom was not baked enough. I didn't not experiment with using my hand held over the coals to test their heat but now I see how crucial that can be for the balance.

I suppose the air space formed by the trivet makes a difference in how much heat needs to be beneath the oven. I used the trivet to allow air to circulate around the loaf pan.  Perhaps it didn't need to be raised at all.

I have seen bread baked without a pan in a Dutch oven.  It was just set down on the greased bottom of the oven. I wanted a loaf shape but I also got the benefit of being able to pull the first, failed loaf out of the oven to finish baking it in the electric oven.  It was easier to remove the pan with the successful loaf without having to move the Dutch oven out of the fire place, helpful considering the weight of the oven and all the ash.  My tiles stayed cleaner.

There is a difference between cooking over a fire pit with coals and cooking beside a fire place.  It is harder to see into the fire place and lifting heavy pots from the side is a challenge.  I used my lid-lifter to look into the Dutch oven while the coals were still on it but I had to make sure I lifted straight up to keep the ashes out of the food.  So I also had to make sure I didn't scrape my hands on the hot chimney while lifting.

None of this makes the job impossible.  I hope I can have more fires so I can practice more cooking on my hearth!

Tuesday, March 1, 2016

Playing with Fire -- Cooking on my hearth (part 1)

I live in California and we are experiencing an El Nino winter:  wet and cold.  I know this is really nothing compared to the places that are being buried in snow and all that, but this is unusual weather for us.  The upside is that my yard is being watered regularly (hooray for the rain) and it has been cold enough for me to build a fire in my hearth and actually enjoy the heat it puts out.  It has been several years since this has happened!

I've built several fires in the last few weeks.  One day when I was watching one and wishing I had marshmallows to toast, it occurred to me that I could practice my demonstration cooking.  Why not?  I always need more practice and this would be using wood and embers instead of the charcoal I normally work with.  Also cooking in the enclosed fire place is different than an open pit.

The last time I tried this was in 2012 when I made Boston Baked Beans in my Dutch oven using charcoal.  You can read about it here:   Boston Baked Beans.

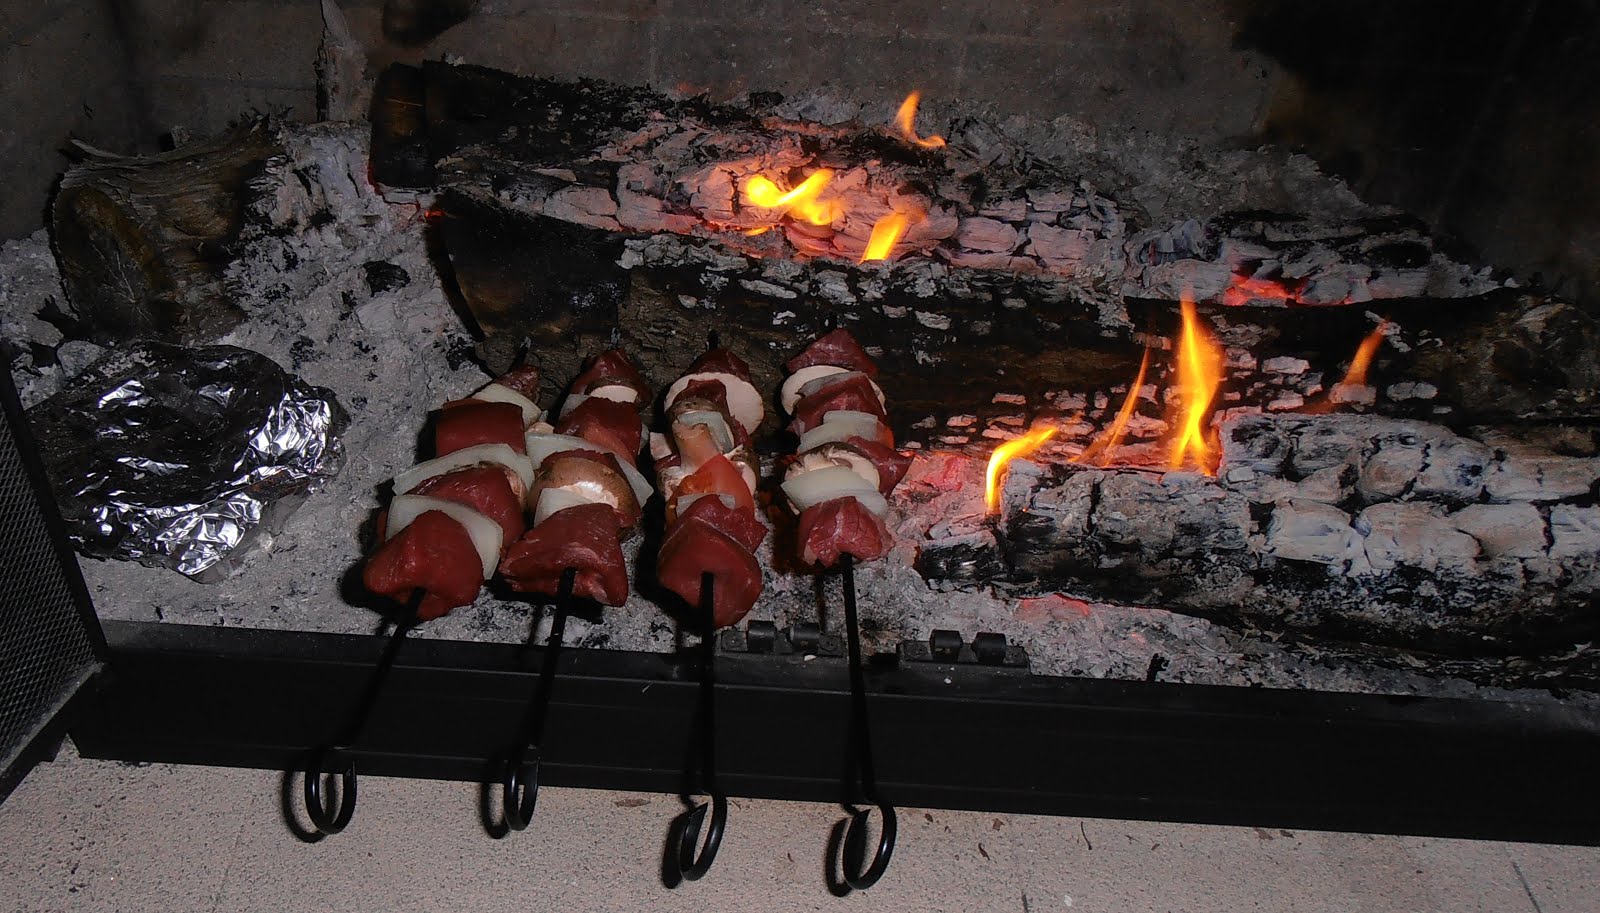
My first attempt was with a lovely piece of beef which I cut up to make shish kabobs.  These are chunks of meat and vegetables put on a skewer and cooked near the flames or over glowing embers.

I used the beef, big pieces of onion, thickly sliced mushrooms, and chunks of tomato.  Once the food was cooked (or close to it), I brushed the kabob with a honey-ginger sauce to give it some extra flavor and cooked it a few minutes more.

To add to the fun, I took several slices of sourdough bread, buttered and sprinkled with garlic powder, and wrapped them in foil.  This I put on some coolish embers to the side of the fire and turned it a few times while the kebabs cooked.


What I Learned

My primary experience in cooking shish kabobs is at the beach, working near a bonfire.  There is so much heat spread out in a big space that it is easy to cook the whole thing just by propping the skewer up against a rock and using the sand to keep it from tipping over.

So for my hearth I had to plan on where the skewer was going to be:  the tip needed to rest on something, the handle needed to rest on something where I could reach it easily for turning, and I needed to know where the heat was in order to cook things evenly.  These had to be sturdy locations because letting the food fall into the ashes and embers is not a tasty choice.

I also had to plan on where to place the skewer before it went into the fire and where to place it when it came out.  Also where I would hold the skewer to brush on the sauce.  This was drippy and messy and I really didn't want sauce all over the tiles in front of the fire.  So I had a bunch of platters handy and decided in advance which was going to do what job.

So I figured out to use a log that was not burning too much to hold the tip of the skewer and was pleasantly surprised to find the fire place screen was a good place to rest the handles.  That left a good open space in which to place the heat.

See the foil packet?
*Important:  When you put the food on the skewer, plan to leave several inches between it and the tip and it and the handle so the food is not touching the places that are supporting the skewer.

My first mistake was not spreading the hot embers out evenly beneath the skewers.  Most of the heat was near the tip and that meat cooked quickly and scorched a little.  The meat near the handle barely cooked and the veggies didn't cook much at all.  The onion was too raw for my taste, even with turning the skewers regularly to cook them on all sides and rotating their order to get each one near to the heat.

Looks good, but...
...some of the meat was too rare, while...
... the rest was just right.
What I realized is that I had planned on reversing the skewers at some point, which is silly because then the handles would have gotten too hot.

When I spread the heat out evenly, the meat along the whole skewer cooked at the same rate.  The veggies got cooked more but still the onions were too raw.  I think the next time I try this I will cut the onions smaller and perhaps brush the onions and mushrooms with oil before they get put on the skewer.

This had the heat spread better beneath the entire skewer.
See?
The sauce still splashed some and I got drips on the tiles but they cleaned up easily.

The Verdict

The meal was good despite the raw onions.  Once I got the embers distributed correctly, the food cooked better and was tasty. The butter had melted on the bread.   I declare it a success in flavor and in experience.

Much, much better.
What is really important is managing the heat, paying attention to where the flames are and how hot the coals are.  I am so used to a gas stove and an electric oven that I don't have to think about the heat distribution!

Another aspect of fire management is keeping the flames that you are not using for cooking low enough that it is not uncomfortable to sit near while you work.  Since the weather was cold I was happy but if the fire had been bigger, I would have been sweating and feeling like I was cooking, too.

Monday, February 15, 2016

Cherry Bread Pudding with Vanilla Sauce

Company was coming for dinner and I wanted something different for dessert.  I also had a lot of several-days-old bread that needed to be used up before it went moldy.  My taste buds decided that a bread pudding would be just the thing!

My experience in eating bread pudding has primarily been from friends who took slightly stale bread, tore it up into chunks, piled them into a pan, soaked them with a custard of eggs, milk, sugar, and flavorings, and then baked them.  The key was a long soak so the bread chunks got damp all the way into the middle.

These were always good!

So I went looking for that sort of recipe and was amazed to find out that all the old recipes did not ask for bread chunks but for dried crumbs.

The recipe I chose was from Hearthside Cooking by Nancy Carter Crump.

ISBN 0-914440-94-2
This is a fun book because Ms. Crump took recipes "from a variety of primary 18th- and 19th-century sources both published and unpublished" from "archives, libraries, and private collections throughout Virginia and North Carolina."  Her goal for the book was to interpret those recipes both for modern kitchens and for fireplace, "hearthside", cooking.

While I was tempted to cook this on a hearth fire, I recognized that the time and effort involved were not compatible with the time I had allotted to prepare the dessert.  I'll save that for another day.

An Ordinary Bread Pudding (page 256)

Original recipe from the Virginia Gearhart Gray Collection:

Quarter of a pound of grated stale bread.  One quart of milk boiled with two or three sticks of cinnamon slightly broken.  Eight eggs Quarter of a pound of mace & little grated lemonpeel.  Two ounces butter.  Boil the milk with the cinnamon strain it and set it away till quite cold. Mix the butter and sugar.  Grate as much crumb of the bread as will weigh a quarter of a pound.  Beat the eggs and when the milk is cold stir them into it in turn with the bread and sugar.  Add the lemonpeel and if you choose a tablespoonful of rose-water.  Bake it in a buttered dish and grate nutmeg over it when done.  Do not send it to the table hot.  Baked puddings should never be eaten till they have become cold or at least cool.

Ms. Crump's redaction:

1 cup milk
1 cup cream
2 sticks cinnamon, broken in 3 or 4 pieces
2 teaspoons freshly grated lemon peel
1/4 cup melted butter
2 eggs, lightly beaten
1/2 cup sugar
1/4 teaspoon nutmeg
4 cups coarse bread crumbs
2 teaspoons rose water (optional)

1. Scald milk and cream with cinnamon sticks and lemon peel on trivet over hot coals.  Add butter and set aside to cool.  When cool, strain into eggs, combining well.

2. Add sugar and nutmeg to bread crumbs.  Pour in milk and egg mixture.  Add rose water, if desired, and stir mixture well.

3. Pour mixture into 1 1/2-quart buttered casserole in a preheated 350 degree F oven for 45 to 60 minutes "until knife inserted in middle comes out clean."

4.  Serve at room temperature or cold with cream, Vanilla Sauce, or Wine Sauce.


Cherries are in the bowl.
My Notes

I dried my bread crumbs in the oven just to make sure they were stale enough. They weren't crispy but stiff.

"Scalding" milk is not something I do often.  It requires heating the milk mixture gently until bubbles start forming around the edges of the pan.  What this does is allow the flavors of cinnamon and lemon to infuse the liquid.  I let it cool for a while on the counter to get that infusion but then got impatient and put the pan into the refrigerator.

Pre-scalding shot
I used rose water (love the stuff!) but only 1 teaspoon since I wasn't sure how my guests would react to it.  It was strong enough for me in the batter and subtle enough in the finished product for my guests.

Adding the custard to the crumbs
I wanted to use dried fruit to make it a little more "fancy" and happened to have some dried bing cherries handy. I covered them with boiling water for 15 minutes to soften them and then drained off the water. (Ms. Crump has a note at the end of the recipe:  "1/2 cup raisins or currants may be added."  My cherries measured out to about 3/4 cup after soaking.)

About half of the cherries went into the batter and were stirred in.  The other half I sprinkled on top of the batter just in case the first half decided to sink to the bottom of the pan.

Half the cherries here
Ready for the oven!
While the pudding was baking, I made the Vanilla Sauce.  I didn't use the recipe in Ms. Crump's book but a recipe I had copied from somewhere else and left as a note and a place marker at the bread pudding recipe.  Circa 1997.

Vanilla Sauce

1/2 cup sugar
1 Tablespoon cornstarch
1 cup boiling water
2 Tablespoons butter
1 teaspoon vanilla extract
dash salt


Mix sugar and cornstarch.  Add boiling water, stirring constantly.  Boil 5 minutes.  Remove from heat.  Stir in butter, vanilla, and salt.

My Notes

I followed this recipe as directed.  Boiling the mixture for 5 minutes made the sauce very thick. (Where were you when I needed you for the Lemon Cream Pie???)  I put the container of sauce into the refrigerator until it was time to serve it with the bread pudding.

You really do need to stir it constantly.
The Verdict

The baked pudding was beautiful.  We forgot to take a picture of the whole dish but here is one of what was left after serving.

The five of us ate nearly the whole thing!
It baked for the entire 60 minutes before a knife came out clean but I think it could have come out at 45 minutes and been a little moister.  Not a problem, though.

The texture was dense, moist, and the cherries made it a bit chewy.  The flavor was very slightly sweet.  It was hard to detect the spices and lemon but I think, as background flavors, they added depth.  The rosewater was very subtle and complimented the cherries well.

Everyone liked it.  The leftovers made a good breakfast treat.  I warmed them up and liked the flavor a lot.  I tasted more of the cinnamon.

Success!

The vanilla sauce was too solid coming right out of the refrigerator so I warmed it up in the microwave.  This caused it to bubble but it really didn't thin out to a pouring consistency.  Still, it was tasty with the pudding, adding more sweet and a vanilla counterpoint to the cherries and bread.  We just had to spread it around with a spoon.

So success with reservations.  Next time I won't refrigerate it in advance.

Pre-chilling consistency.  Perfect.
Reviewing this book reminded me how much I like to cook over fire and how I need more experience than what I get a few times a year at demonstrations.  Fortunately the weather has been cold enough to inspire me to build fires in the fireplace.  Perhaps I can get some cooking done there!

Monday, February 1, 2016

When Life Hands You Lemons ... Make a Lemon Cream Pie

In a previous post, I explained how my wonderful neighbor gave me his bountiful harvest of Meyer lemons and that my daughter and I decided that the end of the saying, "When life hands you lemons" is "get cooking!"

After pickling lemons and making a savory chicken and lemon pie, we wanted a dessert.  We revisited Rufus Estes' Good Things to Eat, which was the book used for the very first post of this blog, Peanut Meatose.

ISBN 0-486-43764-7
Here is an excerpt from that post:
Mr. Estes was born a slave in 1857, was employed by a restaurant-keeper at the age of 16, and then became a cook for the railroads at age 26, where he continued for most of the rest of his life.  His culinary skills were so valued that he was assigned to cook in a special car that catered to celebrities.  Mr. Estes prepared food for presidents, princesses, famous actors and singers, and more.  He was trusted to provide them with a good meal and, upon viewing his recipes, I can see that that trust was not misplaced. 
One thing I like about this book is that it is "The First Cookbook by an African-American Chef."  Mr. Estes says, in his foreword,
This book, the child of his brain, and experience, extending over a long period of time and varying environment, ... The recipes given in the following pages represent the labor of years.  Their worth has been demonstrated, not by experimentally, but by actual tests, day by day and month by month, under dissimilar, and, in many instances, not too favorable conditions.
This man was obviously talented and proud of his accomplishments, and I am grateful he took the time to share his recipes with us.

He offers quite a few recipes that use lemons, including an "old-fashion" lemon pie "because it is baked between two crusts, yet many have called it the best of all kinds."  It actually looks quite simple and I might try it some time.  He also gives a "Large Lemon Pie" recipe, which is what we call a Lemon Meringue Pie.

On page 92, he gives another lemon pie recipe that seems like a lemon meringue pie but is cooked differently.  This is what we decided to try.

Lemon Cream Pie

Stir into one cup of boiling water one tablespoonful of cornstarch dissolved in a little cold water.  Cook until thickened and clear, then add one cup sugar, a teaspoonful of butter, and the juice and grated rind of two lemons.  Add the beaten yolks of three eggs and take from the fire.  Have ready the bottom crust of a pie that has been baked, first pricking with a fork to prevent blisters.  Place the custard in the crust and bake half an hour.  When done, take from the oven and spread over the top a meringue made from the stiffly whipped whites of the eggs, and three tablespoonfuls of sugar.  Shut off the oven so it will be as cool as possible giving the meringue plenty of time to rise, stiffen and color to a delicate gold.
And water
My Notes
For the pastry, we used the same crust recipe I used for the Elizabethan meat pie last March.  It baked with a bottom weight (instead of pricking it) at 425 degrees F in a ceramic pie pan for 8 minutes.

I had trouble getting the cornstarch mixture to become completely clear but it did get thick.  I turned the heat down once it was pretty clear so as not to break the thickening feature of the cornstarch.

The Meyer lemons are small so I used the grated rind of two of them and the juice of three.


The "custard" was runny and we worried it wouldn't set up.


After baking for 30 minutes at 350 degrees F, it was still runny.  Since the crust wasn't very brown, we put it back into the oven for another 10 minutes.  During this time, the filling bubbled and thickened.

At this point the crust was brown and we didn't want it burnt, so we took the pie out of the oven.  The filling hadn't set but we hoped it would after it had a chance to cool.  I had whipped the egg whites and sugar into a meringue while the pie was baking so that had to go into a container into the refrigerator.

The pie cooled a little but the filling still hadn't set so we put it into the refrigerator, too, with the idea to put the meringue on the next day.

The Verdict

The next morning we checked the pie and the filling still hadn't set.  It was too runny to serve as a pie, so we poured the filling into a container.  By the way, the crust had cooked up beautifully and stayed in one piece when we popped it out of the pan.  Heart-breaking! (Tasty, too, later on.)

Tilt and slide
My daughter then made a vanilla cake (thank you, Betty Crocker!), split the layer, poured some filling over the bottom layer, put on the top layer, frosted the top of the cake with whipped cream, and decorated it with fresh blackberries and the lemon filling over the top.


It made for a lovely impromptu dessert and was well-received.  The lemon filling was tart, lemony, and not too sweet.  The little bits of zest were pretty and added a nice lemon burst.

The next day we made pancakes and, instead of syrup, we spooned the lemon filling and a blueberry compote over the top.

After that, we put the lemon sauce and more of the blueberry compote on some lemon scones.


I have to call this recipe a failure because it didn't set up properly to be served as a pie.  I think the problem was that there was not enough cornstarch to thicken the liquid.  The standard is 1 tablespoon cornstarch to 1 cup liquid and, between the water and the juice, we had more than 1 1/4 cup liquid. Next time I would use at least 1 1/2 tablespoons of cornstarch.  Still, I am not sure why this pie needed to be baked after the filling was cooked and thickened.

Finally, I needed to do something with the whipped egg whites I had made the night before.  Sitting had made them separate and they did not look like something I wanted to use "as is."  So I put them back into the mixer and beat them, hoping to get them back to stiff and usable.  I was surprised to see that they could be beaten back to stiff.  Once they were ready again, I spooned them into little piles on parchment paper and lightly baked them into simple meringue cookies.

The nice thing about knowing how to cook is being able to adapt and recover from failures.  : )

Friday, January 15, 2016

When Life Hands You Lemons ... Make a Chicken and Lemon Pie

In a previous post, I explained how my wonderful neighbor gave me his bountiful harvest of Meyer lemons and that my daughter and I decided that the end of the saying, "When life hands you lemons" is "get cooking!"

We wanted something savory, meaty, yet still highlighting the lemon flavor.  I found the answer in The Dutch Table by Gillian Riley.  I showed off this book earlier when I tried its chicken hutspot recipe.  It is a lovely book that displays both Dutch recipes and art.

ISBN 1-56640-978-0
What I found was a recipe for Veal and Lemon Pie on page 62.  The ingredients list was inviting however veal was not really an option for me at this time.  We decided that boneless, skinless chicken thighs would be a good substitution, and set off on our Dutch adventure.

Chicken (Veal) and Lemon Pie

1 lb. (500 gm) of chicken thighs (leg of veal), finely chopped.
(1/2 cup veal fat, finely chopped)  I did not use this or substitute for it with the chicken.
1 lemon; half of it thinly sliced, the rest chopped
Salt, pepper, nutmeg, and mace to taste
2 egg yolks
Butter to taste
Verjuice, lemon juice, or white wine vinegar
Rich shortcrust pastry

Mix all the ingredients together except the sliced lemon.  Line a pie dish with a layer of pastry, tip in the meat mixture, and finish with the lemon slices and generous lumps of butter.  Cover with a pastry lid and bake in a moderate oven for 1 hour.  Eat hot or cold.  If hot, make a sauce with meat stock thickened with egg yolks, butter, and verjuice.  (Lemon juice or a very little fine white wine vinegar may be used instead of verjuice.) 

A little chopped parsley or marjoram makes a pleasant addition to the flavorings.
That ball is the crust.
My Notes

For the pastry, we used the same crust recipe I used for the Elizabethan meat pie last March.

We decided to use a deep dish pie pan and so we used 3 pounds of chicken thighs, and chopped them finely using the food processor.  That means we estimated about double the rest of the ingredients.

The Meyer lemons are small (about 2 inches in diameter) so I used four of them.  Two were sliced thinly and two were chopped.  All were seeded as I chopped and sliced.

I love my Ulu knife
I used 1 tsp of salt, 1 tsp of pepper, 1/4 tsp mace, and about 1/8 tsp of nutmeg.  I also included about 2 tablespoons fresh, chopped oregano.
Herbs and spices about to be mixed in.

We used two egg yolks (did we forget to double that?).  I also mixed in about 1 tablespoon of white wine vinegar.

This was the meat mixture and it looked lovely even before being tipped into the pastry.

Now with the chopped lemon and beaten yolks
Once the mixture was smoothed out, my daughter arranged the lemon slices over the top and I arranged a stick of butter, sliced, over the top of that.


She wanted a lattice top so she wove it and finished the edges.

We used the egg whites beaten with a little water as a crust wash in the hopes the crust would brown nicely.

Pretty!
The pie baked at 325 degrees F because a moderate oven is 350 degrees F and we were using a ceramic pan.  After 1 hour it did not look ready so we gave it another 20 minutes to get the crust brown.

The big problem we had was that the juices from the meat and the butter overfilled the pan and made a mess on the bottom of the oven.  I think we probably could have used 1/2 of a stick of butter instead.

It turned out beautifully!


It went into the refrigerator in preparation to be eaten the next day.

The Verdict

I reheated the pie in the microwave for about 4 minutes to make sure the interior got warmed.  Then I covered the top with foil and put it into the oven at about 300 degrees F to finish warming it.

Since we were serving it hot, I made the sauce as the recipe suggested:  1 1/2 cups chicken broth, 1 tablespoon white wine vinegar, 1 teaspoon butter, a little honey, and then once it was well-mixed and hot, I beat in two egg yolks.   It didn't thicken very much but the color was a pretty pale yellow and I liked it.  I didn't add any salt because the broth was already a bit salty.

I served the pie from its pan and the sauce from a gravy boat with a ladle.

Thin but very tasty.
Four of us were there to taste it and we liked it!  I thought it was even better a few days later, reheated in the microwave.

Still juicy
The flavor was lightly lemony, mostly savory from the chicken, and the spicing was delicate yet flavorful.  The filling was not greasy or too buttery and there was still the juice from the cooked meat.  The sauce added a nice, mild zing and made the filling even moister.

I had two parts I would change:

1)  I think I put in too much mace but not by much. (I got a blast of mace bitterness in my first bite.)

2) I would put in less lemon peel and more of the lemon pulp because there was some lemon bitterness in the dish.  The people who like bitter didn't mind and the people who don't like bitter were still able to enjoy it but wished there was less bitter.  Perhaps just use the peel on the slices on top of the meat.

We made the bottom crust too thin so it nearly disappeared in the taste of the pie but the top was robust, crunchy, and delightful.  We thought maybe we didn't really need a bottom crust as the filling stayed in its shape without it.  This pie would be good either way.

We also decided that making it a deep dish pie was not the best way to serve it.  That worked for the Elizabethan pie because it had so many layers, chunks, and spaces, but this filling was uniformly dense.  A normal thickness would have been better.

All four taste-testers declared it a success!

Yes, we served it for Christmas dinner!

Cookies Consent

This website uses cookies to offer you a better Browsing Experience. By using our website, You agree to the use of Cookies

Learn More