Thursday, August 15, 2019

Pickled Cherries

Sometimes you just need to go outside and do something yourself.  I visited the Mile High Ranch recently to pick cherries off their 60+ year old trees.  It was fun and felt like I was getting in touch with nature and history.  Sure, I could have gone to the store and bought cherries, but why not have an adventure?
Luscious, sweet cherries
I came home with 9 pounds of cherries, so of course I had to find something historical to do with them.  I decided against making wine or infusing liquor with them.  I was tempted by desserts and may end up doing one of the boiled or steamed pudding recipes I found.

Today's recipe appealed to me because of the pickled loquats I made while my tree was in full production.  They were tasty to eat and the leftover liquid was good in my tea.  Pickling cherries was high up there on the "Ooooo!  I want to try this!" scale.

I found it in my digital copy of the The White House Cook Book, 1887 version.


The authors, Fanny Lemira Gillette and Hugo Ziemann, have impressive credentials.
Hugo Ziemann was at one time caterer for that Prince Napoleon who was killed while fighting the Zulus in Africa.  He was afterwards steward of the famous Hotel Splendide in Paris.  Later he conducted the celebrated Brunswick Cafe in New York, and still later he gave to the Hotel Richelieu, in Chicago, a cuisine which won the applause of even the gourmets of foreign lands.  ...
Mrs. F. L. Gillette is no less proficient and capable, having made a life-long and thorough study of cookery and housekeeping, especially as adapted to the practical wants of average American homes.
(Publisher's Preface)

The books starts off with directions for carving.  Then it covers a wide range of recipe categories and includes menus for the various seasons, months, and holidays.  It concludes with helpful household management ideas, ranging from "Housekeepers' Time-Table", to dyeing, etiquette, giving dinners, and even measures and weights. 

Today's recipe is from the Pickles section.


Ground spices, not whole
My Notes

I was completely out of whole cloves and never had whole blades of mace, so I chose to use ground spices.  Unfortunately, I didn't see their note about putting the ground spices into a bag, so I put them right into the vinegar/sugar mix for cooking and for pouring over the cherries in the jar.

I chose apple cider vinegar and white sugar.  The authors suggested either apple cider vinegar or white wine vinegar for pickling.

The recipe did not specify removing the seeds, so I left the cherries unstoned.  I picked through my haul and chose only the cherries that were firm and unblemished.  I decided to make one quart's worth.

Sure enough, one quart in my measuring cup fit a one quart canning jar!


As per directions, I used "a large cupful" of vinegar, measuring just over 8 ounces.

The vinegar, sugar, and spices went into a small saucepan, brought to a boil, and then simmered for five minutes.

Some spices stuck to the walls.  I did not worry about this.
Once it had cooled, I poured it over the cherries.  It did not fill the jar up; it only filled to about halfway.

Not enough!
So I estimated it needed another 6 ounces of the vinegar/sugar mix, which I made but did not add any more spices to it.  Once that was boiled and cooled, I poured it over the cherries.  It still wasn't enough and I was out of apple cider vinegar, so I topped it off with some white wine vinegar.  I poured straight from the bottle, without adding any sugar or spices.  It only took a few tablespoons to nearly cover the cherries.

Close enough
Then I put on the lid and put it into the refrigerator to pickle.  Lately I have been making refrigerator pickled vegetables, so I know they need at least a few hours for the pickling juice to have an effect on them.  I decided to let them sit overnight.

The Verdict

To recap, I needed twice as much of the vinegar/sugar/spice liquid to cover the cherries.  Roughly 16 to 20 ounces of vinegar.

I tried them the next day.  My reaction was this:  they need more time to actually taste pickled -- mostly they tasted like cherries with a vinegar coating.  Another day is needed for the process.

The next day they were more pickled but were too sour from the vinegar.  I added more sugar, shook the jar, and waited more.

A week later it was still too sour except for a guest taster who REALLY loves vinegar/pickled foods.  I added more sugar and waited again.

A few weeks later, I thought it was almost right.  The liquor is still very sour but the cherries themselves are slightly translucent and pickled all the way through.  The spices add a light note and were not dominant in flavor.


I like them!  Success!  I think they would be good over vanilla ice cream or mixed into a fruit salad (remove the pits first), and they are also good just out of the jar.  I think the liquor would be a good base for a shrub, to have a syrup of some sort mixed into it and then diluted with water.

They were still somewhat sour (that made them "almost right") so I added more sugar.  I'll keep doing that until I am happy with the sweet-sour balance.   I have probably used more than 1/2 cup of white sugar to get it this far.


Thursday, August 1, 2019

Pork Chops Normandie -- A Train Recipe

I have several cookbooks pertaining to U.S. railroads.  Some I got at the California State Railroad Museum in Sacramento.  Others I found at various other railroad museums around California.   My travel companion often finds these for us to visit, and I love looking through the museum stores to see what cookbooks they might have.

ISBN 978-0-8018-9323-0 
This one, Dining on the B&O, by Thomas J. Greco and Karl D. Spence, I probably got at the Sacramento museum, but I honestly can't remember right now.  In case you don't already know, the Baltimore and Ohio (B & O) Railroad took special pains to offer its customers excellent food, as an enticement to bring in more customers.  From the inside front cover:
Passengers who dined on the Baltimore and Ohio during the heyday of American railroading received five-star service:  white tablecloths, china, and silver; food cooked from scratch; and the undivided attention of skilled waiters.  The B&O's cuisine won wide acclaim as the finest railway food in the country.  Passengers enjoyed it as the slightly swaying dining car clicked along over the rails.
The authors, "captivated by the romance of the subject", researched the original sources of the recipes.  Most of them were from the 1940s and 1950s.  In this book, they give the original recipes along with modern interpretations, and photographs of the dining cars from the period.

The foreword is particularly fun to read as it describes your experience as a passenger, from beginning to end, as it could have been in autumn, 1957.  Written by the last Director of Passenger Services, William F. Howes, Jr., so you know it is authentic!

Most of the recipes remind me of the food my grandparents from the U.S. Midwest would have fixed and enjoyed.  Most of the spicing is with salt and pepper; many recipes include cream, butter, tomato sauce, bell peppers.  For me, who doesn't normally cook these types of dishes, this is a reminder of my childhood.

I would not label the recipes as unusual or surprising.  They are solid meals, some with a bit of flair, that could be "prepared from scratch in a kitchen that occupied a space about 16 feet long and only 7 1/2 feet wide."  (page 3)  If you get this book, take the time to read pages 3 and 4, which describe how they managed to prepare all this food as well as store it and all the utensils, pots, china, crockery, glassware, and silverware in that tiny space.  Truly impressive.

One recipe that appealed to me, because I love meat combined with fruit flavors, is on page 80.

Pork Chops Normandie

When ordering chops for this item show on requisition number of chops desired.  These will be furnished ready cut and four to the pound.  To prepare, place in a greased baking dish.  Season with salt and pepper.  Pour apple cider over chops until juice is even with chops.  Pare and slice firm tart apples over the chops.  About two applies to six chops.  Over the apple sprinkle cinnamon, a little ground clove and ground nutmeg.  Add two bay leaves and bake in a moderate oven about 1 hour and 15 minutes.

The apple cider, apples, and spice flavor impart a most delicious flavor to these chops and is something different from the average pork chop dinner.  Two chops are to be served to the order.


The "Chef's Comments" (modern interpretation) gives specific measurements for three chops, but I think the original recipe is easy enough to follow.  I already knew that a moderate oven is 350 degrees Fahrenheit.  I used one bay leaf for three chops.

My Notes

I greased the baking dish with olive oil. Salt and pepper went on both sides of the chops, which were at least 3/4" thick and weighed about 1/2 pound each.

It took about 1/3 of the bottle of apple juice you see above to get it "even with the chops", meaning to their tops.  Between 2 and 3 cups of juice into the baking dish I used.

I only needed about 3/4 of the green apple to cover the chops, so the rest was cut smaller (unpared) and put into the apple juice next to the chops.  I decided to place the apple slices decoratively on the chops, with a hope they would stay there and look good when I served the chops.

A slight dusting of cloves, a heavier dusting of cinnamon, and a medium dusting of nutmeg were applied.  The bay leaf went into the juice.

The air was scented with the spices and apple juice while it was baking.  Heavenly!

Ready for the oven!

This how they were after one hour at 350 degrees.  The recipe called for 1 1/4 hours, but when I tested them with a thermometer, the interior was over 180 degrees, which worried me.


The Verdict

These chops were two to a pound, so I only served one per person.  They were joined by a tossed green salad and sourdough bread.


It was easy to move the chops from the baking dish to the plate without losing the decoratively placed apples on top.  I chose not to include the apple juice as part of the serving.

First let me say that the flavors of apple and spices was present in every bite, and I loved it.  I thought the spices would be more in the meat than they were, but that didn't make sense because they didn't touch the meat much.  The apple flavor had penetrated the meat, which was wonderful.

My guest taster felt the same, and we both noticed that the meat was drier than we wanted.  I believe that one hour in the oven was too long.  If I do this again, I would check the internal temperature after 30 minutes.  But it was not bad or too dry -- we still ate every bite and enjoyed it!

Success!  I think my grandparents would have liked it and my grandmother would have fixed it more than once.  I recommend it, as it was easy to put together and fun to eat.

I am tempted to reduce the apple juice baking liquid to make some sort of sauce to serve with the chops, though, or to use it with some other dish, or to cook more meat in it (pork or chicken) before tossing it out.  It just seemed like a waste of a beautiful thing.

Monday, July 15, 2019

Gosling with Sour Cherry Sauce (I used duck) -- Transylvanian Cookbook!

I know, I've been away from the Transylvanian Prince's cookbook for a while.  I needed to try some other books and it felt good to do that.  But I had this particular recipe on my "to do" list for a while, so it was just a matter of time to get the ingredients.

The Prince of Transylvania’s court cookbook 

From the 16th century 

THE SCIENCE OF COOKING


You can find a copy of it here:
 http://www.fibergeek.com/leathernotebook/files/2018/05/Transylvanian-Cookbook-v3.pdf

The recipes I have tried are here:  Prince of Transylvania's court cookbook


The recipe is #170,

Gosling with Sour Cherry Sauce

Have enough sour cherry for the gosling, pour some wine onto it; once washed, cook white bread insides and honey with the food as well; once cooked, pass it through a strainer, then add some salt and honey, and a bit of almonds, then cook them together. I’ve told you how to serve it. 

My Redaction

I figured it would be hard to get a gosling, so I settled for a duck from an Asian market.  But the sour cherries were the real challenge:  Everything I read said, "If you can't get sour cherries, use sweet ones and add lemon juice to make it sour."

I really didn't want to do that.  I wanted to try the Official Sour Cherries.  So the duck remained in my freezer until I found a new European market one day.  The place was small but it had two freezers with interesting ice creams and... bags of cherries.  I asked the owner if the cherries were sweet or sour.  She looked dejected and said, "These are European cherries, so they are sour."

Her expression brightened when I said, "Hooray!  Sour cherries!" and I bought two bags.

Now I was ready.  Everything I needed to make the recipe was acquired!

1 duck, cleaned and with the head and feet removed
2 ounces fresh bread crumbs, crust removed
about 2 tablespoons honey for the duck and another 1 tablespoon for the sauce
1 to 1 1/2 cups red wine
300 grams sour cherries (mine were pitted already)
salt to taste
1/2 cup raw almonds, chopped


The honey was en route.
DUCK!
Preheat oven to 350 degrees Fahrenheit.

Put the duck in a big, oven-safe pan with a lid.  Add the cherries, bread crumbs, honey, and red wine.  Stir to mix as best as you can around the duck.

Cover and bake for 1 hour.  Uncover and bake another 15 minutes, or whatever it takes to get the internal temperature to 170 degrees.

Mmmmm.  Smells good!
Remove the duck from the pan and then strain the liquid in the pan into another saucepan.

It produced nearly two cups of liquid
Taste the liquid and add honey and salt to taste.  I aimed for a light sweet-and-sour balance, that leaned towards the sour side.  Add the almonds.

Bring the sauce to a boil, stirring constantly, and let boil/hard simmer for a few minutes.  The sauce got noticeably thicker, just not thick.

I sliced some of the breast meat before spooning the sauce on top and serving.  I dug deep into the sauce to make sure I got almond bits for the top.

Well, I should have arranged the parts a little more artistically.
The Verdict

I served it with a side dish of green beans and some fresh bread.  Because my cherries were pitted, I put some of them from the strainer onto the top of the duck.

Reactions were mixed.  The guest taster thought the meat was tender and succulent and the sauce was wonderfully flavorful.  I thought the meat was tough and had an off-flavor, but the sauce was wonderful.  So we agreed on the sauce!

It was thick enough to stick a bit on the meat's surface.  I put the extra sauce in a bowl on the table because we both wanted more sauce with the meat.

We thought the sauce was just right for tartness, with enough sweetness to keep our mouths from puckering.  The almonds added a crunchy texture, which was welcomed, and their flavor went well with the cherries.  The juices from the duck brought a savory deepness that kept it from becoming a dessert sauce.  It was also rich from the fat.

During the meal, the fat collected on top of the sauce, which I didn't like much.  I think next time I would try to remove much of the fat from the juices before making the sauce.  That would also make it easier to get sauce on the bread which I dipped into the sauce.

There was a lot of sauce left over, which I plan on using with other cooked meats.

I spent some time considering if the sauce would be improved with the addition of spices.  I think not, in that the cherry flavor was really emphasized in this simple sauce, and that a spice like cinnamon or cloves would shift the emphasis away.  Perhaps pepper, to bring some bitter into the sweet-sour combination.  I think I would add spices only if I wanted a change from the "usual."  (Unlikely!)

I also asked around about the off-flavor of the duck meat.  To me, it was strong enough to be off-putting.  I did not like the meat and the scent it had.  It might have been a gland that wasn't removed well when the duck was cleaned.  I really don't know.  So if I wanted this sauce again, I think I would use a chicken or a fatty piece of pork.


Friday, July 5, 2019

Carob Molasses: Gulepp tal-harrub DONE RIGHT

Wow, did I make a big mistake.  It was just my good fortune and a bit of old training that kept me out of harm's way.

I previously wrote a post on Carob Molasses and found it was awful.  Extremely bitter.  I tasted a little and threw the rest away.  Then I contacted Dr. Albala, the author of the book with the recipe I tried, in order to figure out what was wrong.

Our discussion lead me to realize that I MISIDENTIFIED THE TREE.  Yes, what I thought was carob was not.  All my life that tree had been identified to me as carob.  I even looked through the internet to double-check.  But I was wrong.

The tree was actually Cassia leptophylla, the Gold Medallion Tree.  Parts are toxic!  I recalled that there is an evolutionary reason we taste bitter things, and that is to tell us when something is not good for us.  I am so glad I responded correctly to that, because it probably saved me a trip to the hospital.

It goes to show that eating plants can be hazardous, so always be careful!  I should have checked more thoroughly on the tree's identity before I tasted it.

Lesson learned.

Dr. Albala sent me some real carob pods.  This is what they look like, in comparison to what I had harvested.

One carob pod, about 4 inches long
Many carob pods
Gold Medallion Tree pods.  Toxic!
The carob pods are small and curved, whereas the other pods are long and straight.

I followed his instructions to make the syrup:

To make the syrup, just break up the pods, boil them for several hours in water and then strain.  Cook this down until thick, adding a little sugar to taste if you want.

Broken and ready for water
With water
Once the water was boiling, I turned the heat down to low to make it just simmer.  I had to add more water early on because I had barely covered them at the start.  They smelled slightly sweet while they were simmering.  I did cover the pan to cut down on evaporation.

After more than two hours of simmering, I strained them, then simmered to reduce it.
Strained
Reduced in the pan, for comparison.


The final quantity.


The Verdict

I tasted a pod after it was cooked and cooled.  It was soft and sweet and tasty!  I chewed it a little and got the almost-chocolate flavor.  I liked it.

I tasted the syrup after it cooled.  Well, it never got thick but I decided that it had reduced enough -- 1/4 cup!  I didn't want it to burn or evaporate all away.  But I will call it a syrup anyway.

It was still watery, not as concentrated as I think it should be.  But it was sweet with a deeper flavor that was something like chocolate and something like coffee.  I liked it!  Not bitter at all.  

Success!

The internet tells me that the syrup is used to flavor drinks, make a cough syrup, and to coat sore throats.  Some people make a liqueur out of it.  It is sometimes flavored with orange.

Thank you, Dr. Ken Albala, for your time, your help, and for sending me the right pods.  It was kind of you!

Saturday, June 15, 2019

Chakapuli, a Lamb Stew from Georgian Russia

A few months ago I was treated to dinner at a Russian restaurant.  I had looked at the menu online in advance, so I knew I wanted to try chakapuli.  It was described as a lamb stew with onions, tarragon, wine, and plum sauce.

I had no idea how it would taste but I knew I wanted to try it.  And it did not disappoint:  The lamb shank was served in the bowl and rice was on the side, which I mixed into the stew as I ate.  The broth was rich and flavorful, and I loved every bite.

That, of course, meant I needed to try it at home!  There was a challenge in making it myself:  the plum sauce was made from unripe plums, which are not always found in the markets.  I read many recipes online and some of them said to use tkemali sauce, which is made from the plums and can be purchased online.  Well.  I really wanted to avoid purchasing the tkemali sauce because I had found recipes for it.  But it all came down to finding the unripe plums.

My local imported foods market had never heard of tkemali sauce but the other day I went in hoping to find canned unripe or sour plums.  I asked for them and -- hooray! -- was sent to find fresh, FRESH unripe plums that looked just like all the pictures I had seen online.  I was happy to bring a bag home, along with a bunch of fresh tarragon that was just asking for my attention.

I had already procured the lamb shank, so I felt like I was ready to try chakapuli.

I don't have a specific recipe that I followed for this post.  Chakapuli is such a beloved stew in Georgia that there are many variations, probably as many as there are families who make it.  Some called for hot chilies, others for waxy potatoes.  Some required tkemali sauce but others just said to use the plums and add the spices that would be in the tkemali sauce right into the stew.   I wanted to reproduce the version I had in the restaurant, so I decided to skip making the tkemali sauce.

For the seasoning, I chose the spice mix my daughter brought home from her trip to Uzbekistan.  My Russian friend tells me it is a "Universal Spice Mix", and it has dried herbs and vegetables as well as a variety of spices.  I've tried it before on baked chicken and in other stews, and liked it.


The ingredients are approximate as I didn't really measure.  Basically I crossed my fingers and hoped for a good result.  Do you know how hard it is to cook with your fingers crossed?

My Version

1 lamb shank
1 - 2 tablespoons butter
1 to 1 1/2 cups white wine
4 cups water
a good sprinkling of the Universal Spice Mix, or whatever spice mix suits your fancy
a heaping teaspoon of minced garlic
half a bunch of tarragon
half a bunch of green onions
about 1/2 cup parsley
8 to 10 unripe plums

I used about half of the herbs and onions you see here.

I used a big Dutch oven for the whole process.

Melt the butter and then add the lamb shank.  While it is browning, strip the leaves off the tarragon stems, throw the stems away, and coarsely chop the leaves.

Check the shank and turn it to keep browning it.

Trim and slice the green onions.  Pull the parsley off the stems (a few stems are fine) and chop those.

Lovely herbs!
When the lamb is nicely browned, pour in the white wine and reduce by one half or more.  You can see it deglazing the pan.
Browned and now the wine is reducing
Once the wine is reduced, add in the other ingredients.  I saved the spices for last and sprinkled it all over everything.

Getting hotter now
Bring it to a simmer, put the lid on, turn the heat to low, and go do other things for a few hours.

It is ready when the meat is tender and falling off the bones.  The smell is heavenly but you have to wait patiently!

Now a lovely stew
I added a little salt (about 1/2 teaspoon) at the very end.  I also pulled the rest of the meat off the bone.

The Verdict

I served it over some very dry European style bread.  More (fresh) bread was on the side as well as some butter.  White wine (the same as in the chakapuli) was the beverage of choice.  Fresh apricots were dessert.

You really want more plums than this in your bowl
The meat was tender enough to cut with a spoon but not overcooked.  The hard plums had softened into squishy balls of fruity-but-tart morsels.  (Beware the pit.)  The broth was rich and meaty, and the herb flavors came shining through.  It was also a little tart but more like a background flavor.

The broth was very well balanced in flavors, but every so often the slight licorice flavor of the tarragon dominated in a spoonful.  This was not a problem!  It made for a tasty dance on my tongue.

The dried bread made a perfect sponge for this stew which I would have called a soup because of the amount of broth.

Success!!!

It was just the right amount to serve for two.

I know that fresh, unripe plums have a tiny window of sales in the market.  I think I just happened to get lucky that the market had them on that random day I wandered in.  What will I do if I want to make this at another time of year?  It is traditionally a springtime dish, which coincides with the plums.  I think, if I can get some more, I will freeze them.

One wonderful feature of this recipe is how easy it is to prepare:  all of it uses one cooking pot; once everything is in, you put the heat on low and ignore it, and you serve it in a bowl.  Simple, savory, good.

I can also say that this recipe gives me a heightened appreciation for fresh herbs in my cooking.

The Second Time

I tried the recipe again the next day, using a lean, boneless pork roast, about 2 pounds in weight.  I used up the rest of the plums and put the roast in whole for cooking.  There were about twice as many plums in this batch as in the previous.

Once it had cooked for two hours, I took two forks and shredded the pork.

The result?  Everything was still very tasty -- the broth was a little more sour than previously but not in a negative way.  The only thing I could say is that the pork wasn't as tender or flavorful as the lamb.  It was a little dry, even after the shreds soaked in the broth for an hour or so.  But we still ate and enjoyed it!  I would recommend the lamb over pork, or to try a fattier cut of pork.


Saturday, June 1, 2019

Carob Molasses: Gulepp tal-harrub

UPDATE:  The pods you see in this post are NOT carob.  They are toxic and should not be used at all.  Please see my updated post for the correct pods.  Here is a link to the effects of ingesting this plant:  https://wagwalking.com/condition/golden-chain-tree-poisoning/

I recently acquired a copy of The Lost Arts of Hearth and Home -- The Happy Luddite's Guide to Domestic Self-Sufficiency, by Ken Albala and Rosanna Nafziger Henderson.  One reason it appealed to me was that the recipes were of very basic but interesting skills, exactly what the title promises:  lost arts, like unusual (to me) breads, making soy sauce, pickling fish, distilling and brewing, and even non-food skills like making soap, brooms, braided rugs, and your own exterior bread oven.

ISBN 978-0-399-53777-6

One recipe caught my eye, on page 43, called Carob Molasses.  Carobs are used as decorative features in my area -- they are pretty trees -- and I have always wondered what I could do with the pods.

Dr. Albala wrote up this particular recipe and I loved his description:
Carob is one of those health foods that suddenly appeared on the market when I was a kid, as a substitute for chocolate, which it isn't.  
This made me laugh, as that was exactly the experience I had as a kid!  I recall having it handed to me with a statement like, "This is made of carob, and tastes exactly like chocolate!"  No, no it doesn't.  Not even close.  I didn't know about being a foodie back then, but I knew carob's flavor was a poor imitation of chocolate and I wasn't going to accept it as an alternative.

But this recipe intrigued me.  It didn't promise to be like chocolate, just a long-valued syrup to be used in beverages or even (as he suggests) in barbecue sauce or chili.

Carob Molasses

To make the syrup, just break up the pods, boil them for several hours in water and then strain.  Cook this down until thick, adding a little sugar to taste if you want.

It was easy to gather an armful of pods off the ground around a convenient tree.

Easily two feet long or more
These pods are big!  I had to break them into fourths to fit them into my 6 liter Dutch oven.  I washed them first to get off dust and bugs.  The wash water turned light brown almost immediately.

Adding water to cover

I had originally thought the syrup would be made from the seeds, but it is the pods that contain the flavor.  The seeds are hard, and I tasted a piece of pod but really got nothing from it.


Wet pods gave off a slightly sweet scent.

I brought the water to a boil and reduced the heat to a rapid simmer and set the timer for 3 hours.  After about 30 minutes I decided to put the lid on to reduce evaporation, since I had already needed to add boiling water to keep all the pods covered.

I wasn't sure what would happen to the pods while cooking.  I imagined they would get pulpy or soft, but honestly, they remained hard.  You can see the water got very dark brown.

I removed all the pods and strained the liquid.  It measured 8 cups.


So I put it into another saucepan and brought the heat up so the liquid was steaming.  After another 2 1/2 hours, it had reduced to 2 cups.  Not thick but definitely thicker.


At this point, I decided to taste it.

The Verdict

It was pretty awful.

The dark brown, slightly thick liquid had only one flavor:  bitter.  No, let me restate that, it was BITTER.  Deep, concentrated, make-your-tongue-curl bitter.

The recipe suggested to add a little sugar but I realized that no amount of sugar would offset that intense bitterness.

Failure.

I must have done something wrong.  There is no way a concoction like this could be so loved and reproduced over the years.  I decided to contact Dr. Albala to get his opinion on my disaster.

He was kind enough to reply!  Our conversation led me to believe that either the pods were already bitter or that boiling them hard might have been the culprit.  Other online recipes suggest more soaking in hot water or simmering them very gently.

If I get the opportunity to get more pods, I will try it again.  I would really like to see what people enjoy about this food.

Sunday, May 19, 2019

Rose Shrub, a Springtime Treat

I have been hard-pressed to do my blog posts for the last two months.  No, work and life in general have not been the culprits; I can only point to my loquat tree in astonishment.

A loquat, in case you didn't know, is a semi-tropical fruit that happily grows in my area and I have a decent-sized tree on my property.  It has produced fruit before but this year, it outdid itself.  I have picked over 120 pounds of fruit so far and it looks like another 20 to 40 are still on it.  I have made loquat jam, loquat chutney, spiced loquats, and loquat liqueur.  I have 12 pounds cleaned and frozen, waiting for a break in my schedule.  I've given away many pounds to friends.  Loquats are lovely to eat fresh, so I've had a lot of that.

Here is a picture of my tree and a closeup of the fruit on the tree.

One heavily laden loquat tree
Luscious, heavenly, flavorful loquats
The fruit is sweet and tastes somewhat like peaches or apricots without the tartness.  But it is different from them, which makes it a treat.  The recipes are not historic and, although they are foodie fun, most of them I got off the Internet, so I didn't want to write them up for my blog.  Now you know!

But today's recipe has to do with another springtime treat:  Roses!

The wet winter and now cool, wet spring has my yard in full bloom and among the flowers are the roses I planted a few years ago.  Two are highly scented and one of those has been producing flowers regularly.  I decided I wanted to try something with the petals.

I turned to a book I used once before, when I made a Rosemary Tea Sherbert  (part 1 and part 2).  It is Flower Cookery -- The Art of Cooking with Flowers.

By Mary MacNicol, Fleet Press Corp, published 1967

Today's recipe is on page 164.

Rose Shrub

Take one and a half pounds of fresh rose petals, add three cups of water and boil up.  Remove from heat and when cool, strain.  Then add two and half pounds of sugar, and the beaten white of an egg, boil, skim, strain and bottle.


My Redaction

I picked all the rose petals I could off of the three rose bushes.  The dark red roses aren't scented but I wanted them for color.  The other two were deeply scented. 

The recipe books all say to remove the bitter white base of the rose petals.  I tasted them and found that only the red petals had a bitter base, which I tore off.  The other bases were sweet.

A beautiful basketful, picked on a rainy day
It filled my basket to the brim and yet the total weight was barely six ounces.  I needed to scale the proportions.

Rounding up to call it 6
1 1/2 pounds petals (by weight) to 3 cups of water (by volume) is the same as

24 ounces petals to 24 ounces water, so that scales down to 6 ounces of petals to 6 ounces of water.

Similarly, 2 1/2 pounds of sugar is 40 ounces (by weight), so

24 ounces petals to 40 ounces sugar gives

3 ounces petals to 5 ounces sugar.  I had 6 ounces petals so I used 10 ounces of sugar.


That is not a lot of water but the roses took up so much volume that I chose to use my enameled cast iron Dutch oven.  I put the water in the bottom and then packed the petals in on top.

A large pot filled with roses.
I liked that the lid was heavy as I wanted to keep as much of the water and rose scent in the container as possible.  I set the heat to medium high until the water boiled -- I saw steam coming out from under the lid.  Then I turned the heat down to low, which stopped the steam, but I could still hear it simmering.

After about 25 minutes, I turned the heat off and let the whole thing cool for a few hours.  At no time during the cooking and cooling process did I lift the lid.

Once it was cold, I looked inside.

Now they are cooked down.
I decided to squeeze the petals to extract all the liquid I could from them.  I scooped them into a small colander, placed that in the pan, and squeezed with my hands until no more liquid came out. 

Squished until they could offer no more.
You can see the lovely red liquid in the bottom of the pan.

Then I strained the liquid through a fine sieve into a measuring cup and saw it was almost 8 ounces.  I still decided to use the original 6 ounces of liquid quantity to determine the sugar amount because that is what the recipe seemed to indicate.

I put the liquid into a small saucepan and then I added the sugar and the entire amount of egg white, beaten.  I suppose I could have put in a lot less white but I chose not to.  I stirred it all together and put it over medium heat.
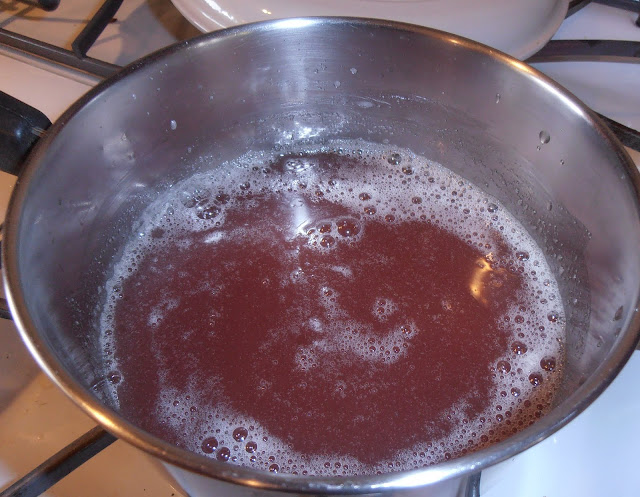
Just starting to warm up.
It started foaming almost immediately but I waited to skim it until it had come to a boil.  As it was heating I kept turning the temperature down so it wouldn't foam over.  When I saw bubbling along the edges, I used a small ladle to skim the foam off the top.

Foam!  You can see the boiling at this point, so I started skimming.
I kept skimming through the foam even though it seemed like I was taking a lot off.  Eventually I started seeing the clear syrup peeking through the foam.

Dark islands of syrup.
So I kept skimming, trying not to take the syrup off, until the surface was pretty clear.

Nearly done.
I used a wet paper towel to wipe the sides of the pan so that when I poured the syrup out, it wouldn't pick up more foam.  Then I poured the syrup through the fine mesh sieve into a clean jar.
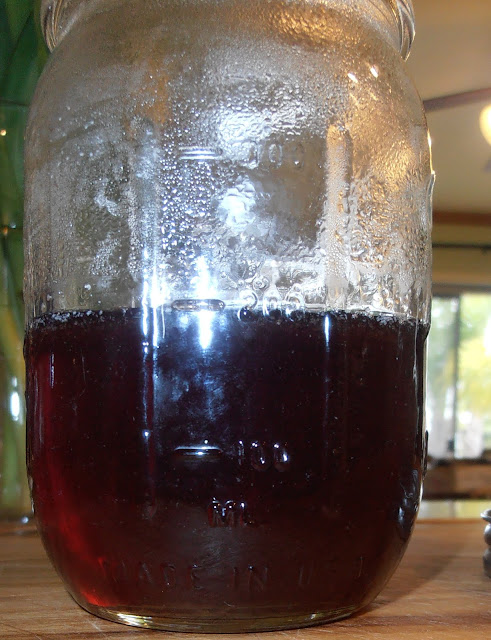
8 Ounces of Nectar!
After it cooled, I gave it the taste test.

The Verdict

First we tasted it just as it was, straight out of the jar.  It was definitely a sweet syrup, thick, with a lovely rose flavor.  One tester is a person who does not generally like the flavor of roses.  When she tried this, she liked it.  She felt the sugar gave the taste enough body to feel like she was drinking something, instead of just getting a strong scent of roses.  She also felt the rose flavor was an actual flavor and not just perfume.

Everyone liked it although we all agreed that it was too sweet to have more than just a sip or two.

So we tried it mixed with several other liquids.

Just adding cold water was okay but I think too much water was added; the ratio should be more like equal parts rose shrub and water but for me to say that, I will need to experiment more.

I also added equal parts tonic water, which was interesting because the tonic water is bubbly and has a bitter taste.  That shifted the whole experience away from sweet, which I liked, and the bitter added an extra dimension in flavor.  One taster, who does not like bitter, did not like the tonic water mix.

I mixed some of the shrub with a white wine, a little more wine than syrup.  That was intriguing because I no longer got the definite rose flavor but it didn't taste like wine, either.  It was a perfumed, fruity sensation that I truly liked.  One tester thought it could be described as a "rose sangria".  She does not normally like wine but felt this was a mixture she could drink, and she described it as "classy."  I liked that.

We also mixed it with white wine vinegar.  When it was about 2 parts shrub to 1 part vinegar, it was too tart for a beverage but we thought it would be a good sweet-and-sour glaze on roasted meat.  At about 3 parts syrup to 1 part vinegar, it was a refreshing, sippable beverage.  Actually, this is what I think of when I think about a beverage called shrub.

Success!

I want to make more (keeping blooming, my rose bushes!) and try it with other foods.  I think it would be good in lemonade, or drizzled over fresh loquats (or strawberries), or on pancakes, or in my hot chocolate, or mixed with vanilla yogurt as a fruit salad dressing, or brushed on the top of a cake hot from the oven (white, yellow, or lemon cake).

Cookies Consent

This website uses cookies to offer you a better Browsing Experience. By using our website, You agree to the use of Cookies

Learn More