Tuesday, October 15, 2013

Romania -- Chicken with Pomegranate Juice

Here is an intriguing book:  The Medieval Kitchen by Redon, Sabban, and Serventi.  The ISBN is 978-0226706856.  


It brings us recipes from medieval France and Italy, which had some different ingredients available than the same time period in England.  Romania is listed on page 88, in the chapter "Meats Cooked in Sauce".  They mention that both sweet and sour pomegranates were available and this recipe called for the sour variety.  Since those aren't available in my area, they recommend adding some lemon juice to brighten the flavor.

Romania -- Chicken with Pomegranate Juice

1 free-range chicken, about 3 1/4 pounds
2 fresh pomegranates
1 cup unblanched almonds
1 medium large onion
2 ounce fresh pork fatback
juice of 1 lemon
1/2 teaspoon strong spice mixture (*see notes below)
salt

Wash the almonds and dry them thoroughly.  When they are completely dry, grind them to a powder in a blender.  Remove from blender jar and set aside (you need not wash the blender before the next step).

Cut the pomegranates in half an scoop out all their seeds into the blender jar.  Puree the seeds and strain; this should yield 1 1/4 to 1 1/2 cups of juice.  Mix the juice and the ground almonds, and add the lemon juice.  Press the mixture through a fine strainer; the result will be an almond milk made with pomegranate juice instead of water.

Cut the chicken into serving pieces and pat dry.  Sprinkle with salt.  Cut the fat into 1/8-inch dice  and render it over low heat in a heavy-bottomed casserole.

Peel the onion and slice into thin rings.  When the fat has rendered, brown the chicken and onion until evenly golden.  If excess fat remains in the casserole, spoon most of it out before proceeding.

Add the almond-pomegranate juice and the spices.  Bring to the boil, then turn the heat down as low as possible and simmer, covered, until the chicken is tender, 30 to 45 minutes.

Check for seasoning and serve.

It looks like the olive oil bottle needs refilling
I'll admit it -- I'm a modern cook using medieval recipes.  Yes, I took some modern shortcuts.  Pomegranates are not yet in season (close!) so I bought pomegranate juice.  I also used the healthier choice of olive oil rather than pork fatback.  Maybe I lost some extra flavor with that decision, but I think my arteries are thanking me for it.

I bought a whole chicken as per the recipe but next time I think I'll just use a cut up one or, even better by my tastes, a package of boneless, skinless thighs.

The "strong spice mixture" is listed as "recipe 150, variation C" further on in the book.  It is basically 1 part ground black pepper, 1 part long pepper, 3 parts ground cloves, and 3 parts ground nutmeg.  At least that is what I used.  I put them all in my coffee-grinder-dedicated-to-grinding-spices-only and whirred them into a powder.

I have long pepper (see the Wikipedia article at http://en.wikipedia.org/wiki/Long_pepper) because I cook in the medieval and Renaissance time period.  It is much like black pepper but with a more fiery bite.  The mixture I put together had quantities that were just eye-balled and it did smell strong and peppery.

Anyway, it was easy to grind the almonds and mix them with the juices.  I let them steep (always a good idea for almond milk) while I cut up the chicken and then browned it with the onions.

Nearly all browned
When I strain almond milk, I always lose a lot of the moisture into the almond meal, so I didn't get much more than 1 cup of the milk from it.  ** TAKE NOTE:  save the used almond meal for a dessert called "Emeles".  See the next posting.

The almond milk was mostly brown so I'm not sure how the authors got the "rosy color" they refer to in the text.  I tasted it and was wowed by the burst of flavor in my mouth.  I couldn't wait to try this dish!

Not rosy but wowsie!
After I poured on the sauce, I sprinkled the spices evenly over the chicken pieces.


I even made sure some of the onion was on top of the chicken.  Then I covered it, set the heat to very low, and walked away for 45 minutes.

'Tis done.

The Verdict
I tried a thigh with some onion and a few spoonfuls of sauce over the top.  Success!  The authors said it would have a "gentle flavor" and it certainly did.  The juice flavors I tasted before cooking had mellowed considerably and blended with the chicken, spices, and onion.  I liked it a lot!

I noticed that some of the sauce around the edges had thickened more than what I had scooped out, so I tried that, too.  Oh, I liked this even more!  The flavor was richer and the sauce stayed longer on my tongue.  The thick pieces of chicken hadn't cooked all the way through (my heat is very low) so I turned it back on and simmered them, uncovered, for another 20 minutes on very low. Now all the meat was cooked and all the sauce was thick. Much, much better!

I truly liked the mellow fruit and spice flavor.  But I was also intrigued with the idea of getting more of that rosy color and a stronger burst of pomegranate, so I took some of the sauce and mixed in just a splash of pomegranate juice.  This was good over the chicken, too!

So make your choice:  Want your sauce to have a gentle, subtle flavor?  Follow the recipe.  Want it to be thicker?  Reduce it and the flavor will intensify a bit, too.  Want that rosy color and a stronger pomegranate flavor?  I would reserve out about 1/4 cup of the pomegranate-lemon juice mix and add it at the very end.

Who knew this recipe could be so versatile?

Tuesday, October 1, 2013

Pwdin Caws -- Cheese Pudding from Wales

I borrowed this book from the library:  The Welsh Dresser -- More Recipes from Wales by Sian Llewellyn.  It was first published in 1974 but I think the one I borrowed was published in 1978.  I forgot to take a picture of the cover, so I found this one on Amazon (sorry it is blurry!):

ISBN 9780860050377
If you could read the front cover, you would see that he labels "cheese" as "caws" in Welsh.  So I think "pwdin caws" translates to "pudding cheese" or "cheese pudding".  Here is the recipe that caught my eye (from page 31).

Pwdin Caws

4 ounces Cheddar cheese
3 ounces bread crumbs
1 ounce butter
2 eggs 
salt and pepper
1/2 pint milk

Heat the butter with the milk and pour over the bread crumbs.  Grate the cheese.  Separate the egg yolks from the white.  Beat the yolks lightly and add to the bread crumb mixture with most of the cheese.  Season to taste.  Whip the egg whites stiffly and fold into the mixture.  Pour into a buttered pie dish and cover with the remaining cheese.  Cook for 30 - 40 minutes in a moderate oven (350 degrees Fahrenheit, 177 degrees Celsius, gas mark 4).


I used dried bread crumbs because I figured their job was to soak up the milk/butter mix and thicken the pudding.  It was the right thing to do.

Since those measures were in ounces, I got out my trusty digital kitchen scale and weighed them appropriately.  By the way, two tablespoons of salted butter really does weigh one ounce!  (I was told so but always wondered.)  The microwave took one minute to heat the milk and the butter until the butter was melted. 

After I poured the milk/butter mix into the bread crumbs, I stirred it.  This seemed to help the crumbs soak up the liquid quickly.

I used more pepper to season because I am finally making friends with that spice.  Mostly it is too strong for me.  Because the butter was salted, I used less salt in the mix than I might normally do.

Crumbs, milk, butter, egg yolks, salt, pepper
The stiffly-beaten egg whites folded in neatly to the rest of the mixture.  At this point I realized what I was making was a simple cheese souffle'.  I love souffle's!!

With folded in egg whites
Since it says to use "most of the cheese", I guessed that 3/4 should go in the pudding and the rest on top.  That was enough to spread across the pan in a very decorative way.


The oven preheated while I was doing the rest of the work.  While cooking, the cheese pudding smelled absolutely heavenly.  After 30 minutes the middle looked set and the dish was ready.


The Verdict
It wasn't as fluffy as I thought it would be but still, it was not dense at all.  It was a little too oily-looking for my senses but it certainly didn't taste greasy.  The bread crumbs made it a little chewy, which was a welcome body of texture to the dish.  The flavor was good -- I could taste the extra-sharp cheddar cheese and the spices seemed right for it.  I probably could have put in a little more pepper but certainly not more salt.

I declare a success!

I think this dish could play the role of appetizer (cut in thin wedges), side dish (with some roast beef to compliment the cheddar), or main course for a light meal. 

Sunday, September 15, 2013

More on the Ymbre Tart

I made this tart to take to a potluck party.

From my experience in the previous post, I microwaved the onions for 8 minutes on high, which made them cooked to tender.

I also used the food processor to chop them so they were bits instead of long, thin slices.

Finally, I had no dried currants so I used three dried prunes.  I cut them into slices with a knife and added them to the onions in the food processor before they were chopped.

The result was OUTSTANDING.  The prunes added that extra depth-of-flavor and a light sweetness that I have never gotten from using the currants.  The fully-cooked onions were a joy to taste -- mild and subtle.

Overall, my reaction was "I can't stop eating this!"   I received several compliments at the party, including one from a professional caterer who wanted the details of the recipe.

It was even better the next day after it had chilled.

From now on, I will use prunes instead of dried currants for this recipe!

Success!

Sunday, September 1, 2013

Tart in Ymbre Day (An Onion Tart)

At my daughter's behest, I returned to one of my favorite books, Pleyn Delit:  Medieval Cookery for Modern Cooks by Hieatt, Hosington, and Butler and published by the University of Toronto Press.

ISBN 0-8020-7632-7
Her desire?

Tart for an Ember Day

Take and perboile oynouns & erbis & presse out the water & hewe hem smale.  Take grene chese & bray it in a morter, and temper it up with ayren.  Do thereto butter, safroun & salt, & raisouns corauns, & a litel sugur with powdour douce, & bake it in a trap, & serve it forth.

This translates to

2 large onions, peeled and sliced or chopped
1 tbsp chopped parsley
1 tsp chopped sage (less if dried)
3 oz cream cheese  OR 1/2 cup cottage cheese
4 eggs
2 tbsp butter
pinch ground saffron
1/2 tsp salt
2 tbsp currants
1/8 tsp sugar
pinch each ground cardamom, mace
unbaked pie shell

Parboil the onions and herbs; add butter to thoroughly drained onions.  Blend the cheese with the eggs.  Add butter, and remaining ingredients and stir in the onions and herbs.  Bake in a 350 degree oven 30 - 40 minutes, until the filling is set and the pastry lightly browned.

Sans currants
The Free Dictionary gives this definition:

Em·ber Day  (mbr)
n.
A day reserved for prayer and fasting by some Christian churches, observed on the Wednesday, Friday, and Saturday after the first Sunday of Lent, after Whitsunday, after September 14, and after December 13.

In the medieval era, it wasn't for fasting as much as it was for avoiding meat but dairy products were permitted.   This is a medieval vegetarian dish!

*****
Credit Where It Is Due
My daughter shopped for, prepared, and cooked this entire recipe!
***** 

She makes her own pie crusts (see recipe below) which she then rolled out and patted into her pan.

"Parboiling" means boiling until barely tender, so she modernized the cooking of the onions by microwaving them for about 7 minutes after peeling them and cutting them in half.  Once they were cool enough to handle, she sliced them thinly.  The parsley was also microwaved for about a minute.

She blended the eggs and cheese by hand and noted that they would have blended better if the cheese had been warmed to room temperature.  Or perhaps they could have been mixed by a machine.  Once everything was mixed, into the crust it went.


It baked for 40 minutes and came out as per the recipe description.

Fresh out of the oven
However the middle was still pretty gooey (although set), so she put it under the broiler until the surface was bubbly and there was more browning.
Fresh out of the broiler
This looked much better and was cooked through.

The Verdict

This is tasty; much like a quiche.  The filling was a lot like creamy scrambled eggs with a herby, savory undertone.  I liked how the onions were just slightly crisp but not so much as to have a strong onion-y bite.  Some who tried it thought the onions could be cooked a little more.


Overall, a success!  It was good for dinner and the leftovers were good the next day for breakfast.  Paired with a salad (green at dinner or fruit at breakfast), it would be an excellent main course.  It could also be cut into little slices and served as an appetizer, although then I would chop the onions instead of slicing them.

______________________________________________

The Pie Crust

She uses this recipe:  http://allrecipes.com/recipe/flaky-food-processor-pie-crust/


Please look at this website for the ingredients and instructions.  She loves it because it is so very simple to put together and works every time.  She just might have me converted!

Looks simple enough!
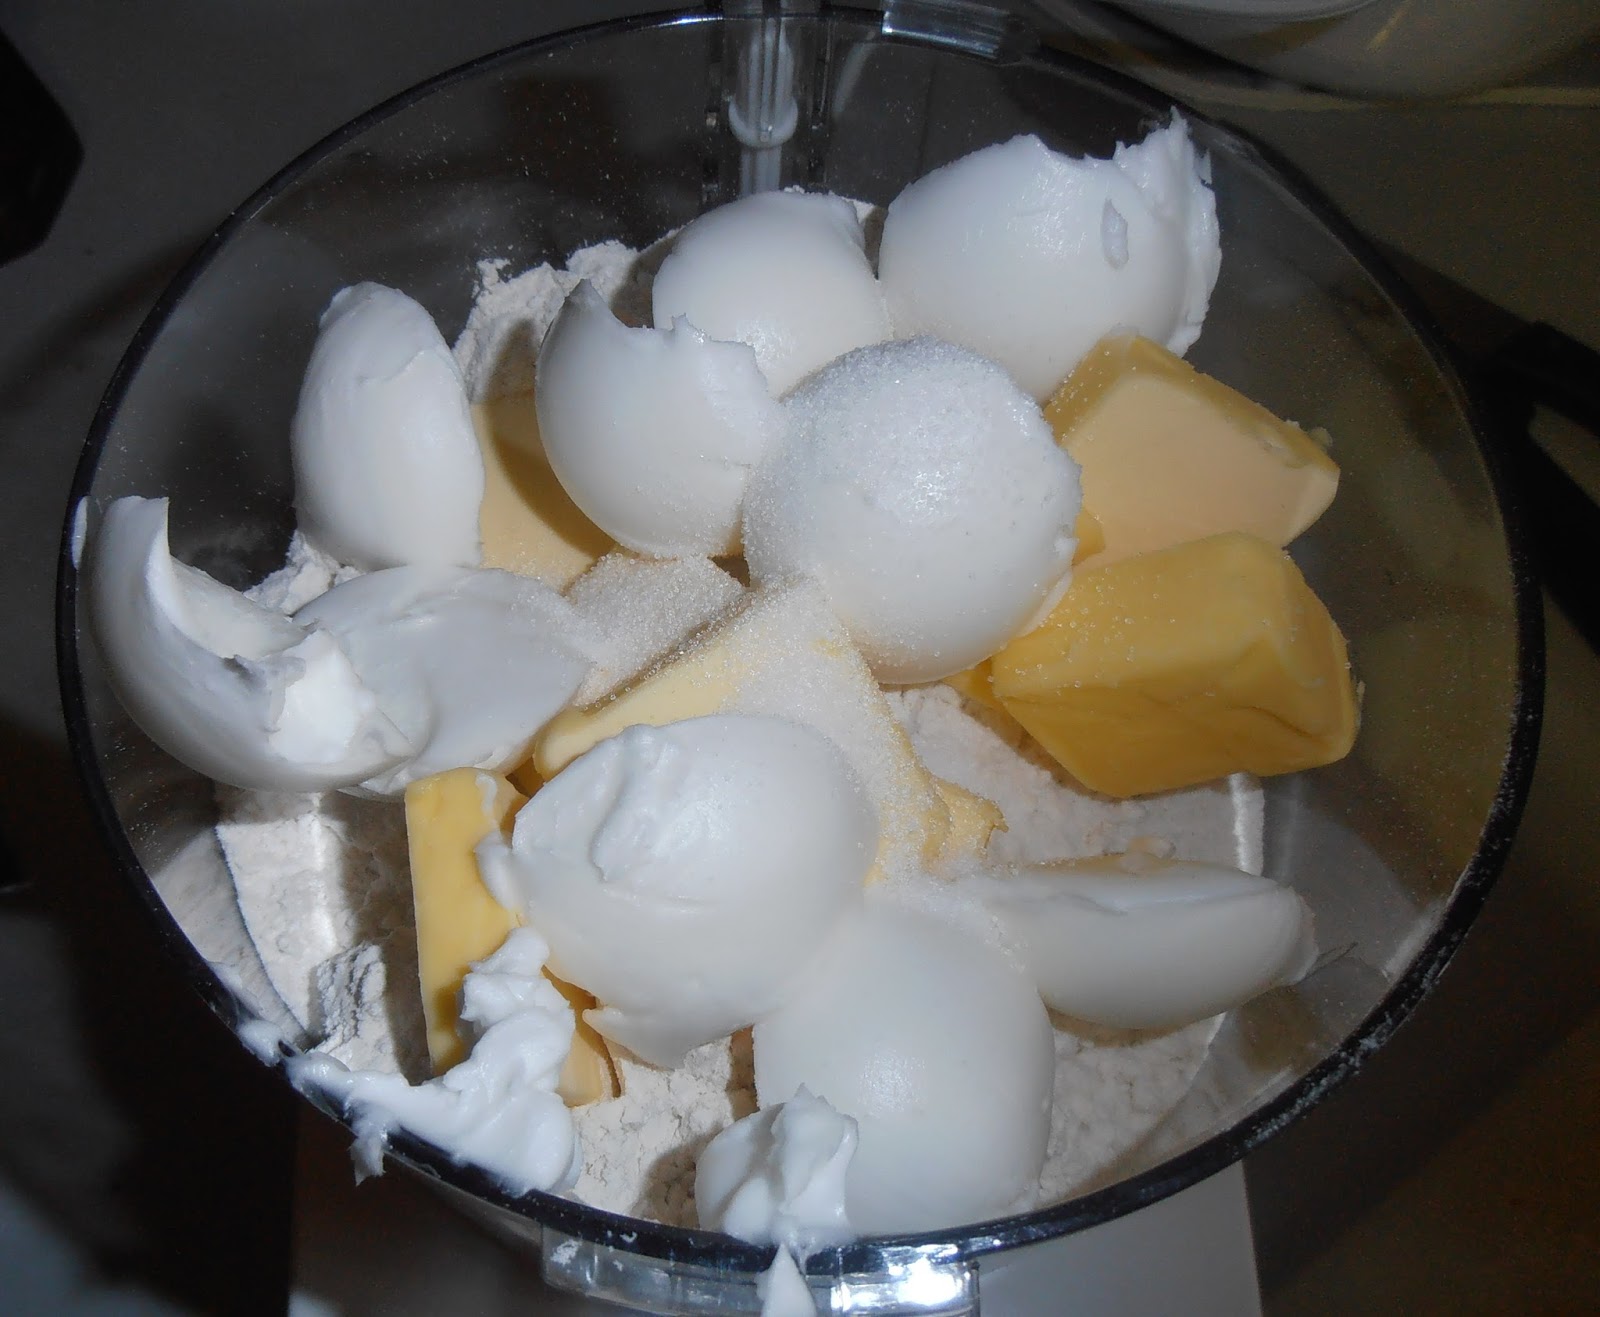
Those aren't hard-boiled eggs but spoonfuls of shortening


After the prescribed pulsing
Lovingly squeezed by hand

Thursday, August 15, 2013

Bone Marrow -- No, really!

My daughter is an anthropologist and tried bone marrow as part of a Paleolithic archaeology seminar.  Of course she wanted me to try it, too!  I was dubious.  My imagination said this was going to be weird, maybe slimy or with some other unwelcome texture.  And I thought the flavor would be... off....

But I am a foodie and I felt I would lose credibility if she offered it and I refused.

Her recipe is not historical.  But the idea of eating bone marrow certainly is and I have seen many recipes in the old books.  So here is her take on it with my reactions.

http://freshlocalandbest.blogspot.com/2011/03/roasted-marrow-bones-with-lemon-parsley.html

Roasted Bone Marrow with Lemon Parsley Sauce

From New York Times via High/Low Food Drink 


Ingredients
  • 8 to 12 center-cut beef or veal marrow bones, 3 inches long, 3 to 4 pounds total
  • 1 cup roughly chopped fresh parsley
  • 2 shallots, thinly sliced
  • 2 teaspoons capers
  • 1 1/2 tablespoons extra virgin olive oil
  • 2 teaspoons fresh lemon juice
  • Coarse sea salt to taste
  • 4 1-inch thick slices of country bread
The olive oil avoided having its picture taken
Method

  1. Preheat oven to 450 degrees. Put bones, cut side up, on foil-lined baking sheet or in ovenproof skillet. Cook until marrow is soft and has begun to separate from the bone, about 15 minutes. (Stop before marrow begins to drizzle out.)
  2. Meanwhile, combine parsley, shallots and capers in small bowl. Just before bones are ready, whisk together olive oil and lemon juice and drizzle dressing over parsley mixture until leaves are just coated. Put roasted bones, parsley salad, salt and toast on a large plate. To serve, scoop out marrow, spread on toast, sprinkle with salt and top with parsley salad.
Serves 4.

*****
Credit Where It Is Due

My daughter did all the shopping, preparations, and cooking here.  : )

*****

I guess there was a run on bone marrow that day because she went to two different sources and could only find the two bones -- and that was after asking the butcher to cut some for her.  We made do with what was available.


She made a little tray out of foil to hold the marrow and placed it all on a cookie sheet.


While the marrow was roasting, she put together the parsley salad.


During the 15 minutes of roasting, the kitchen began to smell like the best meaty roast you have ever smelled.  My tastebuds began to water!


The bones were sitting in a puddle of yellow oil that people have described as "meat butter".  We scraped out the little bit of brown marrow we could get, spread some of it on the bread as well as dipping the bread into the oil.  


There was more marrow in the bones than just this!
The Verdict:  I tasted it without any of the parsley salad.  Oh.  My.  The flavor was rich, meaty, buttery.  I had no problems with the texture:  it was just like eating garlic bread, but much, much better.  Marrow is perfect to put on bread.  The only thing it needed, really, was a bit of salt.  I could have eaten it all just as it was.  Success!


Here it is with the salad.
This tasted excellent, too.  The parsley, capers, and shallots blended well together with the olive oil and lemon dressing.  They complimented the meaty marrow flavor and had just enough acid bite to make it sparkle.  I sprinkled a little salt over the top of it all.
I think the only thing I would do differently would be to chop the parsley and shallots finer, so they sat easily on the bread. 

I feel I have successfully retained my Foodie title while getting to know an historical food source that was much tastier than my imagination allowed for.  This is definitely a repeater and a fun way to challenge my dinner guests' sense of adventure!

Thursday, August 1, 2013

Lyonnaise Potatoes

I have a lovely book, Dining on the B&O -- Recipes and Sidelights from a Bygone Age, by Thomas J. Greco and Karl D. Spence.

ISBN 13:  978-0-8018-9323-0
Published in 2009 by The Johns Hopkins University Press and written in association with the B&O Railroad Museum, it is a compilation of recipes used on the B&O Railroad dining cars, many of which came from other sources and contained notes from the chefs who used them.  The authors believe they were compiled in the 1930s or 40s, with the chef notes added possibly in the 1950s.

I like what the authors said about the company's attitude:  "The Baltimore and Ohio viewed its passengers as friends and family and did what any good host would do:  strove to make them feel welcome aboard its trains." (pg. 3)

Apparently it worked:  "The Baltimore and Ohio Railroad was noted for its dining car cuisine and service.  The Dining Car and Commissary Department rarely turned a profit, but the railroad believed that if it provided superior dining and impeccable courtesy, it would attract passengers, shippers, and investors." (pg. 3)

What amazes me is the description of the kitchen.  "Entrees were prepared from scratch in a kitchen that occupied a space about 16 feet long and only 7 1/2 feet wide. ... The kitchen was a marvel of efficiency, with only a few feet between the oven, broiler, charcoal grill, and steam table on one side and the icebox, sinks, and vegetable storage on the other.  No space was wasted..." (pg. 3)

The recipe I decided to try was originally taken from Charles Fellow's The Culinary Handbook, published in 1904.  It is considered "the first purely American institutional cookbook" because Mr. Fellows attempted to reduce the French influence in the American kitchen.  He focused on "no-frills mid-western cooking methods."  (pg. 9)  His book can be downloaded here:  http://ia700506.us.archive.org/8/items/culinaryhandbook00felliala/culinaryhandbook00felliala.pdf

Lyonnaise Potatoes (pg 111 in the B&O book)

Cold boiled potatoes, either minced or sliced thinly, seasoned with salt and pepper, mixed with a little chopped parsley and fried onions; fried with butter in the form of an omelet.

Chef's Comments
Ingredients for 4 servings

2 Potatoes, boiled, cold
3 tablespoons Butter
1 Onion, 1/4-inch dice
4 tablespoons Parsley, fresh, chopped fine
Salt and Pepper, to taste

Peel the potatoes and place in a pan of cold water.  Bring to a boil and reduce to a simmer for 10 - 20 minutes, depending on the size.  When the potatoes are tender, drain them thoroughly and cool.  Then mince or cut into thin slices.

Melt the butter in a frying pan over medium-high heat and fry the onions until they are soft and beginning to turn translucent.  Add the potatoes, chopped parsley, salt, and pepper to the pan and fry, turning with a spatula until evening browned.  

This recipe can be made without simmering the potatoes, but the frying time is a bit longer.  Add the onions and potatoes to the pan at the same time, cover, and lower the heat for 10 minutes or so, then add the parley, salt, and pepper.  With the pan covered, cook until brown and tender.

Dried parsley can be substitutes for fresh; cut the amount to 2 tablespoons.  If the potatoes seem to be getting too dry while cooking, add a little more butter to keep them nice and moist.


I updated the recipe just a little:  Instead of boiling the potatoes, I microwaved them until they were cooked through.  Then I chilled them in the refrigerator.  This was done a few days before I needed them.  It seemed to me that the point was to start with cooked potatoes, so boiling, baking, and microwaving were all valid options.  Also, I didn't peel the potatoes.

So basically I started with cooking the onions and proceeded from there.

Slow cooking makes them sweeter
Once they were starting to look translucent, and smelling heavenly, by the way, I added the rest of the ingredients.


I noticed I needed to scoop carefully with a spatula and turn the potatoes to keep them from breaking up too much while cooking.

The directions, "until evenly browned", I interpreted as "Let sit in the skillet until they smelled good and were crusty" and that was a good decision!


The Verdict
This dish is not pretty to look at.  It does not contain fancy ingredients.  But it sure is tasty and was a marvelous side dish to the Paper Pork (see the July 1, 2013 post).

The onions make the dish.  Because they are cooked so much they are sweet and add little blasts of oniony flavor to offset the blander potato.  I was concerned at first about using an entire onion with only two potatoes but that is just right.  You need lots of onion here!

The butter keeps everything moist and the salt and pepper give it a needed kick.

Normally I fanatically put tomato ketchup on anything potato-related (not baked, though!) and was surprised to discover this dish didn't need it.

So "Success", definitely.  I think it would be a good accompaniment to any robust meat dish because it will not compete with it.

It seemed that Lyonnaise Potatoes would be good also with paprika or bacon or ham added to it.   

Monday, July 29, 2013

Rosemary Tea Sherbert, Take 2

This time I'm following the Rosemary Tea recipe that I missed in the previous post,

Rosemary Tea (page 150):  "Pour one pint of boiling water on a heaping tablespoonful of young tips." 

to try the Rosemary Tea Sherbert recipe again:


Rosemary Tea Sherbert

Prepare two cups of rosemary tea; mix a half cup of sugar and a half cup of water, let it come to a boil, add a tablespoon of lemon juice and a half cup of orange juice, mix with the tea and freeze.  Serve in sherbet glasses.

Everything else remained the same -- and I have to say that I really like how easy it is to prepare the mixture for freezing -- but I wanted to show you the amount of fresh rosemary that I used:


While it steeped, I made up the sugar, water, and juice mixture.  Then I strained the tea, mixed in the juices, and set the whole thing in the freezer.  Easy!

After it was frozen, with the appropriate stirring, I gave it a taste.

The Verdict
Take 2 definitely had a better balance between the rosemary and citrus flavors.  The rosemary was there but I could taste the orange better.  The lemon was not distinctive but added some sparkle.  The sweetness level was just right.  I declare it a success!

This is not your child's sherbert dessert.  It is more sophisticated.  It would be a nice accompaniment with roasted beef, chicken, or turkey.  I think it should be served just before the meat course.


Update on Take 1
Tasting the stronger rosemary tea sherbert today was interesting:  The flavors were definitely muted as compared to yesterday.  I asked my two visitors to try it and they both liked it very much.  One is a big fan of rosemary and did not think it was too strong at all.  The other thought it was fine and was surprised to think of rosemary in a sweetened dish.


My Conclusion
I think you probably can't go wrong with using any amount of fresh rosemary between the suggested one heaping tablespoon and my experimental half cup.   But judge your audience -- if you don't know that your dinner guests are accustomed to herbal flavors, use the smaller amount and make the rosemary a hint.

If I were to modify this recipe at all, I think I would throw in some lemon zest to perk it up more.  Come to think of it, I think that I would like to make some rosemary bread with some lemon zest added to it.  Mmmmm.....


Sunday, July 28, 2013

Rosemary Tea Sherbert, Take 1

Recently I visited a particularly dangerous place:  a used book store.  It seems the cookbook sections are designed with hooks and lures, and I get reeled in every time.  Stores that sell only new titles are similar, but I've noticed that used books have a hypnotic effect.  I can't walk away without at least looking at every title.  Often one or more books end up in my hands and thus into my collection.

This was a new store for me and I walked away with three books; a return trip concluded with three more.  It looks like it is time to make room on the shelves!

One of the six is entitled Flower Cookery -- The Art of Cooking with Flowers.

No ISBN; the Library of Congress Number is 67-24072
The author is Mary MacNicol and the book was published in 1967 in New York by the Fleet Press Corporation.

What makes this book intriguing is that it is a collection of literary references involving flower use in cooking and medicine.  Some entries are tips,

     "Rosemary is good for many things:  it will make the hair grow, it is a nerve tonic and stomachic, 
     will cure vertigo, strengthens sight and memory, and is a cordial for the heart."

some are quotations,

     "There's Rosemary, that's for remembrance,
     I pray you love, remember"  -- Shakespeare, Hamlet

and some are recipes (page 154),

Rosemary Tea Sherbert

Prepare two cups of rosemary tea; mix a half cup of sugar and a half cup of water, let it come to a boil, add a tablespoon of lemon juice and a half cup of orange juice, mix with the tea and freeze.  Serve in sherbet glasses.

I remember rosemary...

Since I had no idea how, exactly, to make rosemary tea, I guessed.  Mostly I kept in mind that any frozen dish must have the flavors be more intense before it is frozen, since the cold dulls the taste.  So I took about 1/2 cup (not packed) of fresh rosemary leaves stripped from the stems, and steeped them for 20 minutes in two cups of boiling water.

Steeping beauty

While the tea was steeping I cooked the sugar and water, stirring to mix before the heat was applied, and bringing it to a full, roiling boil.  Then I turned off the heat and added the orange and lemon juices.

The scent off the rosemary tea was lovely and made me want to inhale deeply.  I strained the tea into a bowl and stirred in the juice mixture.


The bowl made the mixture wide and shallow; I thought this will make it easier to stir as it freezes.  The timer was set for thirty minutes for a stir and a check after the bowl went into the freezer.

I tasted the cooled mixture after the first 30 minutes; the flavor was an expected rosemary-citrus that was certainly pleasant but the rosemary was too strong for me.  This was a good sign since it was still liquid.

After about 2 hours, ice crystals were forming and it was good to stir the mixture every 30 minutes.  Once there was no more liquid, it looked like soft snow and I gave it a taste test.


The Verdict
The rosemary flavor was dominant, almost to the point of being too strong.  I love the taste of rosemary, so this wasn't an issue for me, however I suspect it would not be right to serve to guests who did not share my enthusiasm.  The underlying flavors of citrus and sweet were alluring and I would guess it would be an excellent item to serve if the rosemary was more of a hint.  It could be a dessert or, better yet, an appetizer or a palate-cleanser between courses.

I would call this a success but with limitations. The pairing of rosemary with the citrus is just right.


It was a little embarrassing to peruse the book some more and find their recipe for Rosemary Tea (page 150):  "Pour one pint of boiling water on a heaping tablespoonful of young tips."  I want to try this recipe again using this to see if my suspicions are true. 


Monday, July 1, 2013

Paper Pork

Boneless pork chops were on sale the other day and I came home with a package of ten.  This was sufficient to motivate me to find a fun and interesting recipe for this blog!

Actually, I found two very similar ones.  Both were in Thomas Jefferson's Cook Book, by Marie Kimball, on page 59.

ISBN: 0-8139-0706-3

One was for veal cutlets and the other was for lamb chops.  I figured they would work well with pork chops, so I tried them out.

Veal Cutlets in Papers

Take 2 pounds of veal cutlet, in 2 cutlets, and flatten well.  Butter a sheet of paper, sprinkle with bread crumbs, mushrooms, and herbs chopped very fine.  Salt and pepper.  Butter two other sheets of paper and put under the first.  Lay your cutlet on, twist your paper round in the form of the piece and tie it with a short piece of thread.  Do the same with both cutlets.  Put in a baking pan and bake one hour in a moderate oven.  When they are done, remove outer paper.  -- Annette

Another Way

Take 6 lamb chops, put each in sheet of paper that has been well buttered on the inside and dipped in water to prevent burning.  Season with salt, pepper, and bread crumbs.  Roll them in the papers to preserve the gravy, tying the ends of the paper neatly.  Bake in a moderate oven three-quarters of an hour.  Serve them in the papers.  -- Volney

I used parchment paper.  My pork chops were pretty thin, so I didn't flatten them at all.  I tried one version with the three layers of paper but my thoughts were that they weren't needed -- one would be enough.  The other four used just one piece of paper.

These recipes reminded me of a dinner I fixed with my Girl Scout Troop years ago, so I wrapped the other five chops in aluminum foil.

Each paper/foil sheet was buttered over a wide area, then sprinkled with dried bread crumbs and sprinkled with salt and pepper.  Then I played with the flavorings:  one had mushrooms and chives; the others had one of the following herbs: basil, lemon thyme, lovage, or lemon balm.  I love my herb garden!
Mushrooms and chives
The pork chops were last to go on.  
Next step:  enclosure!
The first packet, with three layers of paper, I gathered up like a pouch and tied it off.  The rest I folded two sides together and then brought the other two sides up and over so I had a flat purse.

String is knotted
String can be untied by pulling on the short end

All were nestled onto a baking sheet and put in a 350 degree Fahrenheit oven for 30 minutes.  That was a good amount of time and maybe could have been shortened to 20 minutes since the chops were so thin.  

The Verdict:  MOIST.  Tender.  Flavorful.  Juicy.  All the words that normally I don't use on pork chops because they tend to be dry and chewy.  Success!  I tried two packets:  one foil with lovage, which was good but the lovage flavor was unusual to my taste buds (it is a new herb to my garden).  The other was the original packet with chives and mushrooms and it was superb.

Camouflage chop!
The butter did its job to keep the chop from sticking to the paper or foil.  The breadcrumbs did their job of soaking up the juices and holding the flavors close to the meat.  

I think this would be a fun dish to serve to company.  I can imagine sending around a platter with these little packets that each guest would pick up and unwrap at their plate.  Be sure to have a bowl handy to hold the used wrappers.

The only thing I would change is that I would put some bread crumbs and herbs/spices on top of the pork chop, too.  The underside of the chops was the prettiest so I flipped each one as I scooped it out of its wrapper.  Upon rereading the second recipe, I think it is telling me to put the seasonings on top.


Cookies Consent

This website uses cookies to offer you a better Browsing Experience. By using our website, You agree to the use of Cookies

Learn More