Thursday, April 15, 2021

Barebottom Cheesecake

What do you think of when you have a huge chunk of cream cheese that is threatening to go bad on you?  Well, I thought of cheesecake.  The next thought was, "Which cheesecake recipe?"  You see, I have a copy of The Joy of Cheesecake by Dana Bovbjerg and Jeremy Iggers, and it gives me many, many luscious options.

ISBN 0-8120-4278-6

What was I in the mood for?  Heavy?  Light?  Custardy?  Marbled?  Flavored with spices or fruit?  

It ended being decided by how much sour cream I had in the house.  With a little less than 2 cups, and not having any heavy cream, I had to limit myself to the recipes that required less than those two.  

I chose the Barebottom Cheesecake on page 84:

We call this one the Barebottom Cheesecake because it works well even without a crust -- great if you are in a hurry or if you don't have any crumbs on hand.  This is one of the cheesecakes we test on the customers of the Sheepshead Cafe in Iowa City.  It proved to be one of the most popular ones ever served there.  

With a recommendation like that, how could I resist?  I chose to skip the crust and make it truly bare bottom.

Barebottom Cheesecake 

1 1/2 pounds cream cheese

1 cup granulated sugar

2 tablespoons all-purpose flour

6 large eggs, separated

2 teaspoons lemon juice

1 teaspoon vanilla extract

1 cup sour cream

That is a big chunk of cream cheese!
1.  Preheat the oven to 325 degrees.

2.  In a large mixing bowl, beat the cream cheese, sugar, and flour until light and fluffy, about 5 minutes.

3.  Add the egg yolks, one at a time, beating thoroughly after each until the mixture is smooth and blended.

4.  Add the lemon juice and the vanilla, then also stir in the sour cream.

5.  Whip the eggs whites until they form soft peaks, then fold into the cream-cheese mixture.

6.  Pour the mixture into the prepared crust or into an ungreased baking pan and bake for 1 hour, 10 minutes, until the center of the cake is firm.

7.  Cool the cake in the oven for 1 hour, with the door cracked open, then cool to room temperature.  Chill.

My Notes

I used my 9-inch springform pan as they recommended.  Since I was not doing a crust, I left it ungreased.

I chose to use vanilla sugar instead of regular sugar because I could.  I still put in the full measure of vanilla extract, though.  I love vanilla!

Before beating

The cream cheese, sugar, and flour were beaten for five minutes because I used a timer.  The mixture looked light and fluffy as required.

After beating

I had put all the yolks into one cup because I didn't read ahead in the instructions, but I used a tablespoon measure to scoop them out for the "one at a time" requirement.  They made the mixture a delightful soft yellow color.

The mixture was moved into a very large mixing bowl and the metal bowl was washed to ready it for the egg whites.  I think I took them to the firm peaks stage (past soft peaks) but I hoped it wouldn't be a problem.

It was a lot of mixture to fold in with the egg whites.  My experience is that it is easy to miss folding in the batter near the sides and especially at the bottom, so I put in extra attention on those areas.  Once it looked like there was no batter anywhere that didn't have egg white in it, I declared it folded.

The quantity of the batter was absolutely perfect for the springform pan.  I was astonished at how well it fit.  

A Perfect Fit!

It went into the oven while I promised myself not to open the door at all until the 1 hour and 10 minutes mark had passed.  It smelled good while it was baking!

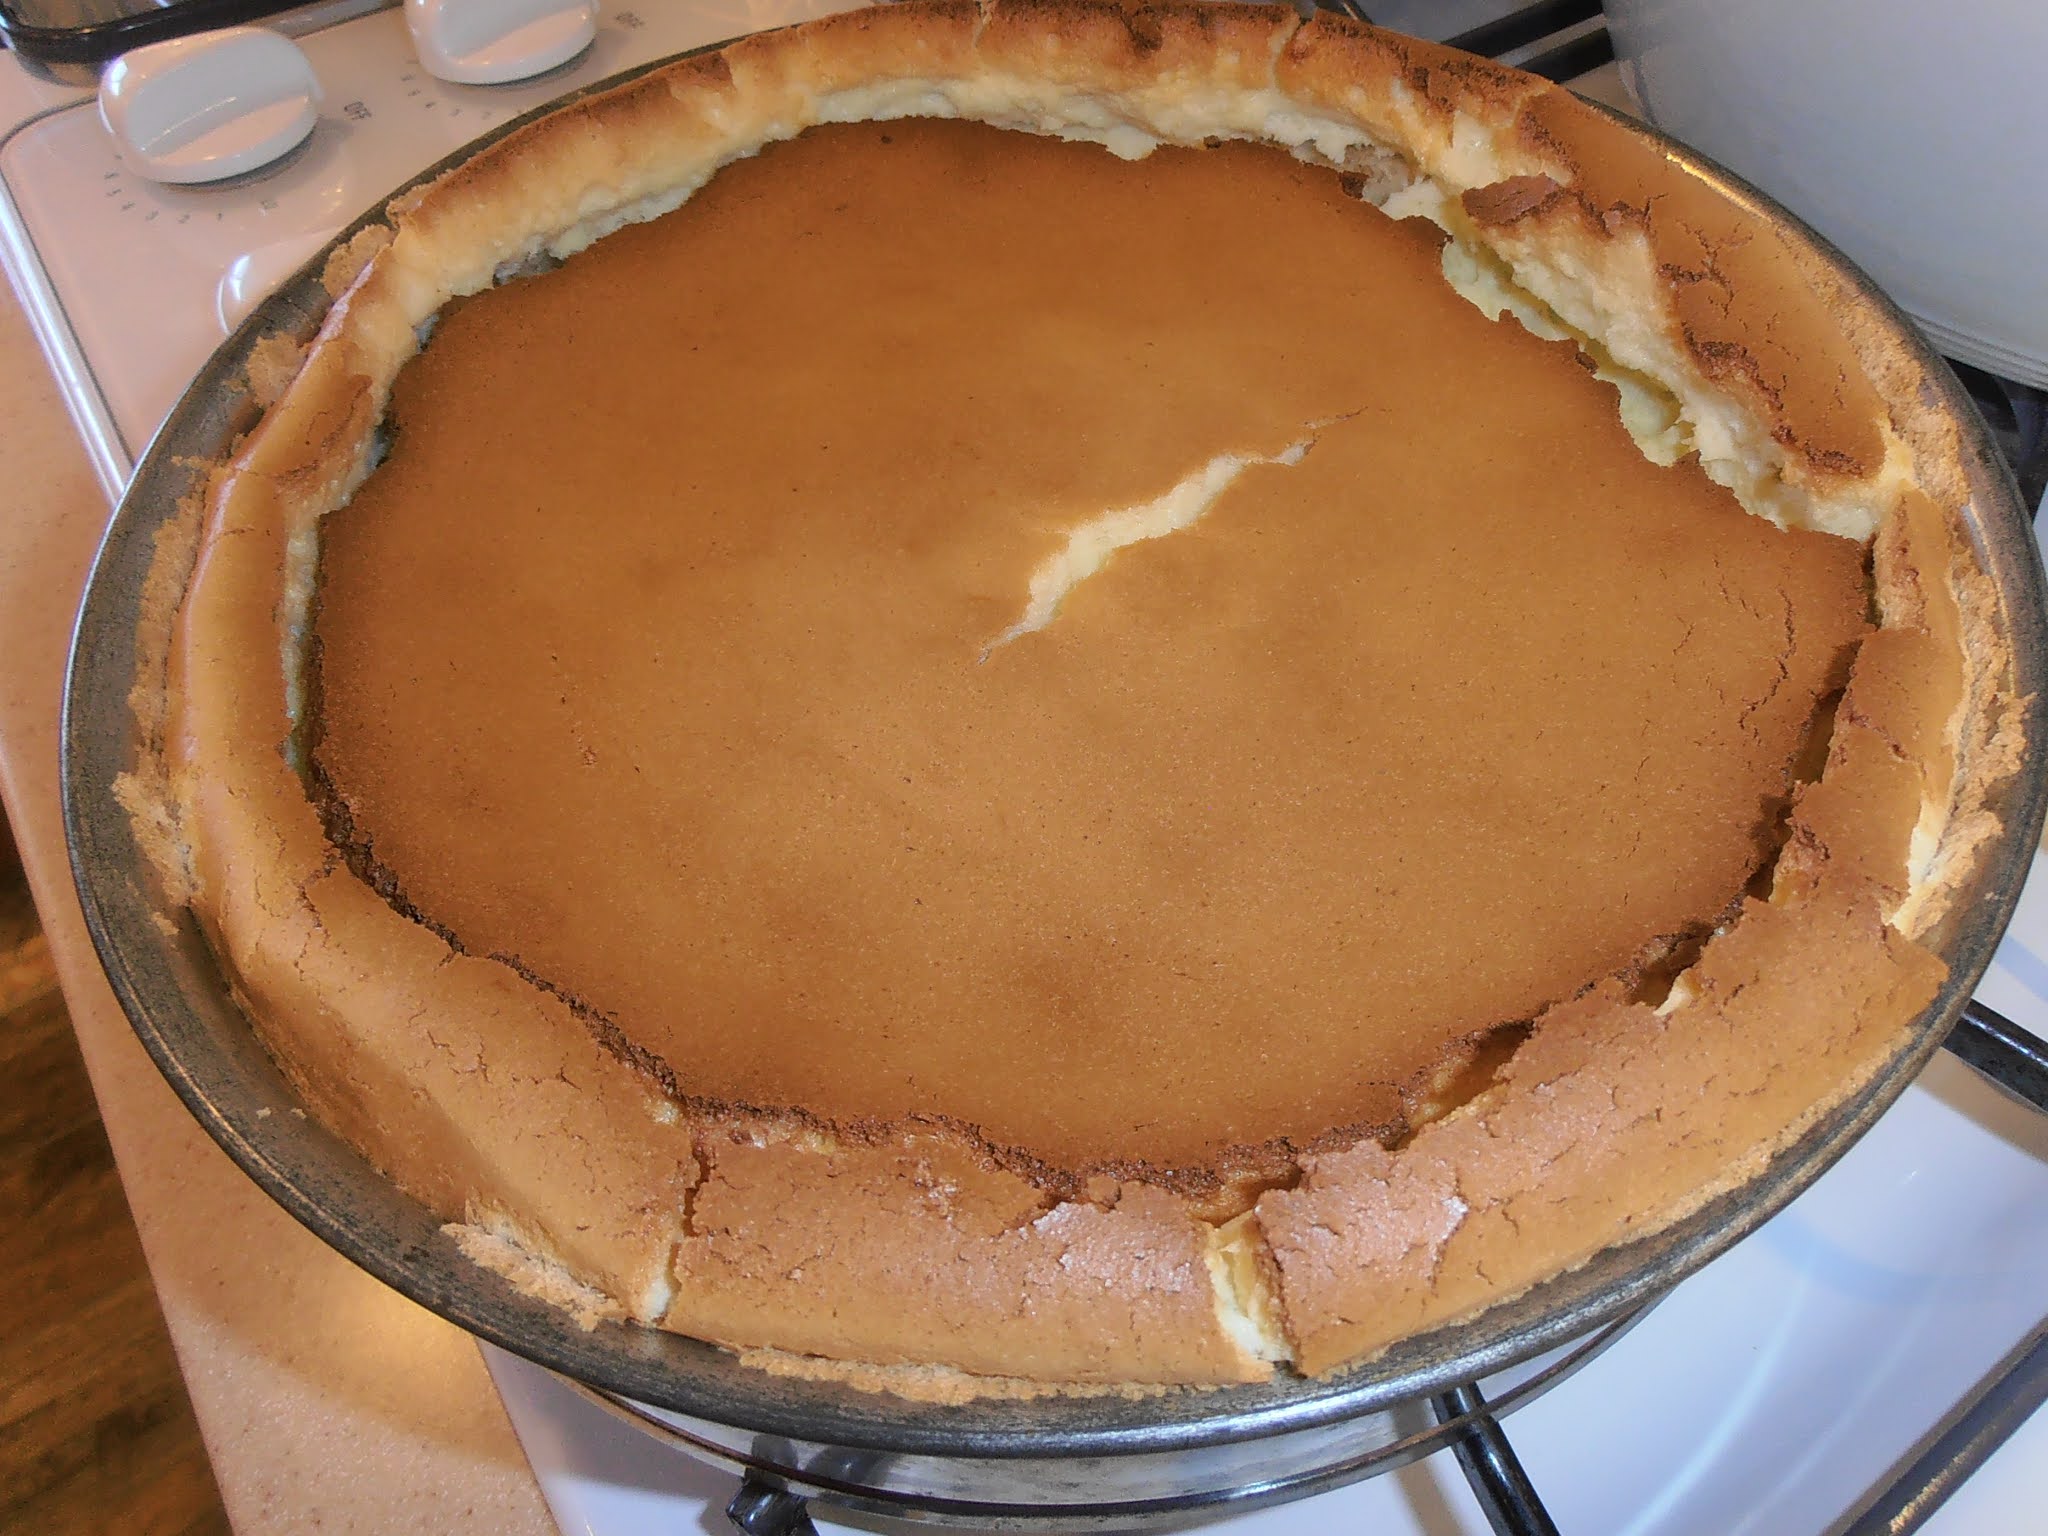
I have to admit that this result is not what I was expecting:

Right after baking.

A very brown top and sides, the uniform tearing around the perimeter.  Well, at least the center was firm!  Perhaps I could have turned off the oven earlier but I wanted to see how this would turn out.

It cooled in the oven for one hour with the door open just wide enough for the handle of a wooden spoon to fit.

And then it sank.

After cooling in the oven for one hour.

I saw it sink more while it was cooling to room temperature.


The Verdict

My guest taster and I tried it without chilling it.  


It was hard to remove a piece without it falling apart, but then again, I didn't take off the springform ring.  So much was stuck to it that I wondered if the cheesecake would hold together or be torn apart if I removed the ring.  Also, I felt I needed to leave it on when it went into the refrigerator.  I will try that after the cheesecake has chilled.

How did it taste?  I was concerned the brown top would taste overcooked, but it didn't.  It was firm and a little toasty in flavor but not burnt or scorched or bad.

The interior texture was smooth, and each bite was so very light and yet was also moist, which we both liked.  It was almost like eating nothing.  One piece did not fill me like some cheesecakes do.

The lemon and vanilla came through, but very subtly.  There was also the cheese flavor but not strongly so.  Honestly, it was like eating light, tasty clouds.

We discussed the idea of adding a topping, like raspberries or a fruit compote, which we thought would be nice but truly not needed.  My guest taster said this was a "stand alone dessert."  I agreed.  It was fine even without a bottom crust.

The parts of the cheesecake that stuck to the sides of the pan were drier and more eggy in flavor.  Not bad, just not as nice as the moist interior.

Would I do this again?  Yes.  I call it a success.  But I would be more careful about getting the egg whites to just soft peak.  Did taking them further cause this to rise and fall so much?  I don't know but the description didn't mention this could happen, so I would guess that was the problem.  I would like to have the whole cake as moist and tender as the center was, and to avoid the drier parts that stuck to the ring.

We had a piece after it had chilled, too.  It was still wonderful and was nicely accompanied by a sherry-based liqueur.


Thursday, April 1, 2021

A Stew that Stains the Tablecloth -- Manchamanteles

Lately I have been exploring Encarnación's Kitchen, a book of "Mexican Recipes from Nineteenth-Century California".  Its recipes are a portion of those in La Cocinero Español, "The Spanish Cook," written in Spanish by Encarnación Pinedo and published in 1898.  Encarnación's Kitchen was edited and translated by Dan Strehl.

ISBN 0-520-23651-3
Ms. Pinedo's book is important because it is the first published book of Californio recipes.  It gives us insight into the culture of the people who lived and thrived in California during its Mexican period, pre-Gold Rush.  There are decidedly Mexican recipes but you can also find ones with Spanish, Basque, French, and Italian influences.  She also includes recipes that use more locally specific ingredients, like the candied fruit of the barrel cactus.  

Mr. Strehl's translation includes an essay and an introduction which put Ms. Pinedo's work into historical context.  Well worth the read!

There are many recipes that are appealing.  What drew my attention were those with chiles.  I have lived most of my life in Southern California but I have never truly cooked with chiles.  This was an opportunity to experiment and improve my knowledge.

I chose Manchamanteles, which is on page 108 of Strehl's translation.

Manchamanteles  -- Stew That Stains the Tablecloth

Take some ripe tomatoes and remove the seeds.  Grind them with soaked, toasted dry chiles, cinnamon, and pepper.  After they are ground, fry in lard, mix with warm water, and add chickens or pork, cooked sausages, olives, vinegar, salt, a lump of sugar, yams, or peanuts.


My Redaction

2 ounces dried California type chiles
2 pounds, 9 ounces Roma tomatoes
1 scant teaspoon peppercorns
2 teaspoons ground cinnamon
4 ounces beef chorizo
1 pound, 6 ounces braised boneless pork
1 pound, 2 ounces yam
1/2 cup chopped peanuts, roasted and lightly salted
1 tablespoon sugar
1 tablespoon apple cider vinegar
1 teaspoon salt
1 cup chopped black olives

And the chiles.  See below.

My Notes

The tomatoes, chiles, pepper, and cinnamon form the sauce in which all the other ingredients simmer to make the stew.  My challenge was learning how to handle the chiles.

I read a lot about the different dried chile types and decided to pick the least "hot", the California or anaheim type.  That way my newbie taste buds received an easy introduction.

If you look carefully, you can see some red highlights.

To learn how to toast them, I found this website, How to Toast Dry Chile and Spices:

Heat a heavy-duty skillet (such as cast iron) over medium-high heat until you can feel the heat radiate from the surface. Working with one type of spice or chile at a time, add it to the skillet. Flip or stir frequently for even toasting, until browned for spices or lightly charred—not scorched—for chiles. Immediately transfer to a cool container.

So I heated up my cast iron skillet and tried toasting one chile, watching it carefully so it didn't char.  I used tongs to regularly flip and turn the chile.


I noticed that the chile originally was stiff, easily broken, and flat.  While it was heating, it became noticeably softer, flexible, and began to puff.


It was hard to see any changes in the color because it was originally so dark, but after toasting several, I noticed those changes as well as a slight change in the way the surface looked.  Just the parts that touched the pan seemed to toast.


I started gaining confidence and so started putting in two and sometimes three chiles at a time.  The bag I purchased contained three ounces of chiles.  I toasted them all but only used two ounces in the stew.

One puffed so much it popped!
Further reading across a variety of sources told me that to soak them, I needed to remove the stems, veins, and seeds and also to rinse the chiles well of any dust or grit.  After some experimenting, I found that I could break off the stem area, where most of the seeds where, then break the rest of the chile into pieces while rinsing out the seeds or pushing them out with my fingers.

The broken, seeded chiles were placed in a bowl and covered with boiling water.


I let them soak for an hour while I prepared the rest of the ingredients.  Then I drained them.


They were soft, flexible, and smelled good.  I noticed a few seeds but didn't worry about it.

I removed the stems and seeds of the tomatoes and cut them into big pieces.  Then I processed them in the blender to make four cups of puree.

Pretty in pink!

Once the chiles were ready, I put them into the blender along with some of the tomato puree and the cinnamon and pepper.  I blended them until the mixture was smooth.  I poured some of it out and added in the rest of the tomato puree so it was all well mixed.  The taste was of raw tomato with a mild chile bite.  I could taste the spices but they weren't overwhelming.  

The sauce went into my Dutch oven that was heated and had about 1 tablespoon olive oil in it (I was out of lard).


I decided that "frying it in lard" really meant to heat the sauce and cook it a little before the other ingredients went in.  I brought it to bubbling over medium heat and then let it simmer over a lower heat for 10 minutes, stirring occasionally.

The braised pork chunk was cut into bite-sized cubes, the yam was peeled and diced, the chorizo was cooked in the skillet and then drained of its fat.  The whole olives were sliced and the peanuts were coarsely chopped.  

Once the sauce was ready, all the other ingredients were added and the mixture was stirred.  It looked too thick so I added a little hot water so it stirred easily.

I adjusted the heat to low, covered the pot, and let it simmer for about an hour, which is what it took to make the yam cubes soft.  Occasionally I stirred it.

The Verdict

I served it with a garnish of chopped peanuts and with warm flour tortillas on the side.

My guest taster and I were a little wary because neither of us are experienced hot chile eaters.  We both knew - intellectually - that I had chosen mild chiles but the chorizo certainly had a kick.  

So we took experimental bites and were pleasantly surprised at the flavor.  The chile heat was mild enough for us but it was there.  The pepper and especially the cinnamon were good background support flavors.  The chunks of ingredients -- pork, yams, olives, and peanuts -- were tender and had absorbed enough of the sauce flavors to be interesting.  The yams came across as slightly sweet.  The raw tomato taste was gone and the spices and other flavors had blended into a nice balance.

The sauce itself had a light sweetness to it, which we enjoyed.  We both decided it needed more vinegar, although we liked it as it was, too.  We ended up putting some aged balsamic vinegar on top and that was wonderful.  I think I would increase the apple cider vinegar to 2 tablespoons and perhaps put the second tablespoon in just before serving it.

The flour tortillas were a good accompaniment and actually the historically correct choice.  Ms. Pinedo lived in Northern California where it was easier to grow wheat than corn.  We each tore off pieces of the tortilla and spooned the stew onto it.  

Success!  I was pleased I handled processing the chiles well and that I didn't blast out our taste buds with too much heat.  If you want more heat, you could use the entire 9 ounce roll of chorizo or you could choose hotter dried chiles, like a pasilla ancho or more.  I bought some pasilla anchos for more experimenting.

For the record, my table did not have a tablecloth, so it was not stained.   


We had the leftovers the next day and found it was even better.  No more vinegar was needed; all the flavors had melded and balanced.  It was excellent.


Monday, March 15, 2021

Tomato Pudding (AKA Pie) - A Shaker Recipe

I laughed when I realized my last six posts were all about desserts or sort-of-desserts.  My sweet tooth obviously took control of my decision-making process!  So I went on a search for something more savory to prepare.

I'm still exploring The Best of Shaker Cooking by Amy Bess Miller and Persis Fuller.  With over 900 recipes, you can understand why it takes time to peruse.  There are so many temptations!  I found a recipe for lamb shanks I would love to make; it is almost time to find lamb shanks in the stores.  Fingers are crossed.

ISBN 0-02-584980-8
This recipe comes from the Vegetable section (See?  No desserts!).  There are twelve tomato recipes; within the recipes they have a quote from a Shaker sister:  "We have tomatoes for every meal -- fried for breakfast, stewed for dinner, soup for supper."  The Shakers were good gardeners and good cooks - which I envy - and their tomato recipes show us how to fry and stew them, but also how to bake and broil them, as well as making dumplings, custard, pie, puddings, salad, and toast.

The recipe specifically labeled as "pie" is basically sliced tomatoes bound together with a mixture of sugar, cream, egg, and nutmeg, and placed between two crusts.  

The recipe I tried is called a pudding.  It is a cooked filling on top of buttered crumbs and topped with a crust.  They offer a second pudding recipe that is similar, using bread cubes on the bottom, crumbs on the top, and the filling has more herbs.  I chose the simpler one to see what the filling is like without all the extras.  Besides, it is fun to make pie crust.  

The recipe source is credited to the Hancock Shaker Village.  Click here to visit their website.

Tomato Pudding (page 158)

4 cups canned tomatoes cooked down to 2 cups

1 cup light brown sugar

1 tablespoon grated onion

1/2 teaspoon salt

1/4 teaspoon pepper

1 cup bread crumbs

1/2 cup melted butter

1 pastry lid for 8 inch pie plate


Combine first 5 ingredients and bring to a boil.  Simmer to thicken.  

In an 8-inch pie dish put bread crumbs, cover with butter, top with tomato mixture, and cover with pastry crust.  Bake in 350 degree F oven for 30 minutes.  Watch to see that bottom doesn't burn (use tip of knife to lift up crust).  Tomatoes burn easily.  Serves 4 - 6.

My Notes

First I made the pie crust dough and let it rest in the refrigerator while I did everything else.

The three cans of diced tomatoes yielded 43.5 ounces instead of the 4 cups = 32 ounces asked for in the recipe.  I decided to use it all and reduce to about half.

Being cautious about burning the tomatoes while reducing them, I keep the heat on very low for a long time.  This wasn't really reducing the quantity, so I turned the heat up after a few hours but watched it carefully and stirred it to make sure nothing was sticking on the bottom.

When it reduced to just under 3 cups (not quite half), I decided it was time to add the other flavors.  I adjusted their measures up a little to match the greater tomato quantity. (Not the sugar.)


To be honest, I was surprised at the amount of sugar listed in the recipe.  (Not that I was complaining, and still not a dessert!)  I wondered if it could be lowered and still taste good.

I also started preheating the oven at this point.

The instructions said to bring to a boil and simmer to thicken, so I put it on medium heat until it started to boil and then put it down to low to just a bare simmer.  I decided that "to thicken" meant to dissolve the sugar and to give the flavors a chance to infuse.  I wasn't sure it would thicken up much more.

It actually did thicken a little more (or was it my imagination?) and it tasted good.  I liked the hint of pepper.  It was a bit sweeter than I expected for a savory recipe.

The bread crumbs made a thick base in the pie pan.

There were no directions to mix the crumbs and the melted butter, just to cover the crumbs.  So I did!  I just poured the butter over the crumbs.

And then I poured the filling over it all.


You can see how full the pan was, which shouldn't have surprised me considering I made more filling that the recipe called for.  I decided it was acceptable because all that was left was to place the crust.

The filling was still very hot and I worried that the crust would be melted if it took me too long to get it "just right" once it was in place.

So I rolled the chilled crust and used an 8 inch cake pan as a guide for where to cut the crust to fit the pie pan.
Leaving an allowance for a decorative edge.

Then I flipped the crust on top of the hot filling and went to work to form the edge.  Boy, did I work quickly!


And then I popped it into the hot oven and set the timer for 30 minutes.

I checked it "using the tip of a knife", barely lifting the crust to see how the filling looked.  It darkened but did not look or smell burned.  I checked after 20 and after 25 minutes of cooking.  

It did overflow the pan - again, not surprising - but I had another pan underneath to catch the drips.

At 30 minutes the crust was nicely browned and it all smelled good.


I let the pie cool to lukewarm before serving.

The Verdict

Cooling allowed the filling to set up and firm before slicing.

I was impressed at how well the layers showed and stayed distinct.


I was also pleased that the tomatoes didn't burn.

I served it with a tossed green salad and a little sliced pork on the side.  It was nice to have the meat be a side dish in this meal.

As for the flavor:  it was good!  A distinctly tomato flavor, with some savory from the pepper and possibly from the onion.  The filling was very moist but not runny.  The top crust added a rich mouthfeel and a crispy crunch.  The bottom crumbs layer added a more chewy crunch, just like a similar crust you find on cheesecakes. 

Success!

Yes, it was sweet but not overly so.  I think you could reduce the sugar by at least 1/4 cup and still have a good result.  

My guest taster thought it was just right as it was.  I loved it, too, but I think it would be better with more pepper and some lemon zest.  The second tomato pudding recipe calls for more onion and adds parsley and basil, and a lot less sugar (lists 1/4 cup).  That would be good, too, and make it more savory.

We enjoyed the leftovers warmed up the next day.


Monday, March 1, 2021

Chocolate Puffs, a Train Recipe

When I travel, my souvenirs tend to be cookbooks.  Why not?  They are fun and useful memories of the journey, and I can "revisit" the trip when I cook.  

Today's recipe is from a cookbook I bought when in Sacramento, touring the California Railroad Museum.  This book contains recipes from the famed "Harvey Houses", which were a creation of Fred Harvey.  His company provided restaurants located along the train routes, where people could get off the train and have a nice meal in a clean place with pleasant servers:

In the 1870s, people traveling west of the Mississippi were still venturing into the wild.  Loud, smoke-belching trains might have cut across the rough terrain, but the harsh weather, rigid seats, and short breaks for bad food in the middle of nowhere showed that the West was by no means won.  Entrepreneur Fred Harvey had an eye for such problems and a nerve for the impossible.  In 1876, he began establishing high quality dining rooms along the Santa Fe Railroad, and his Harvey Houses helped change the entire picture of the American West. 

... Suddenly, after surging through mountain snow or sweltering heat, rail travelers halted at a surprising sight:  a Harvey House arose out of nowhere and served them like royalty.  Fine china, Irish linen ... and, oh, the "Harvey Girls."  Magical and romantic in a region still rough-edged and rowdy, these polished young servers made the Western rail dining experience a true pleasure.

Some of the sites were developed further into beautiful hotels and resort destinations complete with tours.  It was the advent of air travel, automobiles, and faster trains needing to make fewer stops that is attributed to the demise of the business, which I find sad.  

There are many recipes I would like to try in The Harvey House Cookbook by George H. Foster and Peter C. Weiglin.  Chocolate Puffs, on page 108, is credited to chef George Burnickel, who worked on the California Limited.  

ISBN 978-1-58979-321-7

Chocolate Puffs

1 cup flour

1 oz. melted chocolate

1 cup water

3 eggs

1/2 cup butter

Strawberry preserves

Whipped cream

Boil together one cupful of flour, one cupful of water, and half a cup of butter.  Remove from the fire and beat in an ounce of melted chocolate and three eggs (one at a time).  Bake in a gem pan, and when done cut off the top and put into each cake a teaspoonful of strawberry preserves.  Cover with whipped cream, sweetened and flavored.

And water.
My Notes

I didn't have strawberry preserves but I did have a most marvelous pomegranate jelly made by my friend, MR.  I thought it would go well with chocolate.  Also, I had no whipped cream.

A gem pan is a muffin tin, so I used my regular sized, non-stick muffin tin.  

Mr. Burnickel did not specify an oven temperature, probably expecting that anyone reading the instructions would have experience in knowing the right one, so I did a little reading on the side.  The recipe looked like a choux paste and the word "puff" in the name gave me enough hints on what to do.  I preheated my oven to 400 degrees F.

The chocolate was melted in the microwave (with some left over for nibbling!).  The butter was frozen so I was reluctant to put the flour-water-butter mixture over a high heat for boiling.  I wanted the butter to have a chance to melt.  The three ingredients went over a medium heat, and I stirred it a lot until it all came together and didn't stick to the sides of the pan any more.

Pre-chocolate

Then I turned off the fire and mixed in the chocolate until that mixture looked smooth and well-blended.  After that, the eggs, beating in each one until the mixture looked smooth before adding the next.

With chocolate and eggs.

I used a ladle to scoop the batter into each pan.  I wasn't sure how much they would puff so I filled the cups about halfway to 2/3 full.  That left me with one empty cup, which I filled with water.  (This is recommended to keep balance in the way the pan heats.)

My reading suggested cooking them at 400 degrees F and then reducing the temperature to 350 degrees F.  I cooked them for 12 minutes at 400, which made them puff nicely, and then 23 minutes at 350.  The recommendation was to remove them only after they were "very firm."

I managed to keep the over door closed until about 20 minutes into the 350 degree cooking slot.  Then it was briefly opened for me to poke it, checking for firmness.  They browned well and didn't burn, and they smelled lovely.

I wanted to take them from the pan immediately so they could cool on a rack.  They all stuck to my non-stick pan!  So I let them cool completely in the pan and pulled them out later with the help of a small metal spatula.  

The Verdict

Some of the puffiness had left my cooled chocolate puffs, but they didn't sink down to anything embarrassing.  The bottoms tore when I took them from the pan, so I didn't cut off the tops for serving, I just turned them over.

The texture inside looked just right.

The interior was visibly moist and the "feel" of the puff was delicate and tender.

I served it with a spoonful of pomegranate jelly on top.  The jelly looked like a jewel.

My guest taster noted that the exterior was a little crispy and the interior was moist and tender - very nice!  The chocolate flavor was subtle but pleasantly there, and the pomegranate jelly (tart and sweet) went very well with the chocolate.  I agreed with him completely.

We both enjoyed it as a simple and yet satisfying dessert.  It was pretty and it was tasty.  When you include how few ingredients it required and how easy it was to prepare, I think it gets very high marks.  

Success!  I would do it again if I can have chocolate in the house that isn't already consumed for being, well, chocolate.  

Be sure to grease the pan!


Monday, February 15, 2021

Dried Apricot Cake - A Shaker Recipe

Sometimes when I am thinking about this blog, I just pick a random book off the shelf and browse through it, looking for ideas.  Today I was drawn to The Best of Shaker Cooking, by Amy Bess Miller and Persis Fuller, which was published originally in 1970 and this revised edition in 1985.

ISBN 0-02-584980-8

Shaker cooking is interesting because of the use of herbs and also because those folks really used and polished their recipes.  Cooking tasty, nutritious food was a noble goal in their eyes, as evidenced by this "Comment on Kitchen Education" from the Shaker Manifesto, published in 1883:

The origin of many of the troubles which afflict mankind may be traced to a disordered stomach. ... Give the stomach good, wholesome food, and it will fill your veins with pure blood; which in turn will give you a healthy brain and drive away the whole brood of manufactured troubles. 

The manifesto quote is on page 434 of the cookbook, and is followed by the authors' "Note on Shaker Cooking."

Shaker cooking is not a collection of recipes but rather an attitude toward food and its preparation.  In Shaker kitchens meals were planned and cooked to satisfy both bodily and, in a sense, spiritual hunger.  The Sisters prepared food as efficiently, nutritiously, and tastily as possible.  ... They knew, too, that meals must "create contentment, joy and satisfaction in those who partake of them."

I look at each recipe as one that is proven and pushed to be its best.

In skimming through it, I realized first that I wanted a dessert (my sweet tooth was speaking loudly to me) and second, I had a bag of dried apricots that needed to be used.  A dried apricot cake seemed to fit the requirements.  This recipe had the added bonus that it required sour cream (which I had) and not milk (which I didn't have).  It is credited to the North Union Shaker Village, Ohio.  You can read more about the history of the village by clicking here.

Shaker Dried Apple (or Apricot) Cake (page 213)

1 cup dried apples (or apricots)

1 cup molasses

2/3 cup sour cream

1 cup sugar

1 egg

1 3/4 cups flour, sifted

2 teaspoons baking soda

1 teaspoon cinnamon

1/2 teaspoon cloves

1/2 teaspoon salt

The apricots were soaked the night before.  Just apricots and water left on the counter.

Soak dried apples in water overnight.  In the morning cut fine and simmer in molasses for 20 minutes.  Cool.  Combine cream, sugar, and egg and beat until smooth.  Combine dry ingredients and sift several times.  Blend both mixtures and beat until smooth.  Add fruit and molasses.  Turn into buttered bread pan and bake in  moderate 350 degree F. oven for 1 hour.  This is a very tasty dessert; the dried apples take on a citron flavor.  Makes 1 cake.

My Notes

Plan ahead of the day you are making this cake because you have to soak the dried fruit overnight.  

I took the drained, soaked apricots and first sliced them thinly, then chopped them until they were small bits.  Some bits were smaller than others.  

I love the ulu knife.

I put them in a pan with the molasses, brought them to a simmer over medium heat, then reduced the heat to low for the 20 minute simmer.  I stirred them occasionally.  

Before cooking

When the 20 minutes was up, I turned off the heat to let them cool.  This was a good time to start preheating the oven, although it took more than an hour to cool the fruit.  This is also a good time to butter the loaf pan.  I put the oven to 325 degrees because I was using a glass loaf pan.

After cooking

For the rest of the recipe, I just followed along through the steps as directed.  Here is the sour cream, sugar, and egg after mixing.

Then, in a separate bowl, I placed the dry ingredients.  It is helpful to have the brown spices because instead of sifting the mix, I whisked it until it looked well mixed, and the brown spices show me that.


Both mixtures blended together nicely.

And then the fruit and molasses mixture went in.


I noticed that the mixture started bubbling right away, so I moved quickly to get the batter into the bread pan.  Since I wasn't sure how much the cake would rise, I was concerned that putting in all the batter into one pan would overflow it, so I grabbed another loaf pan, buttered it, and put the rest of the batter in it.  Both pans were no more than 2/3 full.

After one hour of baking, the loaf pans came out.  I was disappointed to see that both had collapsed in the middle, although poking in a pick told me they were cooked through.

I let them cool for a little while, then pulled the cakes out of their pans and let them finish cooling on a rack.  Having them upside down made them look better, but I don't think Paul Hollywood of the Great British Baking Show would have been fooled by this.


The Verdict

These are dark cakes and the scent of cinnamon and cloves filled the house.  Very nice!

The texture was fine, the crumb was moist and tender, and the fruit came through as little bits of chewy dispersed throughout.  I thought it was interesting that I could not tell they were apricots, as the flavors of the molasses and the spices were dominant. 

It was sweet but not cloyingly so.  The exterior was a little chewy and slightly crisp, which was nice.  Later it was not really crisp but very sticky.  If you don't like cloves, find a substitution because they were very dominant, along with the molasses.  I found that there was a pleasant bitterness, which my guest taster thought was wonderful.  He decided this cake would be perfect with his 80 year old madeira, so I gave him some pieces to take home.

My conclusion was that this cake needed a frosting, so I took some cream cheese and spread it on a piece.  That was good, but what was better was mixing cream cheese with a little powdered sugar and a splash of lemon juice, mixing it until it was smooth, then spreading it on the cake.  

That was excellent.  The frosting added another layer of complexity and also balanced the bitter, sweet, and spice with a creamy texture and a little sour from the lemon juice.

I think this cake would be good with a robust tea or hot coffee.  I also think it might be good with a little finely slivered bits of candied ginger in the batter.  Perhaps replacing the cloves with powdered ginger would be good.  A sprinkling of slivered almonds over the frosting would be pretty and tasty, too.

Success!  The recipe "felt" like a quick bread but some of the techniques (cooking the fruit in molasses, mixing the wet with the dry ingredients thoroughly) were different.  I don't know what I did wrong that made the tops sink in, but it turned out to be no big deal once I turned them over.  It is very reminiscent of a gingerbread, but softer and very moist and tender.

Cookies Consent

This website uses cookies to offer you a better Browsing Experience. By using our website, You agree to the use of Cookies

Learn More