Showing posts with label foodie fun. Show all posts

Sunday, March 1, 2026

Twinkie Trifle - A Completely Silly Bit of Foodie Fun

I needed a dessert that went together quickly, where most of the prep could be done in advance, and would still appeal to a variety of eaters.

So I decided to revisit a dessert I did years ago, with a slightly different take:  a Twinkie Trifle.

Let's first define what an English trifle is:  "a traditional English layered dessert featuring sponge cake or ladyfingers soaked in sherry or fruit juice, layered with custard, fruit (fresh or jelly), and topped with whipped cream, often garnished with nuts or cherries."

My American trifle used the iconic Twinkie, that golden sponge cake filled with a white cream center.

Picture courtesy of Wikipedia.

I bought a big box with 16 Twinkies in it, individually wrapped.  That was one prep step completed.

For a custard, I bought a big box of instant pudding; the flavor was chocolate fudge.  I mixed it with milk the day before I needed the dessert so it had time to set up in the refrigerator.  I used just a little less milk than the recipe called for to make sure it was thick.

I used fresh strawberries, sliced and lightly sprinkled with powdered sugar.  Again, I did this the day before the gathering.  The next day, the berries had released a lot juice, which was my goal.

Also the day before, I whipped heavy whipping cream with just a little bit of powdered sugar.

So all the prep was done, and just before I needed the dessert, I assembled it in a glass serving bowl.

The layers were:  Twinkies, pudding, strawberries, repeat all.  Then I spooned the whipped cream over the top and sprinkled sliced almonds.  The shape tilted inward, so I didn't fill the entire bowl as that would have been too much.

Pictures!

Bottom layer.
Pudding layer.
Fruit and whipped cream on top.  Did I forget to take a picture of just the fruit layer???
Nutty.

Notice that the second layer of Twinkies were broken up into smaller pieces than the first layer had them.

Some of my guest tasters don't consume alcohol, so I didn't sprinkle the Twinkies with anything.  

Once it was assembled, I served it up.

The Verdict

Despite my best efforts, it was pretty sweet.  It was fun to look at, brought laughter at the table because I used Twinkies, and we all tried it.

I liked it, especially with the strawberries.  The nuts were a nice touch, adding a crunch to an otherwise soft dessert.  Some of my guest tasters enjoyed it, too, although we were already pretty full from the preceeding dinner.

Success!

However, there were leftovers, which were so much better the next day.  I believe that the liquid from the fruit had soaked into the Twinkies overnight.  This seemed to even out the sweetness factor, making the entire dessert much better and appealing.  Success again!

Years ago, I made this with milk chocolate pudding and canned cherries.  I cooked the juice the cherries were in to thicken it with cornstarch and added a little sugar and orange liqueur.  Once that cooled, I put the cherries back into the juice.  I also sprinkled the Twinkies with a little orange liqueur.  I think I put some powdered ginger in the whipped cream, too.  That was also a fun and tasty dessert.

You can see this is a playful dessert that you can adjust to suit your tastes and preferences.  Use the concept of an English trifle to guide your choices.  Let me know what you did!


Friday, March 15, 2024

A Little Foodie Fun, with Fire! Mole Colorado

It was another cold and rainy day, so I made a fire in my fireplace.  At this point, it is almost a reflex to want to cook with that fire, so today I decided to create a mole colorado, Oaxacan style.  (Pronounced "moh-lay".)

A mole is a sauce, and this particular one needed to be tomato-based.  My challenge was to create it without a specific recipe.  I wanted to make it using general guidelines for moles and many of the traditional ingredients as I had read about them.

The guidelines are:

  • Moist ingredients (tomatoes, onions, garlic) - char the exterior on a comal or dry skillet
  • Dry ingredients (chiles, spices, nuts, seeds) - toast on a dry skillet
  • Blend everything together with just enough water
  • Simmer until the flavors meld and the sauce thickens

Some of the ingredients I picked were not appropriate for charring or toasting, so I held those out until the blending step.  But I get ahead of myself.  

My Creation

1 large brown onion, unpeeled
4 Roma tomatoes
3 cloves of garlic, unpeeled
3 New Mexico chiles
3 costeño chiles
1/4 cup white sesame seeds
1-3 inch long stick of cinnamon plus another 1/2 teaspoon ground cinnamon
3 allspice berries (you might want more)
1 ounce bittersweet chocolate
1/2 cup raisins
1/4 teaspoon salt
about 2 1/2 cups water

First I needed to char the tomatoes, onion, and garlic.  The onion was big, so I cut it in half and placed the pieces cut-side-down on the dry skillet.  The tomatoes went whole over hot coals.  The garlic cloves were also placed in a dry skillet.
Coals cool down and sometimes they do that faster than I anticipate, so the garlic and the tomatoes got moved around as needed to find the heat.  You can see in the picture above that the live fire was closest to the pan with the onions, so that is where the garlic and tomatoes ended up.

I wanted to do more than just char the onion halves on the cut side.  I wanted them to be pretty cooked once they were ready to leave the fire.  So after they cooked on the cut side, I turned them to cook on the skin sides.  In all, they were on the fire the longest and were soft almost all the way through.  They also got a nice char on the cut side.


I charred the garlic with their skins on until the skins split.  This had cooked the garlic to soft.  The chiles were charred in the dry skillet until they had turned mostly black and puffed up.

The big chiles are New Mexico, the small are costeño.  Note the garlic cloves.

The tomatoes didn't get much charring but they did get soft and the skin broke up.


I toasted the sesame seeds until they smelled nutty, which also made them more ivory than white in color.  Toasting the cinnamon stick didn't change its appearance much, but it smelled more spicy than usual.  The whole allspice berries also smelled a little fruity once toasted.

Use more allspice

Once everything was done with the fire, I moved to the kitchen.  I removed the peel from the onion and the garlic cloves.  I did not remove the stem ends from the tomatoes.  I pulled off the stems from the chiles and removed their seeds.  

All the ingredients went into the blender *in batches* with some water to get it all moving.  This included the chocolate (broken into pieces) and the raisins but not the ground cinnamon and salt.

The first batch needed one cup of water.  Once that was blended, I poured most of it into a kettle.  I left some behind to act as liquid for the next batch, which only needed 1/2 cup water to get it going.  The third and fourth batches didn't need more water at all when I left some of the previous batch with them.  Then I used about 1 cup water to rinse out the blender jar.

All batches went into the same kettle, then were stirred together.  This means it is not important what ingredients went into which batch -- as long as they were blended to smooth each time and added to the kettle.  By "smooth", I mean that there were no visible chunks, even though the mixture looked grainy.  The chiles became tiny, dark flakes in the liquid, so it wasn't perfectly smooth looking.  

This is smooth!

The kettle went onto the fire, where I put coals below it, a few around it, and it was near the live fire.  I stirred it often.  I also rotated the kettle so the hot side near the live fire was switched with the cooler side away from the fire.  I added more coals around the edges as needed.

It started steaming quickly.  Sometimes it bubbled and blurped on the hot side, reminding me to stir it more.  

See the blurp?

I tasted it occasionally.  Before cooking, the dominant flavor was raw tomato, bright and acidic.  I knew the mole had to cook at least until that raw tomato flavor was gone.  That took about 30 minutes.  Then the dominant flavor was onion (it was a very large onion), and I wanted to cook the sauce long enough to get that onion flavor blended with the others.  That took about another 30 minutes.

After 1 hour of cooking, I decided it needed more cinnamon, so I added 1/2 teaspoon ground cinnamon (untoasted) and it needed salt, so I added 1/4 teaspoon.  I wish I had added more allspice, but I was reluctant just in case I over-seasoned it.

It cooked another 10 minutes when I declared it thick enough.  You can see by comparing the first kettle picture to the one below that the level reduced about an inch, mostly from steaming.


Notice, too, that the color darkened considerably.  That isn't from the lighting -- the uncooked sauce was red; the cooked sauce was brown.

The Verdict

I had some roasted pork tenderloin and some roasted turkey in my refrigerator, so I sliced them up and warmed them in the oven.  A few slices went onto each plate, some mole was spooned over the top, and was garnished with sesame seeds.  There were flour tortillas and a tossed green salad on the side.  And wine!
Pretty!
We liked the mole with both meats.  We couldn't really decide which one was better with it.  (This was not a problem!)  I particularly liked dunking the flour tortilla into the extra mole and eating it without any other meat or garnish.  I thought the flavor of the mole was emphasized this way.

That flavor was ... complex...  Not that this was unexpected, with all the different ingredients involved.  It is just challenging to describe.

My guest taster thought there was meat in it, so I would say it had an umami taste.  We both thought it was fruity, probably from the raisins.  It was bitter, but not in a bad way.  That could be from the charring, but also from the bittersweet chocolate.  My guest taster had wondered if there was chocolate in it, and was happy to learn there was.  I could taste the cinnamon but not the allspice.  I wanted more of both spices.

I could not taste the garlic, but I don't know if it needed any more.  I would say not.  

The chiles were there, adding a lot of flavor and only some heat.  I had been warned that costeños were hotter than what I was used to, and to use them with caution.  This was good advice!  While I didn't get a burn from the chiles, their heat was present.  Maybe I could have put in one or two more, but considering I am a chile newby, it was good that I didn't.

The sesame seeds, surprisingly, didn't get broken up much by the blender.  I was surprised at how many were still whole or nearly so after the mole was cooked.  This added a nice little sesame flavor blast while I was eating it.  

In summary, it was sweet, bitter, deep, rich, mildly spiced with a little chile heat.  As I said, it was complex.  We loved it.

The next day we heated up some of the pork roast, covered the slices with a fried egg, and spooned some mole over the top.  That, with some flour tortillas, was breakfast.  Excellent.

I don't know how my mole would compare to a "typical" mole colorado from Oaxaca.  I don't think it matters.  It was good and we wanted more.  I achieved success.

Saturday, October 15, 2022

Pepino Dulce -- The Cucumber Melon, explained.

I have a good local farmers market.  One stall is occupied by a woman who sells young plants of an astonishing variety.  She has the usual tomatoes, peppers, greens, herbs.  But she also offers intriguing plants, many of which I have never heard of.  This brings me back again and again to see what I want to try to grow in my yard.

What I want to share with you is the success I had with the pepino dulce I brought home last year.  I bought it just because the description said it likes growing in my area and that it makes fruit.  Once I got home, I spent time reading up on it.

Pepino dulce:  Wikipedia tells us that "Solanum muricatum is a species of evergreen shrub native to South America and grown for its sweet edible fruit."  It appears to be a native of Chile or Peru.  You can tell by the genus Solanum that it is related to tomatoes and eggplants.  Some people call it a "sweet cucumber", a cucumber melon, or a pepino melon.

I knew it would grow into a bush-like shape that would benefit from some wire support.  It needed full sun and a decent amount of watering.  I had recently made some new planting beds with automatic irrigation, so I had an appropriate place to put my new baby plant.

A tiny baby!
That was in fall of 2021.  Its growth really took off last spring.  I loved the flowers, which are white with purple stripes (or was that purple with white stripes?).

Here it is at its prime several months ago:


The bush is about 4 feet in diameter across the ground and about 2 to 3 feet tall.  You can see the fruit on it, as well as some flowers.  It is a robustly healthy plant with only a few issues from whiteflies, which did not appear to affect its growth.

I wasn't sure exactly when to harvest the fruit and ended up trying it when it was green, ripe, and very ripe.  Amazingly enough, they were all good in their way.

As the fruit ripens, it develops purple stripes.  Sometimes bold, sometimes subtle, and you might have to look hard, but you can find them.

When they still have a greenish tinge, they are not fully ripe.

Greenish with stripes, but starting to change to cream-colored.
You can still eat them.  They are firm, almost crispy, and they taste just like cucumbers.  I ate them raw, sliced into a salad like a cucumber.  Very nice!  I also pan-fried them in a little olive oil and dressed them with a sprinkling of salt and pepper.  Still good!

The next color phase is cream heading to yellow-cream.  The fruit feels a little softer, but not by much.  At this stage it is starting to taste more like a honeydew melon, just not as sweet.  It is juicy, mild, and refreshing.  I call this ripe.

Very ripe is when the fruit may be even more yellow-cream colored, it softer, and has a distinctly banana-like scent to it.  
There are both ripe and very ripe examples here.
Visually they might be the same but the banana scent is very distinctive.  The skin slips off easily.  It is more a food I would add to a fruit salad instead of a tossed green salad.

The skin, core, and seeds are edible, but I prefer to cut out the core and seeds.  Some people I have had taste it prefer to remove the skin.  

Sometimes there is a space between the seeds/core and the fruit.
The ripe and very ripe are good to eat in slices, just as they are.  I haven't tried mixing them with other fruits in a salad or other dish.  They do pair quite nicely with gouda cheese and similar mild, white cheeses.  I have put them out with a cheese platter and enjoyed them a lot.

What's interesting is that, despite the banana scent, they do not taste like bananas at all, not even a hint.  They continue to taste like less-sweet honeydew melons.  

Here in Southern California we are on watering restrictions because of the drought, so my pepino dulce plant is looking stressed.  It still has young fruit on it and is supposed to be a perennial, so I am hoping I won't lose it and I can see what it does next year.

I enjoy the fruit, though not everyone does.  One guest taster said it made her burp just like cucumbers do.  Several guest tasters liked it enough to request cuttings for their own yards.  I read that the plant can reproduce by seed but does better from cuttings.  I currently have four cuttings enthusiastically sprouting roots while in glass jars with water.  They will go into pots soon.  (Update:  Once they were put in pots and set out in the yard to start hardening, the bunnies ate them down to the dirt.  I guess I have to try again!)


Monday, August 1, 2022

Corn Pudding

My friend AD shared this family favorite recipe with me as part of a "send me one of yours and I'll send you one of mine" recipe swap.  She says, "This a new family favorite dish that has become a fall/Thanksgiving staple for us."

When someone raves about a recipe and recognizes that it is so good the family wants to have it every year for a holiday special, I know it needs to be put into my blog to keep it available for years to come.  Also, I love corn in many forms, so I knew I had to do this.

It is made with fresh corn, scraped off the cob on a grater, and I have no idea if it will be good with canned corn.  I waited to make it until I had fresh corn.  

Corn Pudding (4 to 6 servings)

6 tablespoons unsalted butter

1/4 cup granulated sugar

1/2 cup heavy cream

1/4 cup flour

1 teaspoon salt

5 large eggs

I think I should have husked and cleaned the corn before putting the buttered pan in the oven.

Cut butter into an 8 x 8 glass baking dish.  Pre-heat the oven to 350 degrees F with the dish inside to melt the butter.

Use a box grater to grate the corn kernels into a large mixing bowl.  Combine the corn with sugar, cream, flour, and salt.  Lightly beat the eggs and add to the corn mixture.

When the oven is heated, carefully pour the melted butter into the corn mixture and combine with a few swift strokes.

Pour the mixture into the buttered baking dish and bake at 350 degrees F for 60 - 70 minutes.  It is done when a golden crust forms and the interior has set.

My Notes

I don't have an 8 x 8 glass baking dish, so I used my 6 x 10 1/2 dish, whose volume is very close to the 8 x 8's.  

I do not own a box grater so I used my flat grater.  Now I appreciate the value of the box grater, because the corn spattered a lot while grating.  After some practice, I managed to keep it off my shirt (mostly) and in the bowl (mostly).  

I estimate about 2 cups of juicy corn gratings, but I didn't measure it.

Sprinkling the sugar and the flour across the top seemed to minimize clumping.

Corn, salt, sugar, flour, cream

I had salted butter only so I used 1/2 teaspoon of salt into the mixture.

The butter was browned and a sizzling when the pan came out of the oven.  It took more than a "few" swift strokes, but I think I incorporated the hot butter into the batter well.


It smelled so good while it was baking!

The Verdict

It baked for 60 minutes.  A golden crust had formed and the middle had set.

After it cooled for about 10 minutes, I served it up.

The butter did a good job of keeping the pudding from sticking to the pan.

The pudding was very delicate and light in texture.  Very much like custard, but a bit heavier.  The crust was a little chewy, particularly on the edges.  It held together well and I ate it with a spoon.

The corn flavor came shining through.  I loved it!  The salt quantity was just right.  It was not too sweet, so that was also just right.

My guest taster and I both had a some in a bowl as dinner, as it was too hot of an evening to eat much more.  He had two servings.

This would be a perfect side dish for any roast meat or hearty stew.  

If it were bumped up with bacon bits and caramelized onions, it could be a main dish.  You would need to use a bigger pan.

Success!  I can see why AD's family wants it as a regular holiday special dish.  It is easy enough to make that I could see it being made more often than that, especially in the summer when fresh corn is abundant.

Thanks, AD!

Thursday, April 15, 2021

Barebottom Cheesecake

What do you think of when you have a huge chunk of cream cheese that is threatening to go bad on you?  Well, I thought of cheesecake.  The next thought was, "Which cheesecake recipe?"  You see, I have a copy of The Joy of Cheesecake by Dana Bovbjerg and Jeremy Iggers, and it gives me many, many luscious options.

ISBN 0-8120-4278-6

What was I in the mood for?  Heavy?  Light?  Custardy?  Marbled?  Flavored with spices or fruit?  

It ended being decided by how much sour cream I had in the house.  With a little less than 2 cups, and not having any heavy cream, I had to limit myself to the recipes that required less than those two.  

I chose the Barebottom Cheesecake on page 84:

We call this one the Barebottom Cheesecake because it works well even without a crust -- great if you are in a hurry or if you don't have any crumbs on hand.  This is one of the cheesecakes we test on the customers of the Sheepshead Cafe in Iowa City.  It proved to be one of the most popular ones ever served there.  

With a recommendation like that, how could I resist?  I chose to skip the crust and make it truly bare bottom.

Barebottom Cheesecake 

1 1/2 pounds cream cheese

1 cup granulated sugar

2 tablespoons all-purpose flour

6 large eggs, separated

2 teaspoons lemon juice

1 teaspoon vanilla extract

1 cup sour cream

That is a big chunk of cream cheese!
1.  Preheat the oven to 325 degrees.

2.  In a large mixing bowl, beat the cream cheese, sugar, and flour until light and fluffy, about 5 minutes.

3.  Add the egg yolks, one at a time, beating thoroughly after each until the mixture is smooth and blended.

4.  Add the lemon juice and the vanilla, then also stir in the sour cream.

5.  Whip the eggs whites until they form soft peaks, then fold into the cream-cheese mixture.

6.  Pour the mixture into the prepared crust or into an ungreased baking pan and bake for 1 hour, 10 minutes, until the center of the cake is firm.

7.  Cool the cake in the oven for 1 hour, with the door cracked open, then cool to room temperature.  Chill.

My Notes

I used my 9-inch springform pan as they recommended.  Since I was not doing a crust, I left it ungreased.

I chose to use vanilla sugar instead of regular sugar because I could.  I still put in the full measure of vanilla extract, though.  I love vanilla!

Before beating

The cream cheese, sugar, and flour were beaten for five minutes because I used a timer.  The mixture looked light and fluffy as required.

After beating

I had put all the yolks into one cup because I didn't read ahead in the instructions, but I used a tablespoon measure to scoop them out for the "one at a time" requirement.  They made the mixture a delightful soft yellow color.

The mixture was moved into a very large mixing bowl and the metal bowl was washed to ready it for the egg whites.  I think I took them to the firm peaks stage (past soft peaks) but I hoped it wouldn't be a problem.

It was a lot of mixture to fold in with the egg whites.  My experience is that it is easy to miss folding in the batter near the sides and especially at the bottom, so I put in extra attention on those areas.  Once it looked like there was no batter anywhere that didn't have egg white in it, I declared it folded.

The quantity of the batter was absolutely perfect for the springform pan.  I was astonished at how well it fit.  

A Perfect Fit!

It went into the oven while I promised myself not to open the door at all until the 1 hour and 10 minutes mark had passed.  It smelled good while it was baking!

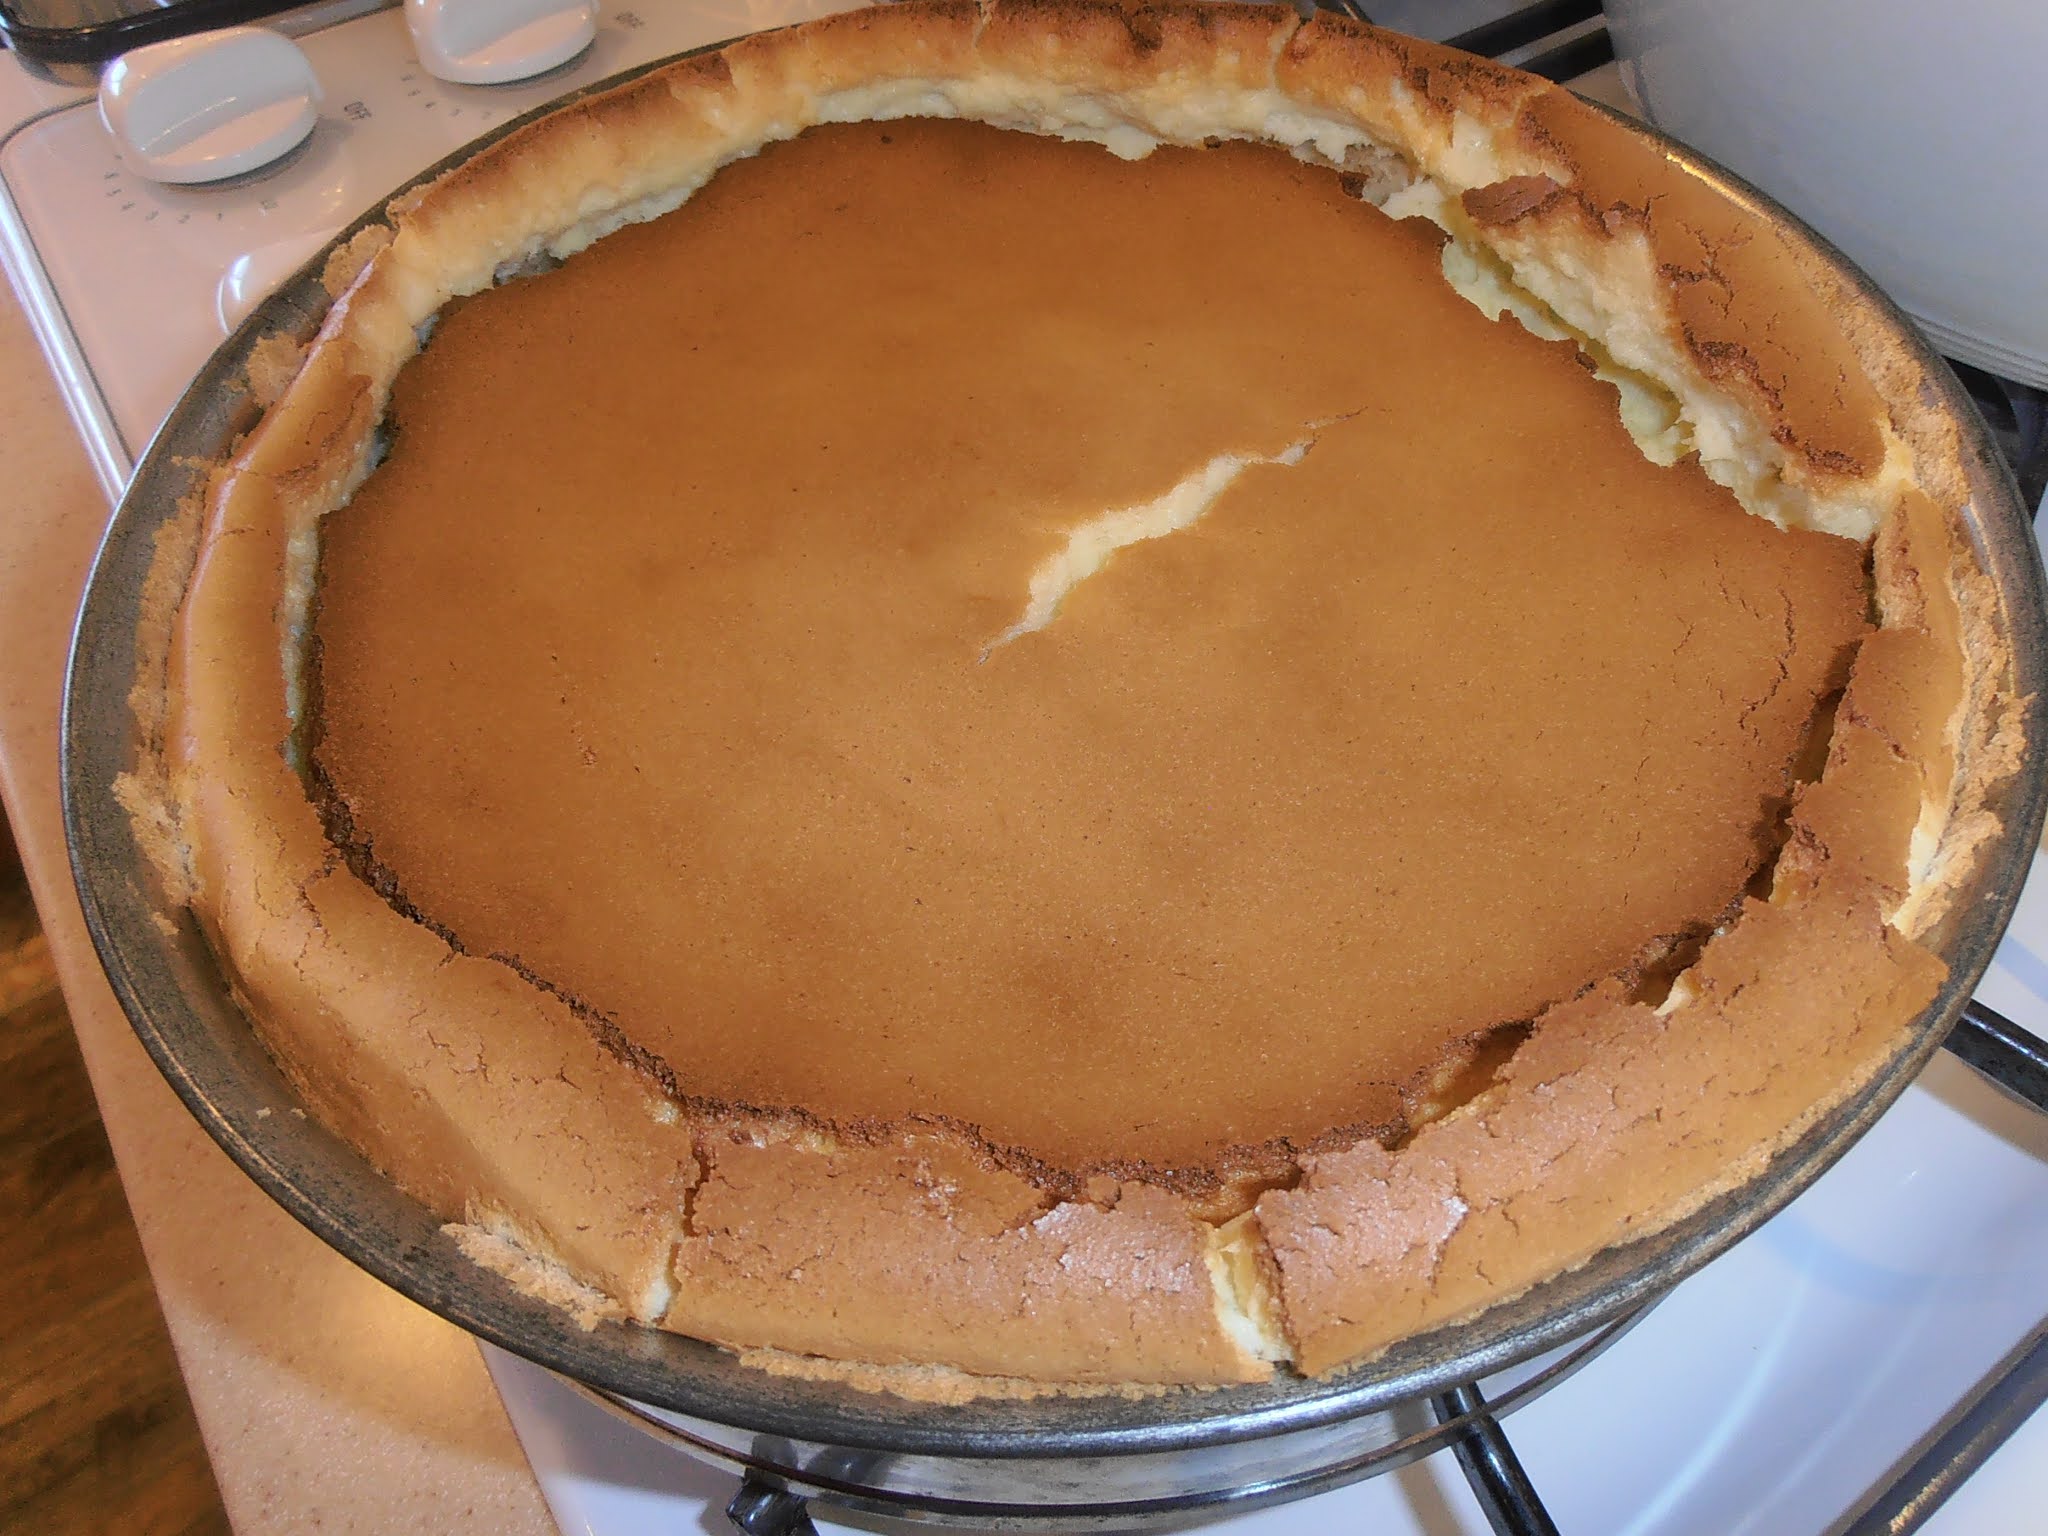
I have to admit that this result is not what I was expecting:

Right after baking.

A very brown top and sides, the uniform tearing around the perimeter.  Well, at least the center was firm!  Perhaps I could have turned off the oven earlier but I wanted to see how this would turn out.

It cooled in the oven for one hour with the door open just wide enough for the handle of a wooden spoon to fit.

And then it sank.

After cooling in the oven for one hour.

I saw it sink more while it was cooling to room temperature.


The Verdict

My guest taster and I tried it without chilling it.  


It was hard to remove a piece without it falling apart, but then again, I didn't take off the springform ring.  So much was stuck to it that I wondered if the cheesecake would hold together or be torn apart if I removed the ring.  Also, I felt I needed to leave it on when it went into the refrigerator.  I will try that after the cheesecake has chilled.

How did it taste?  I was concerned the brown top would taste overcooked, but it didn't.  It was firm and a little toasty in flavor but not burnt or scorched or bad.

The interior texture was smooth, and each bite was so very light and yet was also moist, which we both liked.  It was almost like eating nothing.  One piece did not fill me like some cheesecakes do.

The lemon and vanilla came through, but very subtly.  There was also the cheese flavor but not strongly so.  Honestly, it was like eating light, tasty clouds.

We discussed the idea of adding a topping, like raspberries or a fruit compote, which we thought would be nice but truly not needed.  My guest taster said this was a "stand alone dessert."  I agreed.  It was fine even without a bottom crust.

The parts of the cheesecake that stuck to the sides of the pan were drier and more eggy in flavor.  Not bad, just not as nice as the moist interior.

Would I do this again?  Yes.  I call it a success.  But I would be more careful about getting the egg whites to just soft peak.  Did taking them further cause this to rise and fall so much?  I don't know but the description didn't mention this could happen, so I would guess that was the problem.  I would like to have the whole cake as moist and tender as the center was, and to avoid the drier parts that stuck to the ring.

We had a piece after it had chilled, too.  It was still wonderful and was nicely accompanied by a sherry-based liqueur.


Cookies Consent

This website uses cookies to offer you a better Browsing Experience. By using our website, You agree to the use of Cookies

Learn More