Showing posts with label honey. Show all posts

Wednesday, July 15, 2020

Playing with History -- Roman Empire Honey Cheesecake

Yes, we are still in a pandemic and yes, I still need to minimize my trips to the store.  But if I plan ahead well, I can get some ingredients I don't normally keep around the house (although I am not always sure why I don't!) and make historical recipes.  So while I still consider myself in the "Making Do Challenge", I'm going to stop using that phrase in the title of my posts.

Today I was looking at a webpage by another blogger.  She (I don't see her name on the blog) made a recipe from PBS.org and Squidoo Ancient Roman Recipes (which is another blogger site!).   It was for Libum, a sort of cheesecake soaked in honey.  You can view her page here.

I liked the idea of a dessert that is a cross between bread and cake, and it only uses a few ingredients.  At first I thought I would not be making it for this blog, so I made it according to her directions.  It came out just as she directed:  four lovely loaves with a mild cheesy flavor, the scent of bay, and the sweetness of honey.  My guest taster and I both truly enjoyed them after a dinner of a big tossed green salad (which also had some sliced meat and crumbled cheese on it).

We both wanted to have them again, which got me to thinking about what I would do instead of what her instructions said.  And that, my friends, had me decide to write it up for my blog.

Since I am not following the historical directions as closely as I normally would, I decided that "Playing with History" was the best description for my post.  In a way it is an historical upgrade but I see it more as a side step instead.

Libum  (Honey cakes or Honey Cheesecake)

(these are from the PBS.org site)

Ancient Roman Libum Recipe

Libum to be made as follows: 2 pounds cheese well crushed in a mortar; when it is well crushed, add in 1 pound bread-wheat flour or, if you want it to be lighter, just 1/2 a pound, to be mixed with the cheese. Add one egg and mix all together well. Make a loaf of this, with the leaves under it, and cook slowly in a hot fire under a brick.

- from Cato's On Agriculture, reprinted in The Classical Cookbook


Modern Roman Libum Recipe (serves 4)

1 cup plain, all purpose flour
8 ounces ricotta cheese
1 egg, beaten
bay leaves
1/2 cup clear honey

Sift the flour into a bowl. Beat the cheese until its soft and stir it into the flour along with the egg. Form a soft dough and divide into 4. Mold each one into a bun and place them on a greased baking tray with a fresh bay leaf underneath. Heat the oven to 425° F. Cover the cakes with your brick and bake for 35-40 minutes until golden-brown. Warm the honey and place the warm cakes in it so that they absorb it. Allow to stand 30 minutes before serving.

And bay leaves and frontignac.
My Notes

I followed the modern recipe except I first put the ricotta into a bowl, measured the flour over it, then poured the beaten egg over the top.  I mixed it with a spoon until it was barely mixed, then used my hands to finish mixing it.  The spoon came in handy to scrape the dough off the sides of the bowl.

It was a little sticky to work with but came together as a cohesive ball with just a little hand mixing.  I was careful not to overwork it; I kept thinking about how quick breads are best with minimal mixing.

Soft, moist, but not too sticky
Instead of four cakes, I made eight little ones.  Each one sat on half of a bay leaf.


The oven temperature was 375 degrees F and they baked for 30 minutes before they turned lightly golden brown.

They puffed!
I decided that four of them would soak in honey, which I diluted a little with water and warmed on the stove.  The other four would soak in the elderflower syrup, frontignac, which I had written about in a previous post (but did not warm).  (See here for how to make frontignac.)

As soon as the cakes were done, I flipped each one over and peeled off the bay leaf.

Leaf off, leaf on.  I love the leaf imprint!
Then, while they were still very warm, I put them into the honey and the frontignac to soak.  I let them soak an entire hour.
in frontignac
in slightly diluted and warmed honey
The Verdict

The first time I made them, they soaked about 15 minutes in warmed undiluted honey while we ravenously hovered over them and then couldn't wait any longer.  They smelled wonderful!  The bay scents the air and stimulates the appetite.  There was some honey soaked into the cakes, which was tasty.  We sopped up the rest of the honey with the cakes as we were eating them.

This time I managed to control myself and wait the entire hour.

I diluted the honey this time to make it more syrupy than just warming it.  I wanted it to soak into the cakes more.

After soaking for one hour, I noticed that the frontignac appeared to have been absorbed more than the honey but both syrups still had not been completely absorbed.

I flipped the cakes over to put a little glaze on top of each one, then decorated them with borage flowers that were from my garden.

Just too cute!
We had them for dessert, two each.  Both had their syrup soaked into the bottoms and up about 1/4 inch.  Both were tasty and flavorful!  Bay, cheese, honey or elderflower, all in a light bread base.  I liked the honey best and my guest taster liked the frontignac best.  Both were good.

You can see how far the syrup soaked into the cake.
The only difference I noticed between making the small ones and the large ones is that the small ones seemed a little drier in the middle.  Not bad, just a small difference.  We enjoyed them with a homemade fig wine as an aperitif.

Success!  I might make them again and try making six instead of four or eight.  Making the servings a little bigger might keep them moist without making them too big.


Monday, December 4, 2017

Honey Balls -- A Ladies' Group Christmas Cookie

In the early 1980s, a friend gave me this book:

Well loved, and published in 1971
My Internet searches tell me that "The Open Line" was a radio show in Iowa, Minnesota, Wisconsin, Illinois, and Missouri.  Jim Loyd was the host and listeners would send in their recipes.  From that, the radio station published bulletins and, later, cookbooks containing those recipes:
The first Open Line Cookbook, "The Best of the Open Line", was offered in 1969 and included Open Line recipes collected over the first six years of a daily radio telephone program on WMT Radio called "The Open Line", first airing in 1963.  From the very beginning, recipes and questions and answers on cooking dominated the whole hour, indicating the popularity of favorite family recipes passed along for others to share and enjoy.  In the first cookbook, reluctantly, some recipes had to be passed by because a 250 page cookbook will only accommodate so many recipes.  A second cookbook called "The Rest of the Best of the Open Line" was offered in 1971, including some of the omitted recipes and new recipes received in the two years between the first and second cookbooks.  (Source:  http://www.openline.bplaced.net/book3.html)
You can find some of their bulletins here:  http://www.openline.bplaced.net/index.html  It is an old website, at least it looks that way from the formatting.  If you explore more of their links, you can find the cookbook I used for this recipe here.

The reason I categorize the recipe under "Ladies' Groups" is this quote from the back page of this book:
Open Line recipes have a special something in common.  They are all a favorite in somebody's family, and are offered in the hope that someone else will share the joy of discovering a way to please their own cookie eaters...
Many of them could have become forgotten recipes, the pride of a past generation.  Passing them along now will perhaps keep them alive and busy, to be enjoyed by generations to come, that remember how good Grandmother's Christmas baking always was, and now can be again in the floured hands of today's Mothers, and tomorrow's Grandmothers.
To me, these are the same thoughts and motivations the Ladies' Groups have for publishing their recipes.  The only difference is that these recipes don't have a name and location attributed to them.  In a way, that makes me sad.

So here is to all the ladies (and gentlemen) who contributed recipes to Mr. Loyd's show and thus to his books.  You are unnamed but your recipes are not forgotten!

Honey Balls
(page 43)

1 cup shortening
1/4 cup honey
2 cups sifted flour
1/2 teaspoon salt
2 teaspoons vanilla
1 cup chopped nuts

And powdered sugar!
Cream shortening, add honey and cream well.  Add dry ingredients, then vanilla and chopped nuts.  Roll in balls the size of hickory nuts and bake on ungreased cookie sheet.  Bake for 30 to 40 minutes in a 300 degree (F) oven.  While hot, roll in powdered sugar.  Roll in powdered sugar again when cool.

My Notes

Notice these don't use eggs or any sort of leavening!  I suspect it is either an old recipe or was created during a World War when foods were rationed.

I chose a dark honey for a rich flavor.  I used almonds which I chopped and lightly toasted.

After the shortening was beaten well all by itself, I added the honey and beat it some more.  It was definitely creamed well!


The dough came together easily and wasn't sticky at all.  Then I chilled it for about 20 minutes while the oven heated and I ate lunch.


I had to look up the approximate size of hickory nuts and settled on about 1 inch diameter.  When I placed them on the cookie sheet, I wasn't sure if they would spread or not.  Sure, the recipe says they are "balls" but with all that shortening I wondered if they would spread.  So I spaced them widely apart.  The rest of the dough went back into the refrigerator.

Being cautious
The recipe called for baking them for 30 to 40 minutes and my oven tends to cook things quickly, so I chose 30 minutes.  They smelled heavenly while they were baking!  You can see they didn't spread at all.

Room to play
I rolled them in powdered sugar when they were right out of the oven.  I was surprised at how much sugar stuck to them.  In some areas, it was thick.


It was time for the second batch.  I spaced them closer together.  In taste testing the first batch, I thought they were cooked too much.  They weren't burnt but I wanted them to be softer.  So I cooked the second batch for 25 minutes.

Batch #2, closer and cooked 5 min. less
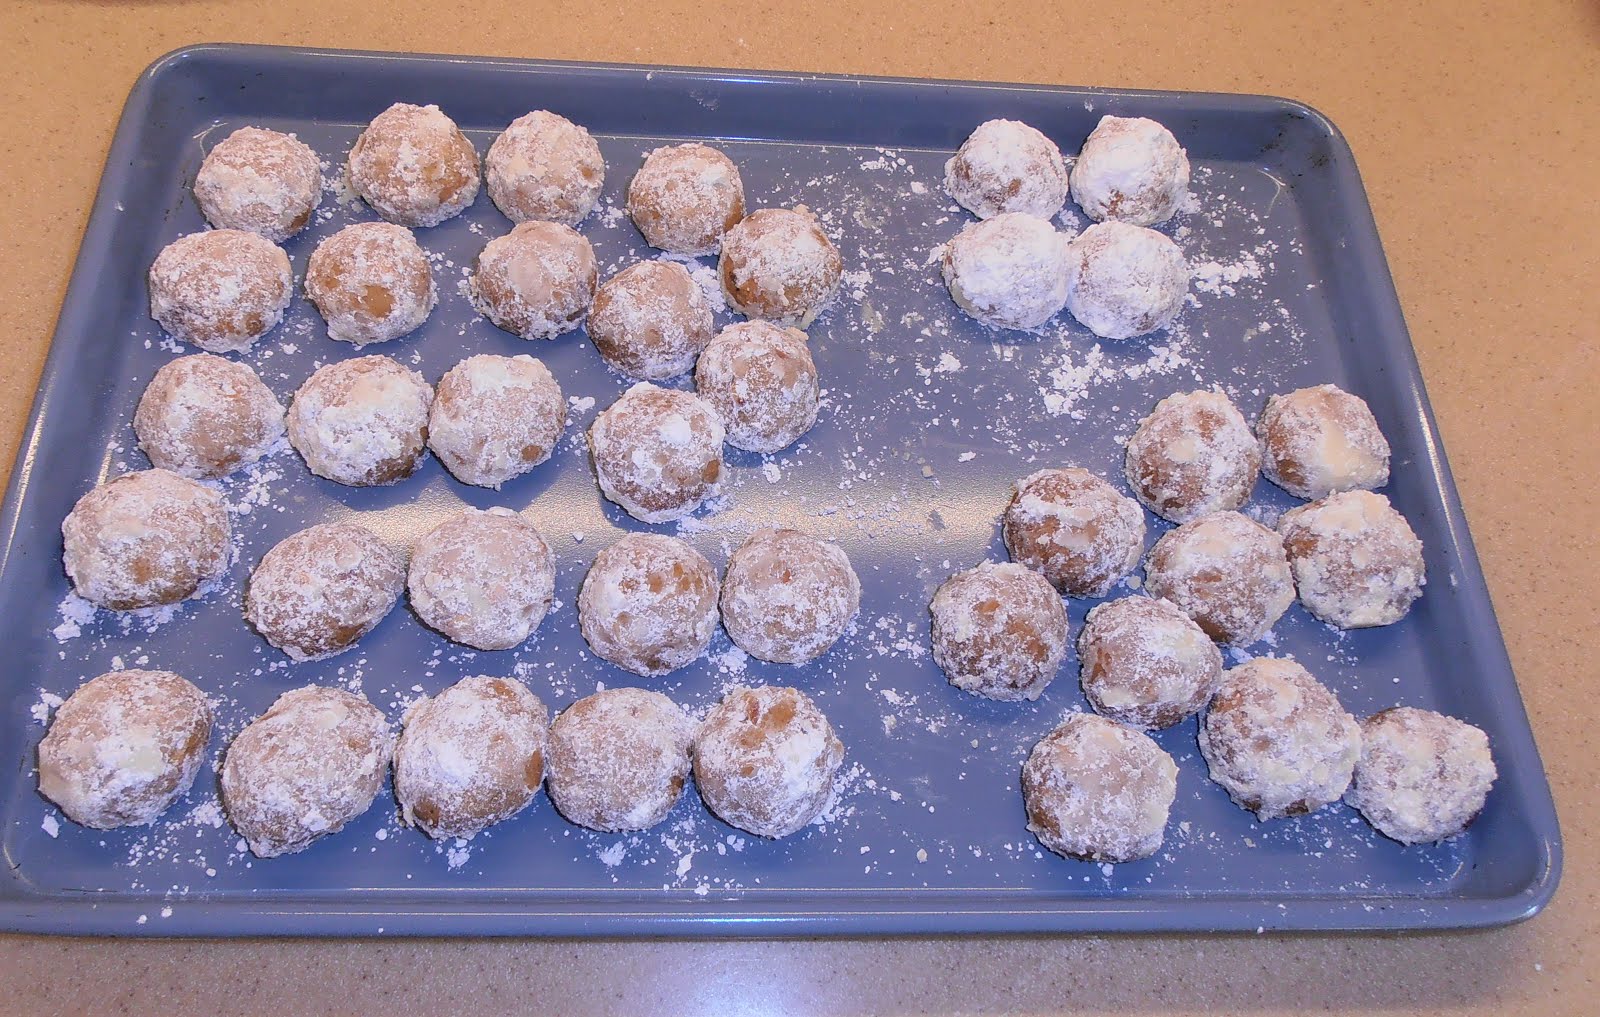
So much sugar stuck to both batches from the first roll that I wondered why I should roll them twice.  I tried four of them and noticed that they were prettier after the second roll.

The twice rolled four are in the upper right corner.
The Verdict

Several of us tested them.  We found that the honey flavor was detected after we had been chewing the cookie for a little while.  It wasn't dominant but it was there.  Mostly I tasted the nuts.

The first batch was good but a bit too dry for my tastes.  The second batch, cooked five minutes less, were better but I still think they should be cooked for only 15 to 20 minutes in my oven. 

They were good cookies!  Nutty, very slightly sweet, crunchy.  The second roll in the powdered sugar only enhanced the look and did not make the cookies any sweeter.  I think people who normally don't like sweet cookies would like these.  I also think they would go well with coffee or tea. 

Now that I know they don't spread when cooked, I would put the entire batch on one cookie sheet if I could. 

Success!  A handy cookie any time of year.  I suspect the dough would freeze well -- and maybe would be good to shape into a log and sliced.  Then the cookies would bake very quickly.  It is worth a try some day.

Cookies Consent

This website uses cookies to offer you a better Browsing Experience. By using our website, You agree to the use of Cookies

Learn More