Showing posts with label gadgets. Show all posts

Sunday, March 1, 2020

I Made a Tvare

My friend KC made me aware of a cooking gadget called a tvare, a Norwegian whisk.  She showed me the steps and how convenient making it from a Christmas tree really is.  So I did!

Wikipedia tells us:
tvare f or m (definite singular tvara or tvaren, indefinite plural tvarer, definite plural tvarene)

    1. stirring stick for cooking, with tines at the end.  A Norwegian whisk.  Fashioned crudely from the crowns of conifer trees, etc.
    2. archaic auger or drill 

Other sources I spotted mentioned that "tvare" is the tool and "tvara" means "to mix."  The idea is to cut the tree trunk so you get a handle and have branches near the thick end to make the tines.

The instructions were straightforward:
  1. Cut the part of the tree you want to use
  2. Trim the branches
  3. Remove the bark -- don't worry about this too much because of the next two steps
  4. Soak it in boiling water for 10 to 15 minutes 
  5. Resume removing the bark
  6. Sand it smooth
  7. Seal it with oil
My Attempt

I used my Noble fir Christmas tree, with my focus on the top two fifths or so.  I thought I could get two tvarene from this and still have handles long enough to make me happy.  


I looked for branch cluster and cut the trunk just below it.  I had to remind myself that the handle was the part of the trunk above the cluster so the tines would curve upward when the tool was in use.


I cut the thickest part of the trunch first and then, after deciding how long a handle I wanted, I cut above that to get the second tvare.

Then I trimmed the branches to what I considered a good length for the tines.


I knew it could be a challenge to smooth off the bumps of the branches I didn't want, so I cut them as close to the trunk as I could.  


I had a very sharp knife to start peeling off the bark.


There were three parts to pay attention to for this step:  the brown bark, the white fibrous layer under the bark, and the creamy wood below that.


My goal was to remove as much of the first two layers as I could while working outside and then leave the details to come off once the tvare soaked in the hot water.


To soak them, I used a big pan filled with water and brought to boiling.  I turned the fire down so the water was simmering.  Neither piece of wood fit in the pan, so I put one end in the water for about 10 minutes then flipped it so the other end soaked, too.  The steam seemed to be beneficial for the parts that never actually touched the water.


The water turned dark reddish-brown and smelled wonderful.

What I liked about this is the layers that still needed to come off were easily removed -- they slipped off with my fingernail or with a gentle push with the knife blade.  The wood cleaned up beautifully, even in the tight corners where the branches met the trunk.


The next step was to sand everything but I felt the wood was still too freshly cut off the tree.  I left the tvaren on the counter for a week or so, until they felt lighter and warmer to the touch than when they were freshly cut.  They dried inside and out, and I could tell the difference.

For the bigger tvare I used a 120 grit sanding sponge.  It worked well, especially in the tight spots, except where small wood parts protruded from the tines.  I had to get my knife and whittle those off so they wouldn't tear the sponge.  I also carved the thicker bumps down as much as I could so there wouldn't be any place for food to hide when the tvare was being cleaned.

I decided to go more "rustic" for the smaller tvare.  I sanded it completely with a piece of sandstone.  This worked really well, especially over the bumps and across the cut trunk ends.  The piece (when I started using it) had a narrow point that I used to get in the tight spots.  Eventually it broke off but I was done using the point at that time.

The sandstone in the middle.
The difference between the two sanding methods was this:  the sponge made the wood satiny smooth and a joy to hold.  The stone made it easy to remove bumps and smooth them down without having to use the knife but the wood's surface wasn't as texturally pleasant.  It was perfectly acceptable, just not like satin.  

Some of the cut tine ends splintered when I cut them, so I used the knife to whittle them to more of a point.  My goal was to reduce places for food to hide from cleaning.

Once the pieces were wiped with a damp cloth to remove the sanding dust, I let them dry for a few hours.  

I wiped them both thoroughly three times with block oil, letting it soak in for about an hour for each layer.  The wood soaked the oil up each time, with no excess to wipe off.  I feel that was just right but can always oil them again any time.

Completed tvaren.  I oiled the cutting board, too!
The Verdict

They are both fun to hold.  The bigger one's smooth surface just invites your hand to slide over it.  It is fun to feel the bumps.

The smaller tvare's handle, near the top, is very thin and a little flexible.  I will have to be careful not to break it when using it, but I think I would only be using this to mix small quantities or substances that were not too heavy or thick.

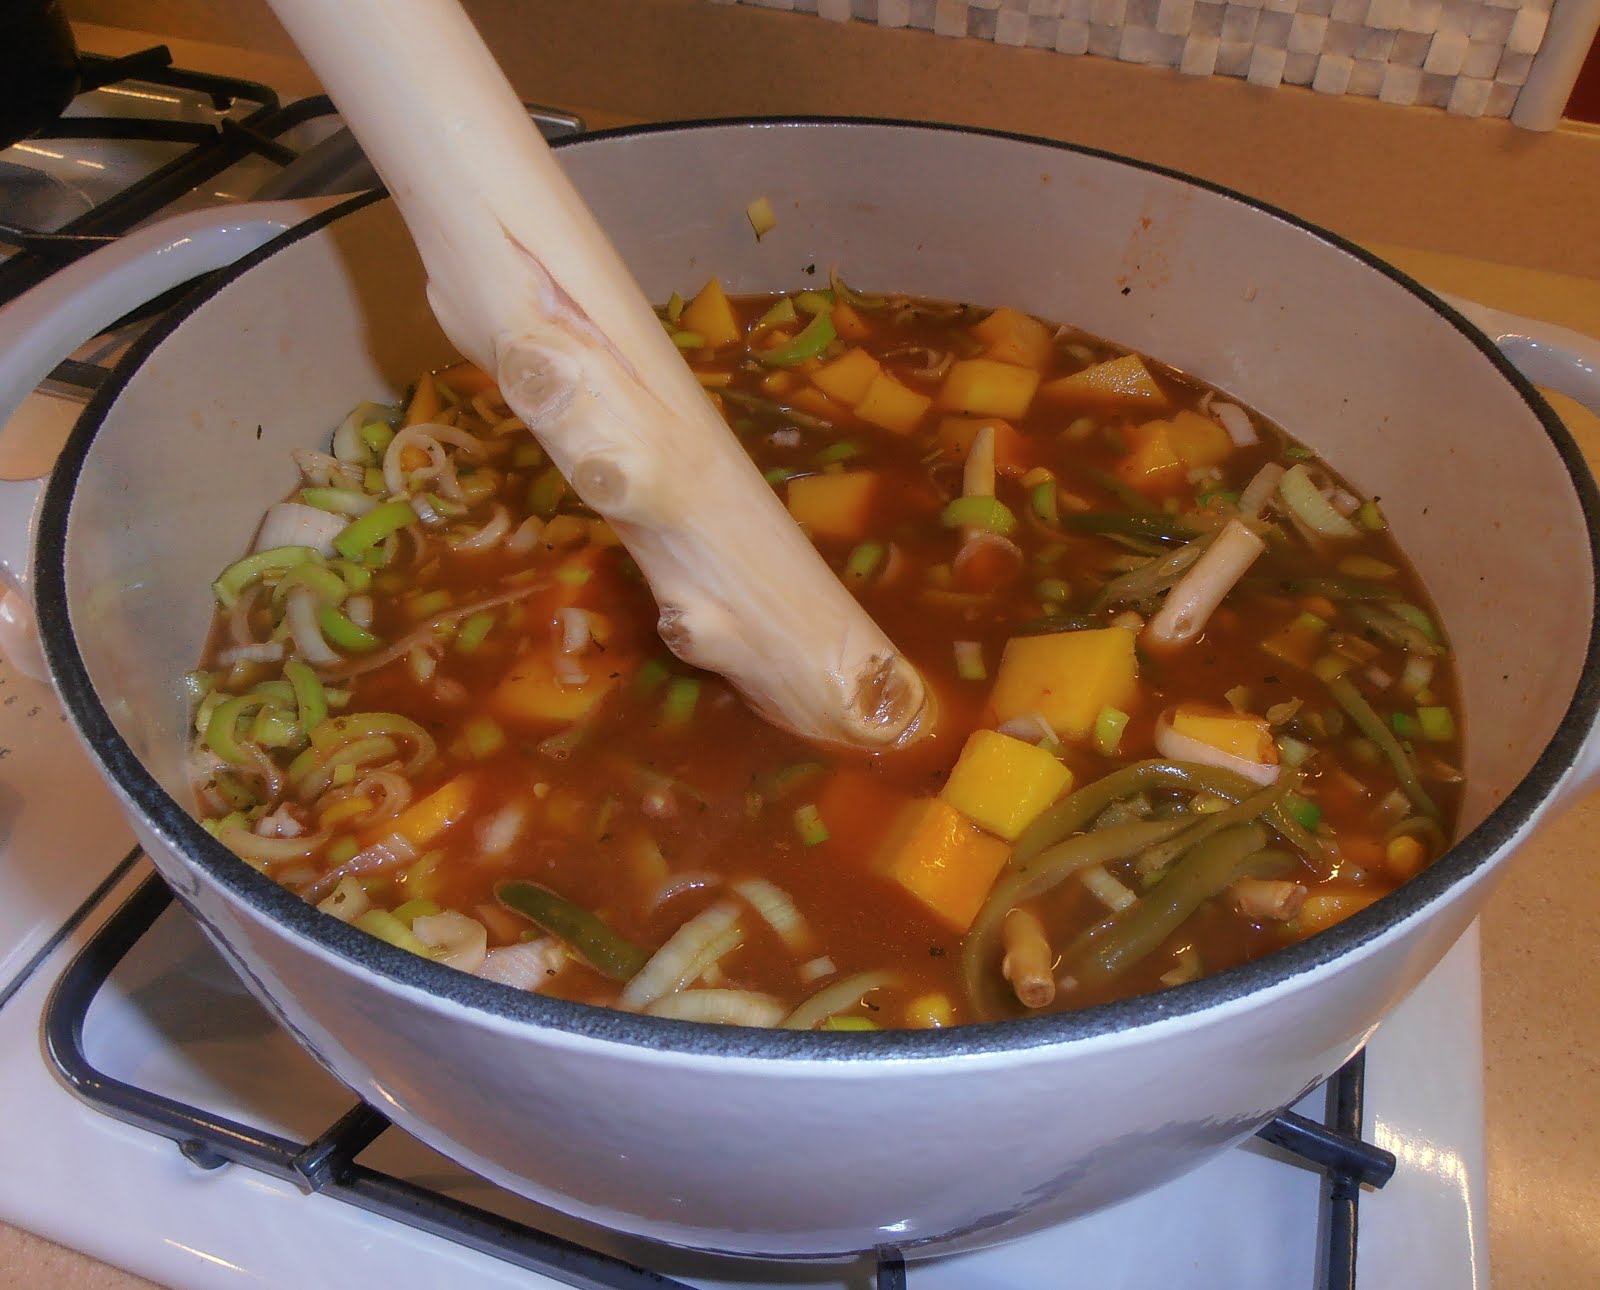
To feel that I was completing this experiment, I had to try them out.  So I made a stew of sausages and vegetables, in my big Dutch oven, and gave it a stir.  The result?  The big tvare was almost too big for that pot -- stirring was restricted but twirling it worked really well.  The smaller tvare worked better but I worried I would break the handle.  It wasn't very stressed but I was being cautious.

They both cleaned up well with a quick rinse and a wipe down.

So I declare it a success!


I really like having both of them.  They are striking to look at, fun to hold, and quite usable.  I decided to put them on display in my kitchen in a glass vase to show off their entire glory.

I encourage you to make one, too, the next time you have the opportunity to get the top of a pine tree.  I enjoyed the process and felt like I was connecting to history!


Friday, April 15, 2016

Corn Sticks - Playing with a Kitchen Gadget

I had made a chicken stew with a Mexican flair:  chunks of chicken thighs with diced tomatoes, carrots, onions, black olives, black beans, chicken broth, and garlic, which was spiced with cumin, oregano, coriander, salt, and pepper.  It was all cooked in one big pan over a very slow fire and the flavors came together into a fragrant blend.

For one breakfast it was heated and put in a burrito-size flour tortilla with scrambled eggs, salsa (mild, because I am a wimp), and shredded Jack cheese.  But for this particular dinner I offered up a bowl full of hot stew topped with shredded Cheddar cheese.  I wanted something like corn bread to go with it.

One of the lovely parts of cornbread is the crispy crust.  I realized that there was no better way to maximize that crust than to make corn sticks in my old, cast iron corn stick pan.

My inherited beauty
It is lovely.  The individual sticks look like ears of corn and, because you put the batter into the cups when the pan is very hot, even the part touching the pan turns out crispy.

My old friend, Betty Crocker's Picture Cookbook, came in handy for the right recipe.


In the section called "Quick Breads" I found a recipe called "Canary Corn Sticks"  (page 70).

Canary Corn Sticks
from Ohio

Beat 1 egg.

Beat in 1 1/2 cups buttermilk
             1/2 tsp soda
             1/2 cup sifted Gold Medal flour
             1 1/2 cups corn meal
             1 tsp. sugar
             3 tsp. baking powder
             1 tsp. salt
             1/4 cup soft shortening


Pour or spoon into buttered hot square pan, muffin cups, or corn stick pans (see Betty's notes, below).  Bake just until set.  Serve piping hot with butter.  

Temperature:  450 degrees F (hot oven).

Time: Bake 10 to 15 minutes for corn sticks.  

Betty's Notes

Beat egg.  Beat in with rotary beater milk, dry ingredients, soft shortening (bacon fat is good). Beat just until smooth.

Generously butter 12 corn stick pans ... Heat in oven while mixing batter.

Pour batter into hot pans until almost full.

My Notes

I keep dried, sweet cream buttermilk around so I reconstituted it with water and mixed it into the beaten egg in a big bowl.  Then I mixed the dry ingredients together in another bowl until they were well mixed.

Once the dry and wet ingredients were put into the same bowl, I used a vegetable shortening and cut it through the mixture while stirring.  This still left small bits of shortening in the batter.


The corn stick pan was oiled (not buttered) and, when removed from the oven, was very hot and the oil was smoking a little.  The batter sizzled when I spooned it in.

First batch cooked.
After 10 minutes they were ready.  I made a second batch, too, which looked better than the first.

Second batch, overfilled.
But they turned out to be beautiful!
The Verdict

The first batch wasn't as fluffy as the second and had holes in it.  I think the oil on the pan fried the batter whereas in the second batch, it just kept the pan from being sticky.  But still they were both tasty!

I love the color assortment.
They were an excellent accompaniment to the stew in both flavor and having a crispy crust.  Some were soaked and dunked in the stew, others were buttered and eaten without the stew on them.  The corn taste made up for the lack of corn kernels I wanted to put in the stew but didn't have handy.

Success!

I ate more than this one stick.

Tuesday, August 4, 2015

Another Gadget Post -- A Pasta Cutter

I have this fun looking gadget in my kitchen that looks like this:

Note the orientation
How strange!  I thought about it and its parts to get a clue on what it does and decided it cuts pasta dough into strips.  My daughter searched the internet and confirmed my suspicions:  you can find it for sale listed as a vintage rotary pasta cutter or vintage noodle cutter.

The wheel width is not adjustable like some brands but if you aren't demanding a variety of noodle widths, you might be happy with this.  I wasn't quite sure how to use it but we decided to give it a try.  Of course that means we needed pasta dough!

I turned to my faithful The Great Food Processor Cookbook by Yvonne Young Tarr.

ISBN 0-394-73284-7
On page 365 you will find a simple recipe labeled

Pasta Dough

Yields enough to serve 4 to 6

3 cups flour
1 1/3 teaspoons salt
2 eggs
1/3 cup water


And water.
Combine flour and salt and sift together into container; turn machine quickly on and off twice.


Turn on machine and add eggs, 1 at a time, until both are well incorporated, then start the machine again and add enough water in a thin, steady stream to make a soft, well-formed, but not sticky dough.  Cover dough and set aside for 30 minutes.


Knead dough according to directions for your machine until it is smooth and elastic, then turn out onto a lightly floured pastry board.

Divide dough into 4 equal-size pieces; roll out, one piece at a time, into very thin, even sheets of pasta.  Sprinkle each sheet lightly with flour and cut into desired pasta shape.


No pastry board but a floured counter top worked great.
My Notes

I used my mixer with a dough hook to do most of the kneading and found I had to add a little more water to make the dough soft instead of stiff and hard.  Once I got the right amount, the kneading looked "right" in that the dough was being manipulated by the hook instead of just bouncing around the bowl.

To use the pasta cutter, I tried holding it and dragging it across the dough in a variety of ways.
This is wrong!  : )
This picture shows me using the cutter upside down.  Not intentionally but I realized that the metal "V" acted as a shield to keep the cut noodles from staying between the wheels as it rolled.

There were several other issues I had to deal with.  One was that the wheels didn't really roll well; this was fixed by a bit of cooking oil dribbled down the shaft and the wheels rotated by hand until they turned smoothly.  The other is that the shield kept rubbing against the wheels; that was just a matter of wiggling it back and forth until it fit over the wheels and snapped into place without touching the wheels at all.

To get it to work well, I had to push it hard against the dough and it still didn't always cut the dough through.  I suspect the wheels need some sharpening, which I didn't do, but I found the noodles separated easily with a gentle pull from my fingers.

After the noodles were cut, I hung them on a wire rack to air dry for at least 30 minutes (as recommended by the cook book instructions for cutting fettuccine).
For the second batch, we put the rack horizontally and let the noodles hang below.
The cook book recommended that we fix the noodles by cooking them "for 5 minutes in a large amount of salted water", which we did.  After they were drained, we dressed them with browned butter and minced Seer Torshi (see this previous post and the next one!).

The Verdict

I liked how it cut noodles into a sensible width and made many at one time.  It worked much better after I oiled the axle and properly aligned the shield over the wheels.  Oh yes, and it worked much better when I held it in the correct position!

The noodles themselves were tasty:  tender not chewy (I cooked them al dente) and with a mild flavor that showed off the sauce well.

Success!  I would use this gadget again, just making sure it is oiled and properly aligned.  The finished noodles are a good width for my needs and I think they would be excellent in a soup as well as with other sauces.

Sunday, February 1, 2015

Aebelskivers -- Swedish Pancakes and a Kitchen Gadget!

A long time ago I had a friend named Joe K.  One neat thing about Joe was how much he admired his mother and her talents.  When he found out I liked to cook, he got me some of her favorite recipes, among which was aebelskivers, AKA Swedish pancakes.

The recipe is written in her hand and I cherish it and the others with it.  I have made them and loved them; the recipe cards are yellowed with age and stained with food splatters.

Page 1.  I think her name was Betty.
My house was filled with family and I wanted to make a fun breakfast for them all.  Then I realized my blog goal to use some interesting kitchen gadgets would be perfect for this:  to make aebelskivers, you need an aebelskiver pan.


Mine is cast iron.  I don't know how old it is; I probably got it from one of my grandparents and I recall that aebelskivers were a bit of a fad in the 1960s and 1970s, so that could be when they purchased it.

Aebelskivers are tasty like American pancakes but they are lighter and ball-shaped.  The pan allows that shape to happen.  They are good served with a dusting of powdered sugar, or syrup, or jam, and a little bit of soft butter.  A great start to a fun breakfast.

Aebelskivers
(makes 56 cakes)

6 eggs, separated
1 3/4 cup buttermilk
2 1/2 cup sifted flour
1 cup sugar
1/2 teaspoon salt
1/4 teaspoon cream of tartar
1 tablespoon vanilla
1 teaspoon baking powder

Separate eggs.  Add cream of tartar to whites and best until stiff but not dry-looking.  

Sift flour (pre-measured), sugar, salt, and baking powder together.  

Beat egg yolks, buttermilk, and vanilla together.

Add liquid ingredients to flour mixture and beat until smooth.  Fold in egg whites carefully.

Heat aebelskiver pan over burner until drop of water dances on bottom of cup.  Brush cups with salad oil.  Spoon 1/2 full with batter.

Turn once, using fork and paring knife (some people use knitting needles).

When brown on both sides, remove to hold in oven at approximately 250 degrees F.  

Frequently refold batter, as whites tend to rise to top.

Batter's up!
My Notes

The directions are straight-forward and easy to follow.  That being said, it has been a long time since I made aebelskivers so I made some mistakes when cooking them:

  • I put too much oil in the cups.  Just brush them lightly.  You don't want oil puddles.
Do not do this at home.
  • I beat the egg whites too much -- they got dry-looking and that made keeping the aebelskivers in their ball shape difficult when turning them.  They kept deflating!  
Stop before this stage
or they will be too flat!
  • I had some issues getting the pan to heat evenly, which I don't recall ever happening before.  I'm not sure why.  What I did was put the aebelskiver pan over an inverted cast iron skillet so that the skillet evened out the heat.
This burned off all the seasoning on the skillet
The Verdict

Success!  Oh yes, they were tasty!  We all enjoyed them despite my blunders and I would do them again any time I had the opportunity to feed a crowd.

Just some of the batch
We did discuss what could be done if you wanted the aebelskivers but didn't have the special pan. We tried baking them in mini-muffin pans at 350 degrees F but the texture was not the same.  They were certainly edible and tasty but they weren't pancake-like.  I think they would make good quick breads, especially with a spoonful of jam in the middle.


We also tried cooking them like regular pancakes, and had good results.  The flavor and the texture were right; the only thing missing was the cute and interesting ball shape.  So this is how I would recommend cooking them if you want to give them a try but you don't have or want to buy the pan.


By the way, the other recipes in the set are Apple Pfankuchen, Pfeffernüsse, and Lebkuchen.  All quite yummy!

Thursday, January 1, 2015

Happy New Year Four! Playing with Kitchen Toys

I am finding it hard to believe that I have completed three years of blogging.  When I first started I was skeptical that I could fulfill even one year, and yet here it is with over 13,300 page views from all over the world and this, the 87th post.  My blog is linked into Top Food Blogs at myTaste.com and into Tasty Query.  Each post goes on a Pinterest board, too.  All of these have helped make my fun more visible.  It would not have happened at all without my daughter's encouragement and computer support.  Thanks, Girlie!

One major change in my cooking is that my confidence level for playing with recipes or just creating my own dishes has risen considerably.  I have read enough and practiced enough that I have ideas and concepts that can guide me through judging when a flavor seems "right" and what sorts of items to combine for a tasty meal.  Not everything I try works out but my successes far outnumber the failures.  I have a wonderful sense of freedom in the kitchen.

On this, my first posting for a new year, I like to set some goals.  This year has two:  to continue to explore historical or traditional recipes from a variety of countries, hopefully with a greater emphasis in using vegetables; and to explore some old kitchen gadgets to see how they are used.  With those in mind, I present to you a gadget that has been in my possession for years, mostly in storage, and I had no idea what it was designed for.


Lid on.
Lid off.
It is made of metal, in shiny chrome, has metal feet on the bottom, a flat cooking surface in the center, a well around that, a handle, a lid, and a flange on the raised rim.  Every time I saw it I wondered about its use.

I decided to figure it out.  My major clue was the manufacturer's stamp on the bottom:

The manufacturer was the Everedy Company, Frederick, Maryland, USA
It is called the Bacon-Egger, Jr., and a quick look around the 'net showed me that they were for sale in 1956: see this ad in the Spokane Daily Chronicle.  I think I inherited it from my grandparents, so this time period seems reasonable.

The description in the ad says, "Fries bacon, keeps it hot till eggs are done."  Ah ha!  Now I know what to do!

It is used on the stove top and first I cook the bacon.

Four half pieces fit comfortably on it.
The lid is used to keep the bacon flat and the well catches the grease.

The holes in the lid let out steam.
I was ambitious and cooking for three people, so I tried several batches of bacon.  Once cooked, the bacon went on the flange where it stayed warm without cooking and drained extra grease.


The problem was the well filled with grease and I couldn't drain it without removing the pieces from the side.  That means the cooking area flooded, more steam came through the holes making it too hot to hold the knob, and little geysers of hot grease erupted from the lid edges.

My conclusion is that this was designed to cook enough bacon for one to two people with built-in portion control!

I tried cooking one egg in the grease flood but didn't really like how it turned out.  I cooked it over-easy and thought it was too coated in bacon fat.
Room for two!
So I removed the bacon to a plate, drained off the excess grease, returned the bacon to the flange, and cooked a second egg.  It was much better.  Yes, the bacon stayed warm.

The Verdict

Overall it worked well. Success!  The only other issue I found was that it had two "hot spots" on the cooking surface which tended to cook items on them faster than the rest of the surface.  You can see some scorching to the right and left of the egg in the picture above.  I just had to be aware of them and make sure to move the food items around while cooking.

It was easy to clean and easy to drain off the excess bacon fat.

If you are a bacon and eggs fan, this is a handy gadget to have.  I saw them for sale on eBay for about $5.  I also think it might be a good pan for cooking crepes, but I'm not sure if the well will be a help or a hindrance.

I looked up the Everedy Company on the history of Fredrick website and found this description:

The Everedy Company was founded as the Everedy Bottle Capper Company in May of 1930.  It began with a factory building on East Street in 1922, producing a range of metal items for domestic use, including "Speedy-clean chrome cooling utensils, Everedy Door Hardware, Everedy Home Bottling Equipment, Evercraft Modern Gift Merchandise."  This larger complex was completed in 1942 and connected the East Street buildings to the new warehouses on E Church Street Extended.  The total complex had nearly doubled in size and took advantage of this space by securing numerous World War II manufacturing contracts.  After the war the Everedy Company produced "Anti-Tank Mines, navy Anti-submarine floats, grenades, grenade adapters, rocket parts, bomb parts."
Remnants of the company's location still exist:
The buildings of Everedy Square were once the home of the Everedy Company, where the Everedy Bottle Capper was invented and manufactured.  The product met with national success following the enactment of Prohibition.  Prospering for 50 years, The Everedy Company ultimately produced a line of kitchenware that is still used in many households today.
(Citation:  Everedy Square)

I even found a legal description of Everedy's wares on Trademarkia, showing the trademark was first in use in 1936.
Metal hollow ware for use on the top of stoves-namely, frying pans, skillets, and cooking pans [comprising a central fryer portion surrounded by an annular inclined ledge portion having up-struck projections thereon for supporting and maintaining strips of bacon thereon while eggs are being fried in the central portion, where the annular portion and the central portion are connected by an annual grease-receiving trough and where the trough has supporting feet thereunder for mounting the metal.

Cookies Consent

This website uses cookies to offer you a better Browsing Experience. By using our website, You agree to the use of Cookies

Learn More