Showing posts with label almonds. Show all posts

Thursday, December 15, 2022

Broccoli Salad - One of My Most Favorites

I reserve the last post of the year for one of my most favorite recipes.  This year I choose broccoli salad.

Yes, I know that you can find a bizillion recipes for broccoli salad on the internet.  It is also found in many printed cookbooks.  So why would I write it up here?

There are many versions.  This is MY version.  The combination of ingredients that I love the most, the way I make it for myself.  Welcome to a taste of what appeals to me.

I'll let you in on a secret about me:  I love broccoli stems more than the tops.  There!  I said it!  I think they are sweeter, and I love their crunch.  I use both the thick and thin stems in the salad, and I usually peel the thick stems.  See instructions below.

Broccoli Salad

1 pound broccoli, stems and tops

1/2 cup finely chopped red onion

1/4 cup coarsely chopped almonds

1/2 cup golden raisins

1/2 cup bacon bits

2 tablespoons balsamic vinegar

1 cup mayonnaise

1/2 teaspoon salt

2 teaspoons sugar

First, put the vinegar into a small bowl and add the salt and sugar.  Mix well; the idea is to start dissolving them into the vinegar.  Set aside.

Cut up the broccoli.  The very thick stems can be peeled, removing the stringy outer layer and leaving behind the juicy inner core.  Cut them into small bite-sized pieces.  The thin stems can be cut up, and the little "tree" tops should be broken up into reasonably small pieces.  Make everything a good size so it can be eaten without using a knife.

Mix the broccoli, red onion, almonds, raisins, and bacon bits together in a big bowl.

Now mix the balsamic vinegar into the mayonnaise until the dressing is uniformly colored.

Stir the dressing into the veggie mix until everything is well-coated.  Chill and serve.

My Notes

Sometimes my sweet tooth gets the best of me, and I put in more raisins.  

Don't chop the broccoli too small or it won't stand out against the raisins and almonds.

Peeling the thick stem

Chopping the thick stem

Bowl full o' broccoli

The goal for the dressing is to taste tart and sweet and creamy.  When you taste it before mixing it into the veggies, you should get a vinegary bite that is tempered by the sugar.  The salt should not be discernable.

Keep in mind that the bacon bits will add salt to the overall flavor mix. 

The Verdict


This is a favorite because it tastes so good to me.  So success!

It also tastes good to other people, and I have no qualms about serving it to them.  I think the love of sweet-and-sour is universal, and this dressing does it.

I like that the salad is very moist and the dressing is on everything.  You might want less dressing.  I think the dressing ties all the flavors together.

Another reason I like this version is the use of balsamic vinegar.  I think it adds a depth of flavor that regular white or apple cider vinegars don't offer.  Use a good quality balsamic if you can.

The dish is also visually interesting.  The colors of the broccoli, nuts, bacon, and onion all work well, and there is visual texture, too.  

The salad goes well with sandwiches for lunch, as a side dish with dinners of roasted meat or stews, and sometimes I like just a bowlful as the whole meal.

Please enjoy this favorite.  You can also play with the proportions to suit your tastes.  Chopped walnuts are a good substitution for almonds.


Monday, December 4, 2017

Honey Balls -- A Ladies' Group Christmas Cookie

In the early 1980s, a friend gave me this book:

Well loved, and published in 1971
My Internet searches tell me that "The Open Line" was a radio show in Iowa, Minnesota, Wisconsin, Illinois, and Missouri.  Jim Loyd was the host and listeners would send in their recipes.  From that, the radio station published bulletins and, later, cookbooks containing those recipes:
The first Open Line Cookbook, "The Best of the Open Line", was offered in 1969 and included Open Line recipes collected over the first six years of a daily radio telephone program on WMT Radio called "The Open Line", first airing in 1963.  From the very beginning, recipes and questions and answers on cooking dominated the whole hour, indicating the popularity of favorite family recipes passed along for others to share and enjoy.  In the first cookbook, reluctantly, some recipes had to be passed by because a 250 page cookbook will only accommodate so many recipes.  A second cookbook called "The Rest of the Best of the Open Line" was offered in 1971, including some of the omitted recipes and new recipes received in the two years between the first and second cookbooks.  (Source:  http://www.openline.bplaced.net/book3.html)
You can find some of their bulletins here:  http://www.openline.bplaced.net/index.html  It is an old website, at least it looks that way from the formatting.  If you explore more of their links, you can find the cookbook I used for this recipe here.

The reason I categorize the recipe under "Ladies' Groups" is this quote from the back page of this book:
Open Line recipes have a special something in common.  They are all a favorite in somebody's family, and are offered in the hope that someone else will share the joy of discovering a way to please their own cookie eaters...
Many of them could have become forgotten recipes, the pride of a past generation.  Passing them along now will perhaps keep them alive and busy, to be enjoyed by generations to come, that remember how good Grandmother's Christmas baking always was, and now can be again in the floured hands of today's Mothers, and tomorrow's Grandmothers.
To me, these are the same thoughts and motivations the Ladies' Groups have for publishing their recipes.  The only difference is that these recipes don't have a name and location attributed to them.  In a way, that makes me sad.

So here is to all the ladies (and gentlemen) who contributed recipes to Mr. Loyd's show and thus to his books.  You are unnamed but your recipes are not forgotten!

Honey Balls
(page 43)

1 cup shortening
1/4 cup honey
2 cups sifted flour
1/2 teaspoon salt
2 teaspoons vanilla
1 cup chopped nuts

And powdered sugar!
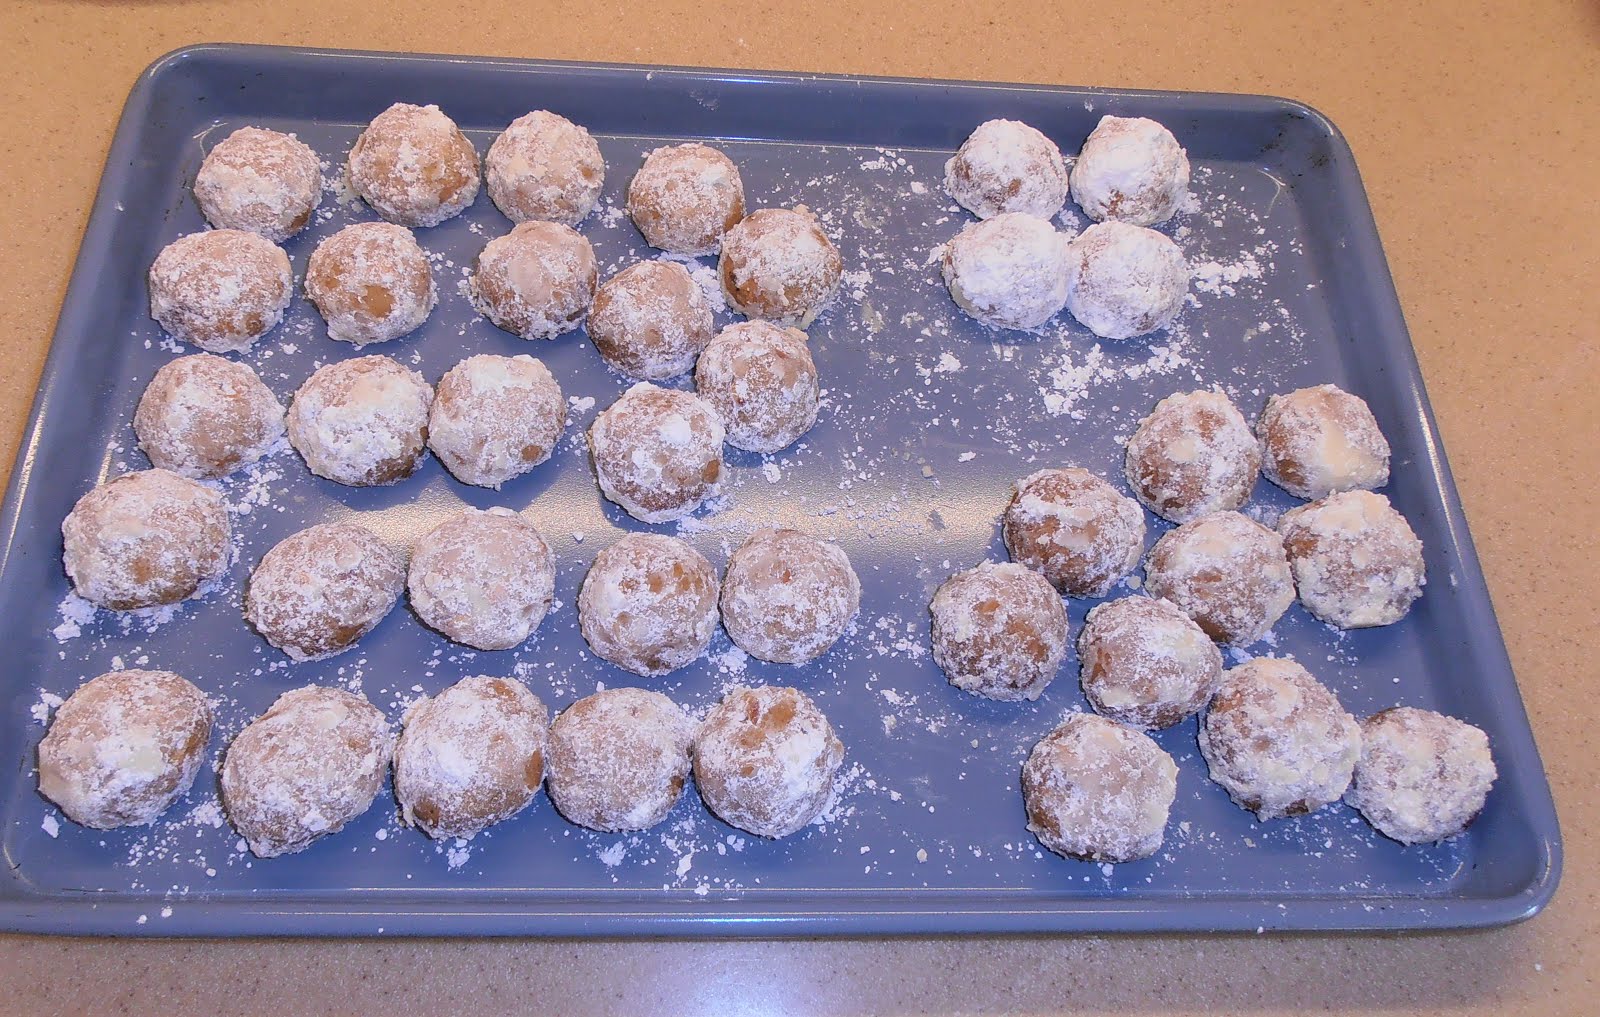
Cream shortening, add honey and cream well.  Add dry ingredients, then vanilla and chopped nuts.  Roll in balls the size of hickory nuts and bake on ungreased cookie sheet.  Bake for 30 to 40 minutes in a 300 degree (F) oven.  While hot, roll in powdered sugar.  Roll in powdered sugar again when cool.

My Notes

Notice these don't use eggs or any sort of leavening!  I suspect it is either an old recipe or was created during a World War when foods were rationed.

I chose a dark honey for a rich flavor.  I used almonds which I chopped and lightly toasted.

After the shortening was beaten well all by itself, I added the honey and beat it some more.  It was definitely creamed well!


The dough came together easily and wasn't sticky at all.  Then I chilled it for about 20 minutes while the oven heated and I ate lunch.


I had to look up the approximate size of hickory nuts and settled on about 1 inch diameter.  When I placed them on the cookie sheet, I wasn't sure if they would spread or not.  Sure, the recipe says they are "balls" but with all that shortening I wondered if they would spread.  So I spaced them widely apart.  The rest of the dough went back into the refrigerator.

Being cautious
The recipe called for baking them for 30 to 40 minutes and my oven tends to cook things quickly, so I chose 30 minutes.  They smelled heavenly while they were baking!  You can see they didn't spread at all.

Room to play
I rolled them in powdered sugar when they were right out of the oven.  I was surprised at how much sugar stuck to them.  In some areas, it was thick.


It was time for the second batch.  I spaced them closer together.  In taste testing the first batch, I thought they were cooked too much.  They weren't burnt but I wanted them to be softer.  So I cooked the second batch for 25 minutes.

Batch #2, closer and cooked 5 min. less
So much sugar stuck to both batches from the first roll that I wondered why I should roll them twice.  I tried four of them and noticed that they were prettier after the second roll.

The twice rolled four are in the upper right corner.
The Verdict

Several of us tested them.  We found that the honey flavor was detected after we had been chewing the cookie for a little while.  It wasn't dominant but it was there.  Mostly I tasted the nuts.

The first batch was good but a bit too dry for my tastes.  The second batch, cooked five minutes less, were better but I still think they should be cooked for only 15 to 20 minutes in my oven. 

They were good cookies!  Nutty, very slightly sweet, crunchy.  The second roll in the powdered sugar only enhanced the look and did not make the cookies any sweeter.  I think people who normally don't like sweet cookies would like these.  I also think they would go well with coffee or tea. 

Now that I know they don't spread when cooked, I would put the entire batch on one cookie sheet if I could. 

Success!  A handy cookie any time of year.  I suspect the dough would freeze well -- and maybe would be good to shape into a log and sliced.  Then the cookies would bake very quickly.  It is worth a try some day.

Thursday, November 2, 2017

Four Sauces for a Chicken -- Sauce #2: Cameline Sauce

I had decided to make four sauces to serve with the roasted chicken I had purchased.  The first sauce was a Roman Empire era sauce called "Sauce for Cooked Meat."

Today's post is about the second sauce, a classic medieval recipe from one of my favorite books, Pleyn Delit, by Hieatt, Hosington, and Butler.

ISBN 0-8020-7632-7
Recipe 48 is Sawse Camelyne, about which the authors say,
Cameline sauce is one of the most ancient and ubiquitous sauces of the Western Middle Ages.  It is difficult to define it, except that is contains, perhaps 99 per cent of the time, cinnamon.  Thus, any version that does not contain cinnamon may be suspected of being the result of careless copying ... We particularly like the version with currants and nuts as an accompaniment to roast lamb, but medieval people liked almost any version of this sauce with most meats:  eg, veal, pork, rabbit.  Currants and nuts are unusual options and may be omitted; with or without them, consider this as an appropriate sauce if you want to do something particularly festive, like a roast suckling pig.
I thought this sauce was very appropriate for my company because they are wine aficionados and this recipe gives wine as an optional ingredient.

One aspect of this book I love is that the authors give the original recipe along with their modern redaction.

Sawse Cameline

Take raysouns of courance & kyrnels of notys & crustes of brede & powdour of gynger, clowes, flour of canel; bray it wel togyder and do therto salt.  Temper it up with vyneger, and serve it forth.

Cameline Sauce

2 tbsp breadcrumbs
1/3 cup vinegar, or 1/2 cup red wine
1/2 tsp salt, or to taste
1/2 tsp ground ginger
1/2 - 1 tsp ground cinnamon
optional:  1/4 cup each currants and walnuts; 1/2 tsp nutmeg and/or 1/4 tsp cloves


I chose the wine, nuts, and currants version
Blend ingredients, preferably in a blender.  May be served without cooking, but if you use wine rather than vinegar it should be simmered for a few minutes.


My Notes

My breadcrumbs were dry.  I chose a good quality Cabernet Sauvignon, and I had no walnuts so I used almonds.  I used a little less than 1/2 tsp of salt and a full teaspoon of cinnamon.

I put all the ingredients in the blender and ran it until the mixture became finely textured but very thick.  It was not going to pour out of the container!  So I added a little more wine and blended it until it was soft enough to pour.

Since I was using wine, I took the authors' advice and simmered the mixture for a few minutes.

Fresh out of the blender
The sauce was still very thick.  The heat on the pan was kept very low and I stirred the mixture often to keep it from sticking and scorching.

Then I poured it into a bowl to cool.  It was still very thick so I stirred in a bit more wine to thin it.

It made a bit more than 1/2 cup.

The Verdict

I served the four sauces on plates.  Each set of plates served two people.

Cameline sauce is the second from the left
You can see how thick the sauce was.  I had it at about "mayonnaise" consistency when I was through making it but the sauce sat around for a few hours before serving and it thickened up again.  I should have thinned it again with more wine.

The idea was to dip pieces of chicken into the sauce before eating but the sauce was so thick that we all ended up spooning the sauce onto our plates and spreading it on the meat.


How did it taste?

My wine aficionados declared it to have a "complex" flavor.  The wine, the spices, the fruit and nuts all contributed to what was recognized as a medieval dish.  To me it was a strong wine flavor (but moderated off the "out of the bottle" wine flavor -- I suppose because of the simmering) with a medium strong spice dance-on-my-tongue.  It was only slightly sweet and slightly rich.

I liked it on the chicken and so did all my guest tasters.  I would not want to eat it by itself as I did the Roman sauce.  It was my second favorite sauce although one of the guests declared it to be his first favorite.

When I was making this sauce I was tempted to put in a little red wine vinegar just to get an acidic tangy sensation but I decided to let the wine do that by itself.  I am glad I left it as it was.  There was some acidity from the wine and that was enough.

It occurred to me that the ground almonds may have contributed to the moderated wine flavor.  Since they were simmered in liquid, they may have formed some almond milk, which is creamy.

I declare it a success and would gladly make it again.  Perhaps I would use fewer bread crumbs or more wine to make it thinner and more "dip-able."  And I would check it just before serving to make sure it was still thin enough to serve.

Saturday, April 1, 2017

Dulcia Domestica -- Roman Empire "Dates Alexandrine"

I have returned to my The Roman Cookery of Apicius book.  This time I have a dessert made with dates and almonds and cinnamon.

ISBN 0-88179-008-7
"Dulcia Domestica" means "homemade sweets".  The author who translated and redacted the recipes, John Edwards, said in the footnotes,
The word Alexandrine when used as an adjective by Apicius implied "expensive" or "best quality."  Alexandria itself was the great port of arrival for spices from India and China.

Dulcia Domestica:  The Original Recipe (Translated)

Take palms or dates, with the stones removed, and stuff them with nuts or nut kernels and ground pepper.  Salt the dates on top and bottom and fry in cooked honey, and serve.

Mr. Edwards also comments
In the preparation of sweets, Apicius used the word "pepper" loosely.  In the first century A.D., cinnamon and nutmeg were thought by the Romans to have common points of origin with pepper.  They were, in those days, prohibitively expensive.
So in his redaction, Mr. Edwards has us using cinnamon.

Dates Alexandria (page 173)

20 whole dates
20 blanched almonds
1 t. cinnamon
butter
salt
liquid honey

And olive oil for the pan
Remove pits from dates.  Roll almonds in cinnamon and stuff one in each date.  Place dates on a greased pan.  Sprinkle salt over the dates, then coat each one with honey.  Glaze in a 450 degree F oven for 10 minutes, then serve.

My Notes

I bought pitted dates, which was really convenient.  To slice them open to allow the almonds, I inserted the knife into the side hole and cut outwards.  This kept the date from being crushed by the knife.

It was easy to blanch the almonds.  The benefit was that the almonds were still damp so the cinnamon stuck to them well.  You really want a light dusting of cinnamon all over the almond.  Some will rub off on your fingers while stuffing and some will rub off to the inside of the date.

I kept rolling the almonds in the extra cinnamon as I was taking some out.
Some dates were big enough that I put in two almonds to make it look filled.

I think they would be better pushed closed, if possible.
I used kosher salt and sprinkled just a little over the tops.  None on the bottoms.

A little more is acceptable.
The pan was greased with olive oil (I think this is more realistic than using butter).

Then I drizzled each date with a bit of honey.  I did not try to coat each one thoroughly.

Just a zigzag drizzle across each.
I cooked them in a toaster oven.  Because of the close quarters and high heat, I cooked them for 5 minutes instead of ten.

I pulled it out when the honey smoked a little.
After they came out of the oven, I let them cool to the touch.  But get them out of the puddle of honey before it gets too cool, or they will stick to the pan despite the olive oil.

The Verdict

Confession time:  I made these once before but didn't document it.  They were good!  This time around didn't disappoint, either.

The nice part about cooking them in the honey is that the honey gets less sticky, making it a pleasure to eat the dates instead of a mess.

I loved the crunchy texture and cinnamon, sweet date flavors.  At first I thought the honey glaze was going to be too much sweet, but it really was just a back up flavor.  It made the overall taste deeper.  But what really startled me was the addition of the salt.

I know salt and sweet together can be good.  In fact, a little salt can make the sweet taste sweeter.  But this was a stronger salt sensation and, once I expected it, was a lovely complement to the sweet.  It reminded me a little of kettle corn, a sweet and salty crunchy version of candied popcorn.

Dates Alexandrine were a solid success.

Now here is the good part:  The second day they tasted even better!  What I noticed is that the salt dissolved into the honey and spread out over more of the date.  It was a lighter salt experience but still good.

I shared the dates with my colleagues.  I had wanted more cinnamon flavor (as did my guest tasters at dinner) but several of my colleagues admitted to disliking cinnamon.  However they did like the dates as given to them and thought the amount of cinnamon was just right.

So it is your choice!  If you think your diners love cinnamon, consider putting on more on the almonds or sprinkling some into the dates.  If you are not sure, go with the recipe.

I liked the author's idea to bake the dates.  However if I were to do this as a public demonstration, I would fry them as the original recipe indicates.

Finally, I would like to try this with pepper only, or a mixture of cinnamon and pepper, some time.  I think the bitter from the pepper would be intriguing and the whole flavor surprising.

Sunday, February 5, 2017

Vintage California Cuisine -- Chicken in Almond Sauce

I was in the mood to try something different.  World War Two recipes came to mind but I didn't find any that peaked my interest.  Then I rediscovered a book I had purchased a few years ago after discussing California cuisine with a history nut.

ISBN 978-0-9795510-0-0
This fun little book dabbles in a variety of sources:  "300 Recipes from the First Cookbooks Published in the Golden State."  Its emphasis is to show how early California cuisine was influenced by many cultures, including New England, the South, Paris, the Quakers, the vegetarian movement in the late 1800s, and of course, Mexico.  All the books cited were published between 1872 and 1915.

The recipe that caught my interest was called "Chicken in Almond Sauce."  (page 95).  It was taken from El Cocinero Español, published in 1889 and written by Encarnación Pineda.  More on this later.

I was intrigued by the ingredient list.  Along with chicken and chorizo sausage it called for chiles, almonds, raisins, and pineapple.  I really wanted to know how those flavors combined!

Chicken in Almond Sauce

Put the stock used for cooking the hen in a saucepan.  Add sliced tomatoes, garlic, slices of peeled and cored pineapple, chorizo sausage, a tablespoon of vinegar, raisins, almonds, small pickled chile peppers, salt, pepper, and the de-boned pieces of hen.

My Notes

I cooked a 4 1/2 pound hen by simmering it gently in a pan of water.  Then I cooled both the bird and the stock, then strained the stock to remove sediment.  The remaining stock was approximately 3 quarts in volume.

To that stock I added my estimation of how much of each ingredient would make for a tasty, balanced dish.

2 tomatoes, chopped
1 clove garlic, minced
1 cup crushed pineapple, drained
4 ounce can diced mild green chiles
12 ounces beef chorizo sausage
1 tablespoon balsamic vinegar
1 cup raisins
3/4 cup ground almonds
1 teaspoon pepper
1/2 teaspoon salt
20 ounces de-boned chicken, sliced

And the stock.
This filled my six quart pan so I brought it to a slow simmer and left it, covered, for about an hour.

The Result

My impression was that this was supposed to have a stew-like consistency.  This was not even close.  It was soup and when I tasted the broth it was weakly flavored.  The ground almonds were an unpleasant interruption in the liquid.

A beautiful color!
Should I serve it as a soup?  I didn't want to so I used a slotted spoon to scoop out the ingredients and then added just a little broth to each bowl.

I love the puffy raisins.
The stew was garnished with some shredded Cheddar cheese and served with some quality tortilla chips on the side.

The chunks of chicken are appealing.
The Verdict

It was good!  Flavorful and the surprise bits of sweetness from the pineapple and raisins was pleasant.  The chicken held together in chunks which helped the dish feel like the chicken was the focus and the vegetables were the support team.  We all liked it and had seconds.  Success!

How I Would Change My Redaction

I think that I should have placed all the ingredients in the pan and then added enough broth to make it moist enough to cook.  If convenient, you could probably put the whole thing in a casserole dish and bake it slowly to blend the flavors.

Two tomatoes was right for the amount of chicken used.  I would use two cloves of garlic, though, for more flavor and 8 ounces of the chiles as I couldn't tell they were there except visually.  One cup each of pineapple and raisins was right, too, and I think chunked pineapple would also work well.

The chorizo was put in in chunks but the long, wet cooking caused it to dissolve into little bits.  Perhaps using less liquid would keep it in larger pieces.  It did flavor the mixture nicely and color it red.  It made the dish more fatty than I like but that wasn't really a problem.

I used ground almonds because I thought they would make the dish creamy, like they do when making almond milk.  They might have if less broth was used or more ground almonds.  I don't think big almond chunks in the stew would have worked at all.  Sliced almonds may have been a good garnish.

More on Encarnación Pinedo

I also have a copy of Encarnación's Kitchen, by Dan Strehl, which contains a selection of recipes translated from her book.  After cooking the Vintage California Cuisine's recipe, I looked up "Chicken in Almond Sauce" to see his version:

Aves o carnes en almondrado
(Birds or meat in almond sauce)

Grind together clean roasted almonds, a slice of toasted bread, two hard-cooked egg yolks, parsley, onions, and finely chopped garlic (understand that you should only use two or three cloves at a time).

Parboil the mixture, then add the broth the poultry or meats were cooked in. 

Then season it with cloves, cinnamon, and capers, and add wine, vinegar, and a spoonful of sugar.

Let the sauce thicken before placing the cooked poultry or meats in it.

Wow, this is very different from the version I worked with!  I'm not sure how the translations could differ so much.  I wish I could read Spanish so I could see Ms. Pineda's version myself.

Mr. Strehl's book has ISBN 0-520-23651-3.  From the comments about it, I suspect his version is more authentic than the Vintage California Cuisine's version.  But it was still good!  To be fair, Ms. Pinedo might have supplied several recipes with similar titles.  This often happens in older cookbooks.


Friday, March 20, 2015

Scottish Border Tart, Take Two

On an early post, I tried the Scottish Border Tart but neglected to include the eggs in the filling.  They were listed in the ingredients but did not show up in the instructions.  So I tried the recipe again, this time adding the eggs at the bold text.
To make the filling beat the sugar and butter together until the mixture becomes creamy.  Beat in the eggs. Add the sifted flour and ground almonds. Spread a layer of jam over the bottom of the pastry and then add the filling.  Arrange a lattice design of pastry strips on top.  Cover with the flaked almonds.  Bake in moderate oven (350 degrees F) for 30 minutes.  15 minutes before the tart is cooked remove from oven and sprinkle over a layer of confectioner's sugar.  Return to oven. 
I used the same pan so everything was the same except for the eggs.

The first thing I noticed is that the filling spread like a batter instead of like a crumble.


Then the almonds on top sank into the filling more.


The finished tart looked softer and showed off the powdered (confectioner's) sugar better.


And the individual pieces looked and tasted fluffier than the first attempt.

Take Two:  Fluffy
Take One:  Crunchy
The Verdict

It tasted great!  The softer texture was nice and more like a coffee cake than a shortbread.

I liked it and so did my coworkers.  Success!

In comparison, they were both good.  However I and my guest taster enjoyed the first version the most because we liked the shortbread crunch along with the almonds.  My recommendation:  fix whichever one appeals to you the most.  Crunchy or soft -- your choice.

Sunday, March 1, 2015

Scottish Border Tart

A number of years ago I visited the quaint town of Solvang, California and, in the shop "Tartan-n-Things", I purchased a book titled Scottish Fare.  It is charming because it is filled with recipes with their Scottish names (like "Roastit Bubbly-Jock" and "Cullen Skink") along with some history, culture, and interesting facts about Scotland.

Published in 1983 by Norma and Gordon Latimer
I was in a dessert mood and the description of the Border Tart looked very appealing.

Border Tart  (page 62)

For the pastry:
1 cup plain flour
2 1/2 ounces butter
1 ounce sugar
1 egg yolk

For the filling:
2 ounces butter
2 ounces sugar
2 ounces self-rising flour
2 eggs
2 tablespoons raspberry jam
1/2 ounce flaked almonds
1 ounce ground almonds

(Note that the measurements are mostly by weight so get out your kitchen scale!)

I love my ceramic salt cellar!
Make up the pastry and roll out on floured board to line an 8 inch flan ring.  Keep the scraps and roll out to make strips for the lattice design on top of the tart.

To make the filling beat the sugar and butter together until the mixture becomes creamy.  Add the sifted flour and ground almonds. ** (See notes below.)  Spread a layer of jam over the bottom of the pastry and then add the filling.  Arrange a lattice design of pastry strips on top.  Cover with the flaked almonds.  Bake in moderate oven (350 degrees F) for 30 minutes.  15 minutes before the tart is cooked remove from oven and sprinkle over a layer of confectioner's sugar.  Return to oven.  Serve with fresh cream.

My Notes

**The recipe does not specify when to add the eggs to the filling.  I didn't notice this until after the tart was in the oven!  I would add them with the flour and almonds.

For the pastry, I mixed the flour and sugar, cut in the cold butter until the mixture looked crumbly, then added in the egg yolk.  Then I let the dough sit covered in the refrigerator for about 15 minutes to give the flour a chance to absorb the moisture.  It rolled out well.


It took three heaping tablespoons of raspberry jam to make an acceptable layer on the pastry.

Instead of self-rising flour, I mixed 3/4 teaspoon baking powder with 1/4 teaspoon salt then added enough all-purpose flour to make the mix weigh 2 ounces.   Then I blended it all together well.

Does this filling look dry to you?
My pan was a 7 inches by 10 inches rectangle and so it took the entire batch of pastry to cover it. That meant no lattice design on it, so I added extra flaked (actually toasted and slivered) almonds and it looked great.

Pretty!
I wasn't sure how thick a layer of confectioner's sugar to make so I kept it thin.

I took the pan out of the oven after 25 minutes of cooking as the crust was getting very brown.  I think I should have reduced the temperature to 325 degrees F since my pan was dark.

Still looks pretty.
The Verdict

I let the tart cool completely before tasting it.  I was concerned that the filling would be awful since it didn't have the eggs and it did look pretty dry when I spread it on top of the jam.  However I held out hope it would still taste good because the filling without eggs is very similar to a shortbread.

And yes, it did taste good!  It was a bit dry so I should have pulled it out of the oven sooner or baked it at a lower temperature.  But the flavor was lovely -- crunchy and nutty and not too sweet.  The raspberry jam was an excellent tart counterpoint to the more subtle crust and filling.

A very closeup cut-away view
Overall it was thin and that was just right.  My guest taster thought it especially tasty with a cup of coffee and I liked it with cold milk.  We did not put any cream on it.

So despite the lack of eggs in the filling, it was a success!

I would like to try it again with the eggs in the filling, just to see how much more they contribute to it.  I'll save that for the next post.


Wednesday, October 15, 2014

Historical Raviolis! The fourth filling (somewhat English)

See the previous post from September 1 for the dough recipe and first filling recipe, the September 15 one for the second filling, and also the October 1 one for the third filling.

My daughter and I decided to experiment with 14th and 15th century recipes for raviolis.  We had to redact the recipes ourselves, working from the lists given but having to figure out quantities by taste and goal.

We were working from a website that looked like a good class handout for a Society for Creative Anachronism workshop, called "Pasta Class" and found at this link:  http://www.katjaorlova.com/PastaClass.html

After successfully redacting three fillings for boiled raviolis, we decided to try a fried version.  The Pasta Class document lists some fried raviolis and some other books we perused mentioned them, too.  We wanted something sweet, so we adapted the recipe for Emeles, a medieval almond cake, as the filling.

England + Italy = Middle East

2.5 ounces ground almonds
1/2 ounce graham cracker crumbs
1/2 teaspoon cinnamon
3/8 teaspoon ground cardamom
3 tablespoons honey


Mix the ingredients well.  Like in the previous filling recipe, we chose not to use an egg to bind the mixture for two reasons:  one was that we made a small amount of filling and one egg might have been too much and the other was that the honey seemed to be doing a good job of binding by itself.  It went into the refrigerator while we worked on the dough.

We used graham cracker crumbs because I already had them handy.  Dried bread crumbs would work well, too.

The mixture turned out to look like what we expected for the Emeles:


Nutty, sweet, and spiced
We made a second batch of dough only this time I added a tablespoon of sugar to the flour.  By the way, I had to add a lot more flour to the recipe to get the right texture for rolling.  I am convinced the original recipe contains a typo.


We rolled the entire batch out into a rectangle, cut it in half, and covered one half with a damp towel to keep it from drying out.  


We scored the bottom dough and portioned out the filling.  Oops!  There was not enough filling for what we planned, so we used some of the leftover cheddar/bacon/chicken filling for the rest.


I should have doubled the filling amounts as I had first planned
Then we wet the scored edges and placed the top dough, pushing out the air and making neat little packets, then cut them apart.


This time I fried them a few at a time in about 1/4 inch of hot vegetable oil until they were a delightful brown on both sides and crispy.


Too many at once and the oil has a hard time staying at the right temperature
After that I drained them on paper towels and dusted them with a cinnamon and cardamom sugar mix.


The Verdict

This was incredibly tasty.  In fact, they tasted like mini-baklavas!  We were not expecting that and it was quite a treat.  They were crispy, spicy-sweet, and nutty with a depth of flavor from the honey.  They were not greasy -- I credit frying only a few at a time.

Success!

The only thing I would change is that we didn't roll the dough out to be as thin as we had for the boiled raviolis.  It wasn't translucent.  I think the raviolis would have been crispier if we had.  I'm not complaining, mind you!  They were delicious.  I would do it again to surprise people with the flavor.

One thought:  If I were feeling lazy or in a hurry, I might use purchased won-ton skins instead.  They are thin and pre-cut and I know they fry up well.


Cookies Consent

This website uses cookies to offer you a better Browsing Experience. By using our website, You agree to the use of Cookies

Learn More