Showing posts with label demonstrations. Show all posts

Wednesday, March 2, 2016

Playing with Fire -- Cooking on My Hearth (part 2)

The success of cooking shish kabobs in my home's hearth emboldened me to try out my Dutch oven again, this time by making bread.

After the fire was burning for a while and producing coals, I started the dough for a simple wheat with rosemary in the bread machine.

I wanted a loaf shape so I planned on using a metal loaf pan sitting on a trivet in the Dutch oven.

Nifty blacksmith-made trivet!
When the dough was ready, I put it into the Dutch oven which had been sitting near the fire.  This was a lovely place to let the dough do its last rise:  comfortably warm and completely draft free.  Be sure to put on the lid.

Ready to rise
There was a nice pile of coals waiting for me when the dough was ready to bake.


There weren't many flames in the rest of the fire place but the coals seemed like enough, so I set up the oven with coals underneath and more above.

The flash hides the glow.
But it turned out not to be enough coals or enough heat after all.  I think with the charcoal I use in my public demonstrations it would have been but it appears that burning firewood does not produce the same amount of heat for the same length of time and I completely misjudged my fire.

I didn't take a picture of the bread in the Dutch oven but here is a worded image:  The risen dough had risen a little more and was dry on top but had not baked at all.  I finished it by baking it in the regular oven and it came out fine although a little flat on the top where it fell.


So the next night I tried again, this time with a raisin bread recipe.

I started the dough as soon as I started the fire.  I loaded the fire up with extra wood because my goal was to have a good set of coals and extra flame with more coals being produced while the bread was baking.  Just in case!

Again I used the Dutch oven sitting outside the fire place as a warm spot for the dough to rise.

Before rising
It has risen!
I had a good supply of coals for the top and the bottom and also some off to the side in reserve.

The glow is intense enough to show up despite the flash.
Without the flash
This seemed just fine.  After about 30 minutes I could not smell bread baking and I worried that the coals on top had died down too much to be effective.  So I took a small piece of burning wood and put it on top of the oven.


Once the 45 minutes of baking time was up, I lifted the lid to see how the bread was doing.  *I didn't lift it previously because everything I have read about baking in a Dutch oven warns us that lifting the lid releases the heat inside and can ruin your baking.

What did I find?  That extra piece of wood was completely unnecessary:

This time being "upper crust" is not an advantage.
The loaf sounded hollow so I removed the pan from the Dutch oven and tipped the loaf out to cool.
Then I sliced it to see how the baking went.

Nearly done.
The loaf was pretty and mostly cooked correctly.  It was too moist overall and almost doughy at the bottom.  Of course there was that burnt top, too.

This tells me I should have had more coals beneath the oven and fewer on top.

Still, the bread was tasty once I cut off the burnt part, and I was saved from tasting the burnt raisins on the top, a flavor I despise.

And then I discovered the bread was even better once it was lightly toasted.

Yum.  
What I Learned

As in Part 1, I learned that fire management is very important.  I had to pay attention to how fast the wood was being consumed, how fast the coals gave up their heat, and to add more wood to keep up my heat supply.

The second baking attempt had enough heat to actually bake the bread but then I messed up the balance between the top and the bottom of the Dutch oven so that the top burned and the bottom was not baked enough. I didn't not experiment with using my hand held over the coals to test their heat but now I see how crucial that can be for the balance.

I suppose the air space formed by the trivet makes a difference in how much heat needs to be beneath the oven. I used the trivet to allow air to circulate around the loaf pan.  Perhaps it didn't need to be raised at all.

I have seen bread baked without a pan in a Dutch oven.  It was just set down on the greased bottom of the oven. I wanted a loaf shape but I also got the benefit of being able to pull the first, failed loaf out of the oven to finish baking it in the electric oven.  It was easier to remove the pan with the successful loaf without having to move the Dutch oven out of the fire place, helpful considering the weight of the oven and all the ash.  My tiles stayed cleaner.

There is a difference between cooking over a fire pit with coals and cooking beside a fire place.  It is harder to see into the fire place and lifting heavy pots from the side is a challenge.  I used my lid-lifter to look into the Dutch oven while the coals were still on it but I had to make sure I lifted straight up to keep the ashes out of the food.  So I also had to make sure I didn't scrape my hands on the hot chimney while lifting.

None of this makes the job impossible.  I hope I can have more fires so I can practice more cooking on my hearth!

Tuesday, March 1, 2016

Playing with Fire -- Cooking on my hearth (part 1)

I live in California and we are experiencing an El Nino winter:  wet and cold.  I know this is really nothing compared to the places that are being buried in snow and all that, but this is unusual weather for us.  The upside is that my yard is being watered regularly (hooray for the rain) and it has been cold enough for me to build a fire in my hearth and actually enjoy the heat it puts out.  It has been several years since this has happened!

I've built several fires in the last few weeks.  One day when I was watching one and wishing I had marshmallows to toast, it occurred to me that I could practice my demonstration cooking.  Why not?  I always need more practice and this would be using wood and embers instead of the charcoal I normally work with.  Also cooking in the enclosed fire place is different than an open pit.

The last time I tried this was in 2012 when I made Boston Baked Beans in my Dutch oven using charcoal.  You can read about it here:   Boston Baked Beans.

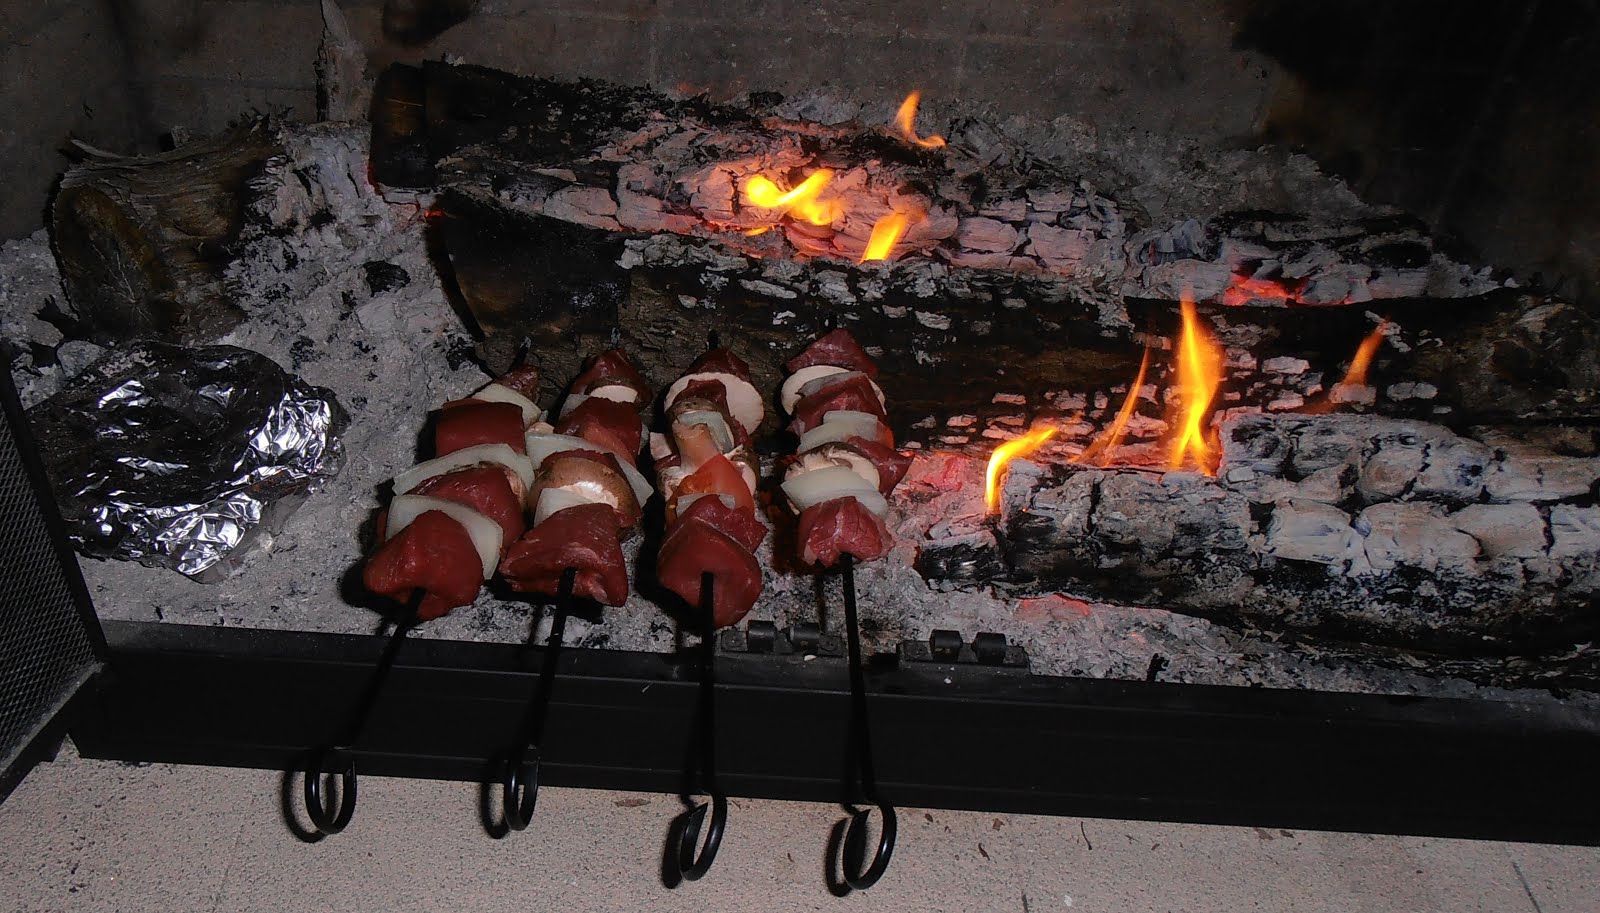
My first attempt was with a lovely piece of beef which I cut up to make shish kabobs.  These are chunks of meat and vegetables put on a skewer and cooked near the flames or over glowing embers.

I used the beef, big pieces of onion, thickly sliced mushrooms, and chunks of tomato.  Once the food was cooked (or close to it), I brushed the kabob with a honey-ginger sauce to give it some extra flavor and cooked it a few minutes more.

To add to the fun, I took several slices of sourdough bread, buttered and sprinkled with garlic powder, and wrapped them in foil.  This I put on some coolish embers to the side of the fire and turned it a few times while the kebabs cooked.


What I Learned

My primary experience in cooking shish kabobs is at the beach, working near a bonfire.  There is so much heat spread out in a big space that it is easy to cook the whole thing just by propping the skewer up against a rock and using the sand to keep it from tipping over.

So for my hearth I had to plan on where the skewer was going to be:  the tip needed to rest on something, the handle needed to rest on something where I could reach it easily for turning, and I needed to know where the heat was in order to cook things evenly.  These had to be sturdy locations because letting the food fall into the ashes and embers is not a tasty choice.

I also had to plan on where to place the skewer before it went into the fire and where to place it when it came out.  Also where I would hold the skewer to brush on the sauce.  This was drippy and messy and I really didn't want sauce all over the tiles in front of the fire.  So I had a bunch of platters handy and decided in advance which was going to do what job.

So I figured out to use a log that was not burning too much to hold the tip of the skewer and was pleasantly surprised to find the fire place screen was a good place to rest the handles.  That left a good open space in which to place the heat.

See the foil packet?
*Important:  When you put the food on the skewer, plan to leave several inches between it and the tip and it and the handle so the food is not touching the places that are supporting the skewer.

My first mistake was not spreading the hot embers out evenly beneath the skewers.  Most of the heat was near the tip and that meat cooked quickly and scorched a little.  The meat near the handle barely cooked and the veggies didn't cook much at all.  The onion was too raw for my taste, even with turning the skewers regularly to cook them on all sides and rotating their order to get each one near to the heat.

Looks good, but...
...some of the meat was too rare, while...
... the rest was just right.
What I realized is that I had planned on reversing the skewers at some point, which is silly because then the handles would have gotten too hot.

When I spread the heat out evenly, the meat along the whole skewer cooked at the same rate.  The veggies got cooked more but still the onions were too raw.  I think the next time I try this I will cut the onions smaller and perhaps brush the onions and mushrooms with oil before they get put on the skewer.

This had the heat spread better beneath the entire skewer.
See?
The sauce still splashed some and I got drips on the tiles but they cleaned up easily.

The Verdict

The meal was good despite the raw onions.  Once I got the embers distributed correctly, the food cooked better and was tasty. The butter had melted on the bread.   I declare it a success in flavor and in experience.

Much, much better.
What is really important is managing the heat, paying attention to where the flames are and how hot the coals are.  I am so used to a gas stove and an electric oven that I don't have to think about the heat distribution!

Another aspect of fire management is keeping the flames that you are not using for cooking low enough that it is not uncomfortable to sit near while you work.  Since the weather was cold I was happy but if the fire had been bigger, I would have been sweating and feeling like I was cooking, too.

Thursday, May 15, 2014

String-Roasted Chicken

My experience in roasting over fire, admittedly limited, was with putting the meat on a spit and having someone sit around it for a while turning the spit.  Nice, fun to look at a demonstration, but tough to keep at it well.  Even the books I have read and the historical kitchens I've visited had spit roasting only.

So imagine my surprise and delight when I came across this book, The Magic of Fire by William Rubel at the Autry Museum in Los Angeles. 
ISBN  1-58008-453-2
On page 62 is the introduction to String Roasting:
"When it comes to hearthside roasting, the elegant solution is to roast from a loop of cotton string hanging from a hook, a practice that lasted well into the nineteenth century.  Today, it is only in France that the system the French call a la ficelle -- on a string -- remains more than a historical curiosity."
I had a Cornish Game Hen that I wanted to try.  I reasoned I wanted a small one for my experiment so it wouldn't take too long to cook.

To summarize the instructions:

   You need a mature fire with a substantial bed of embers. 
   Truss the meat so it is as compact and as symmetrical as possible.
   Skewer the upper and lower thirds of the meat so that the skewers are parallel and at the center of   
       the meat.
On a stick!
   Hang a string from above the hearth or firepit and tie a loop in the end.  The length should get the
       meat pretty close to the embers.
   Make a loop of string and place on part on the skewer, pass the other end through the hanging loop,
       and then over the other side of the skewer.
   Adjust until the meat hangs vertically, without tilting.  Press the loops against the meat.
   Give the meat a spin.

A whirling dervish
   Put a drip pan under the bird and add 1 cup water.
   Baste the meat as needed.

Getting golden
   When the lower part looks done, flip the meat by moving the string to the lower skewer.

Flipped

 Let the meat rest for 10 minutes when done.

 My Notes
I used a technique I learned a few years ago from Gervase Markham's The Complete Housewife (published in the late 1590s) for spit roasting:  he suggests you coat the bird with butter and then with dried bread crumbs.  At first you have to baste it with butter and the drippings but after a little while the bread crumbs have soaked up enough fat to take over the basting themselves.

So what I have here is a chicken that is self-turning and self-basting.  A Renaissance cook's dream come true!

This bird hung over the fire for about four hours.  It should have taken maybe one hour.  My fire was hot but I think the bird was too high above it to get enough heat to cook it to a decent internal temperature.

I liked that the outside was getting golden brown even at the top before it was flipped.  That kept me for worrying that the meat was going bad.

But after four hours I decided to finish it off in a Dutch oven.  I put it and the drippings into the oven with a bit of water then covered it.  Once over the fire I turned it occasionally until it was hot and cooked through.

The Verdict
This has to be labeled as a failure because I was not able to cook the bird completely even in four hours.  However I believe the fault was mine in not getting the fire hot enough or hanging the bird low enough over it.  This is the same error I made the first time I tried spit roasting a chicken -- and the second attempt with the needed corrections worked beautifully. 

So I will give it a failure rating but tell you that it was partially successful because the meat was tender and moist and flavorful.  I did not use any seasonings, just butter and breadcrumbs, and yet everyone who tried commented on how succulent and tasty it was.

I look forward to trying it again some time.  Now I have a better idea of what to do and how to do it.

Friday, November 15, 2013

Mishmishiya -- An Exquisite Lamb Stew with Apricots

Yes, I have returned again to my favorite book, Pleyn Delit


I made this recipe last month while doing a public historical cooking demonstration.  It was perfect for such a demo -- I had one pot over coals simmering the lamb and another pot softening the apricots.  I could easily lift the lid to show visitors what was going on, and the resulting scent wafted to their noses and made them wish it was ready to eat.

The original recipe points strongly at Arabic origins:  the lamb, the seasonings, the apricots, and the almonds, plus the optional rosewater all say "I'm from the exotic East!"

It is quite easy to make and not as sweet as the apricots might suggest.


Mishmishiya -- "Lamb Stewed in Apricot Sauce" (Recipe #80)

Cut fat meat small, put into the saucepan with a little salt, and cover with water.  Boil, and remove the scum.  Cut up onions, wash, and throw in on top of the meat.  Add seasonings: coriander, cumin, mastic, cinnamon, pepper, and ginger, well ground.  Take dry apricots, soak in hot water, then wash and put into a separate saucepan, and boil lightly; take out, wipe in the hands, and strain through a sieve.  Take the juice, and add it to the saucepan to form a broth.  Take sweet almonds, grind fine, moisten with a little apricot juice, and throw in.  Some colour with a trifle saffron.  Spray the saucepan with a little rosewater; wipe its sides with a clean rag, and leave to settle over the fire; then remove.

The redacted version:

2 lbs boneless lamb, in chunks
1 tsp salt
1 - 2 onions, finely chopped
1 tsp each ground coriander, cumin
1/2 tsp each ground pepper, cinnamon
1/4 tsp ground ginger
1/2 lb dried apricots, soaked in boiling water for 15 minutes, boiled 5 minutes, and pureed in a blender
2 oz ground almonds
1 tsp rosewater
optional:  1/4 tsp pulverized mastic, pinch of saffron

As directed in the original translated recipe above, cook the lamb with onion and seasonings over a low heat, covered, until tender, at least 1 hour.  Meanwhile, prepare apricot puree.  Moisten ground almonds with a little of the puree, and add, with the rest of the apricot mixture, for the last few minutes of cooking.  Sprinkle on rosewater.  Remove from heat, cover, and let stand in a warm place at least 5 minutes before serving.

No spices were in this picture.
The only lamb available to me at the store today was lamb chops, and I managed to get one pound of meat cut from the bones.  So I did a half recipe.  I think it is important to cut the lamb into bite-sized chunks and remove most of the fat.

The lamb, thinly sliced onions, and spices (sorry, no mastic) all went into one pan, were covered with water, and placed on the stove.  I had the heat up high until it started to bubble, then I turned it down to a barely simmering state.  At the demonstration, I put a lot of charcoal around the pot until it steamed, then I pulled away the coals until I barely saw bubbling.

I need to point out that the mixture of spices already made my mouth water, before anything started cooking!

Meanwhile, the apricots were soaked in hot water (nearly simmering) for most of the lamb's cooking time.  Yes, I know I didn't follow directions but I was replicating what I had to do at the demonstration -- blenders just aren't an Elizabethan cooking implement and sieves are pesky to use in the outdoors, so I simmered the apricots until they were falling apart, then I put them into my big mortar and mashed them with my pestle until they were pretty smooth.

My modern blender made the apricot puree an easy task, although not as fun as using a mortar and pestle.

At the demo, I tend to lose track of time so I think the lamb simmered for at least two hours.  It was certainly tender and the water had converted to a luscious broth.  Today I simmered it for an hour and the meat was ready.

It was hard to wait the five or so minutes after mixing but I know it is important to allow the flavors to blend.  At the demo, it allowed the stew to cool enough so people could taste it without burning their mouths.

Lamb broth, just before the puree was added
The Verdict

Mixing the lamb and onion broth with the pureed apricots and ground almonds created a stew with a thick sauce at the demo and a somewhat thinner one at home.  The spices compliment the fruit and creamy nut flavors.  The lamb is delicate yet meaty and the onions are an excellent background flavor and texture.  The broth brings them all together but still supplies a richness.


Oh yes, most definitely a success.

At the demonstration, when the stew was ready I was surrounded by visitors who wanted a taste.  I gave them each a spoon and suggested they get a piece of meat along with enough sauce to get the flavor of it all.  I suspect my sauce was thicker there because I had to guess at the right amount of apricots and I probably used more than the recipe called for.  The other possibility is that at home I used more water to simmer the lamb than I did before.

The reaction was unanimous:  "This is delicious!", "Oh WOW!", "Really good!", and "What was that recipe again?" were the comments I heard.  Even the self-proclaimed "picky" eaters liked it. 

Just so you know, I didn't use rosewater in the demonstration dish.  I know that rosewater is an acquired taste and if you are not expecting it or accustomed to it, the floral scent can shock your taste buds or nose.  But I used it on today's recipe and I liked it, although I would probably use a lot less even just for myself until I am more used to it.

One last comment:  If all the meat is eaten and there is still sauce left, don't despair!  Just sop it up with chunks of bread because that is an excellent combination, too. 


Friday, March 15, 2013

Roasted Onion Salad

This is a simple and yet tasty recipe that makes a good side dish.  I don't think it really works for what we call a "salad" today but it sure is good, especially if you pair it up with a roasted meat dish or a grilled steak.

I found this dish in the book The Medieval Kitchen by Redon, Sabban, and Serventi.  (Here's a link to it on Amazon.com; I don't own a copy:  http://www.amazon.com/The-Medieval-Kitchen-Recipes-France/dp/0226706842)

The recipe:

Take onions; cook them in embers, then peel them and cut them across into longish, thin slices; add a little vinegar, salt, oil, and spices, and serve.

This is my favorite way to prepare it.

It is well-suited for an historical cooking demonstration because you simply take the onions (sweet are best but any will do) and roast them in the fire.  I have never just put them in the embers because I find it more visually interesting to put them on skewers where people can see them.  Every once in a while I turn the skewer so the onion roasts evenly all the way through.  The onion is done when it is very soft and is trying to slide downhill on the skewer.

Making it at home is just as simple:  I put the onions in a pan (this catches the drips) and put them into the oven at about 350 degrees F for an hour or two.  In other words, I slow cook them until they are very soft and squishy.

This makes the onions tender and sweet, without that classic onion bite at all.

All done
In either case, when they are cool enough to handle, I peel and slice them. 


I prefer to use just a decent balsamic vinegar and a little grating of nutmeg.  It is also fine to put in some black pepper and a little salt.  I only use oil (olive oil) if I feel the flavor of the onions is a little flat -- mostly I like the clear mild onion flavor without the olive-y boost.  Whatever vinegar you use, make sure it is mellow enough to enjoy "as is".  You don't want a harsh tang when you eat these.

You can consider the advice on the bowl, too!
Nowhere do I give measurements for the vinegar and nutmeg.  I recommend that you splash on a little vinegar, scrape or shake on a little nutmeg, toss the whole and taste it.  Keep doing this until you get that delightful balance of flavors that tickles your tongue.  Different onion varieties and different vinegars will give different results, so you might as well practice analyzing what your taste buds are telling you.

The Verdict:  Success, of course!  I've used this dish many times over the last several years.  The only mistakes I've made were not cooking the onions until very soft, thus leaving behind some of the harsher onion flavor (it is better to cook them "too much" rather than "too little"), and putting on too much balsamic vinegar, so that all you can really taste is the vinegar.  You can drain off the excess and try to mellow it out by adding other spices and the olive oil.  Perhaps you can rinse off some of the vinegar, too, although I've never tried it.

The recipe direction for "longish, thin slices" is a good one.  Large or wide slices put too much onion in your mouth all at once, which I find feels like I am drowning in onion.  The smaller slices are easy to eat with a fork or even medieval-style, using your fingers.


Thursday, November 1, 2012

An Elizabethan Field Kitchen

A little while ago I set up an Elizabethan Field Kitchen to demonstrate historical cooking techniques.  This is different from the big set up I did last spring as I only had a small area, two tables on which to display my wares, a small metal fire pit and a tripod space, and NO FENCE so people could walk right up and talk to me.  The best part:  I could give the public a taste of my food!

Here's how it looked the first morning, after it was set up and ready to start cooking:

The view as you approach.  Fire pit on the left.
A close up of my bowls, platters, and implements

On the other table, foodstuffs and fun things to talk about

My various cooking pots, plus tripod and grates and fire moving tools


I cooked a variety of recipes, always in normal quantities (I'm not trying to feed the public, just give them a bite of what I had made).

My favorite recipe of the weekend was this:


Erbolate  (Baked Herbed Eggs)

To the King’s Taste, page 78

ISBN: 0-312-80748-1

Original
Take parsley, mint, savory, sage, tansy, vervain, clary, rue, dittany, fennel, southernwood.  Chop them and grind them small.  Mix them with eggs.  Put butter in a baking dish and put the mixture in it.  Bake it and serve it in portions.

In other words...

6 Tbsp fresh herbs from the list above or to taste
5 eggs, lightly beaten
1/8 tsp salt
2 Tbsp butter

Mince herbs.  Mix with eggs and salt, beating a few moments.
Melt butter in an 8 inch baking dish.
Pour in egg mixture.
Bake in a preheated 325 degree F oven until eggs are set and top is brown. (about 35 min)
Serve as you would a pie.

Notes:  I used a blend of flat-leaf parsley, apple mint, peppermint, sage, and rue.  It was delightful, especially the mint.  I ended up cooking mine in a fry pan that was already greased from cooking bacon.  The coals were very low so the eggs cooked without scorching the bottom.  All the herbs floated to the top and made the omelet look very pretty.  I think this is the best way to make a simple, flavorful omelet that I have ever experienced (and much, much better than dried herbs, even if they have the chance to rehydrate!).

 *****

I took a mincemeat pie to share with my fellow re-enactors and the public.  Professional photographer Gar Travis took some excellent pictures of it:

I have a pie pan now!

Sharing it with friends.

Credit where it is due!  These two photos were graciously given to me by:
Gar Travis / GT©
www.garphoto.com

The Verdict:  The weekend demonstration was a success.  The site was great to work at, the people were interested and interesting, and nearly every recipe was tasty and fun.  Only one was a border-line success but I think I just needed to measure things a bit more carefully.  I hope to retry some of the recipes at home to see what else I could do or if I could improve upon them.  And I recommend you try the Erbolate.  It is yummy.


Friday, June 1, 2012

My Own Tudor Kitchen

Not only do I like to try historical recipes at home, I sometimes demonstrate historical cooking techniques for the public.  This year, with a lot of help from my friends, I created a Tudor Kitchen -- as close to what was found during Queen Elizabeth I's reign as time and budget allowed.

It is actually a field kitchen because it is outdoors.  If a noble person or the Queen herself traveled, sometimes the Kitchen would travel ahead and be set up and cooking when the Lord or Queen arrived.  Or, in the too-often event of a kitchen building burning down (this is why they were built separately from the living quarters), a field kitchen would be erected so food preparation could continue.

The idea was to create a theater set that convinced people they were actually seeing a period kitchen in action.  Certain adjustments for modern fire regulations and to help control public access were made but overall, I thought it turned out well.

Here is the morning of the first day it was open, before the public arrived and before the tools, serving containers, and other items were out.  In other words, this is an undecorated set.


We made it visually interesting by using a lot of colors.  The red and brown box you see is both a counter and a place to hide the modern ice chest and other food supplies.  This is handy because you don't have to leave the set to get your food items and it keeps them shaded and therefore cooler.

Here is a close up of the fire pit.


It is built out of cinder blocks (unmortared) and has a cinder block base to keep the fire up off the ground.  I plastered it over with a mix of clay, sand, and water to make it look less like modern cinder block.  Unfortunately, most of that mix didn't survive the torrential rains that followed the first weekend.

Then we pulled out the props:  bowls, plates, platters, knives, fire tools, cooking pots, spoons, cooking forks, goblets, tankards, etc., and we decorated the set.


I had spent time examining pictures (drawings) of medieval and Elizabethan kitchens and realized that what made them interesting was the joyful clutter of items.  Perhaps those drawings were "condensed", meaning the items were more spread out or not always out but were put into the drawing just to show them.  But I was there to cook and entertain the public, so I reached for the cluttered look.

It turns out this was really too cluttered -- the entire counter top was full and there was almost no room to put food that was being pulled out from under it.  So after that we didn't put out as many props.

Here's what it looked like the second weekend:

That's not me.  That's my assistant, "Lizzie".
The wooden cabinet on the left was a wonderful place to stack the quantities of bowls and platters I would use throughout the day.


To the right of the cabinet we had shelves that were reserved for the "special" items, like glass (expensive at the time), nice tankards, a marble mortar, and fine pottery with turned wooden lids.  There is even a baker's peel and realistic-looking skinned hare.


By the end of the day, those "S hooks" near the hare were filled with fresh herbs tied and hung for drying.

Here are most of the cast iron pots and pans that I cook with:


This cook yard was put to use both Saturday and Sunday for seven weekends by me and by others.  It was functional, roomy, fun, and fascinating to observe.  Some visitors were pulled in by the smell of the cooking food -- especially when we had a chicken roasting on the spit!  Others were intrigued by all the items we had set out.

I had many a good conversation about what I was cooking, how I was cooking it, the various spices and preparation techniques utilized, and whether or not that rabbit was real.  (Of course it is real.  It is not imaginary!)

We produced a number of tasty dishes each day; I did mostly cooking and the person using it on Sunday did mostly baking.  Much of the food went to feed the rest of the people who were there to demonstrate and entertain.

The Verdict:  Success!  It was the best place I have ever had for demonstrating historical cooking techniques.  We got a lot of positive feedback from our fellow performers as well as the public and I have many fond memories of cooking, making mistakes (and laughing them off), learning new techniques, and having excellent conversations about it.

Look for a future posting that goes into detail about the cooking pots and special tools I used.


Thursday, March 15, 2012

Tudor Kitchen, Part 3

As I mentioned in Part 1, in 2007 I was fortunate enough to visit London, England.  The number one item on my "to do" list was to visit the Hampton Court Palace, which Henry VIII used as one of his palaces.  It has a working Tudor kitchen and I want to share what I saw with you.

This part focuses on food and storage.

Here is some beef that was roasted on the spit.  Notice the hole!


And here are some pies before they are baked...


... and afterwards!  Pies were their own container and didn't need any special cooking dish.  This was convenient when cooking for crowds.


Serving implements include metal plates if you can afford them; wooden if you can't.  Trenchers, plates made from sliced, stale bread, are out of fashion at this time.


 Most people ate with spoons and knives.  Forks were not considered eating utensils in England.  The spoon shapes you see here are typical of the period.


Storage containers came in a variety of shapes and materials, depending on usage.

These are various containers:  tall storage jars with lids (unglazed because they didn't need to be), two pitchers, and some bowls.


These are pitchers and jugs.  The green glaze is a typical color popular in the Henrian era.


You can take cloths and tie them over the tops of the containers, especially if the containers have a lipped edge to catch the string.  I have also heard that sometimes the cloth was oiled or waxed.  I think that would be considered expensive in this time period.


These storage pots are only partially glazed, as was typical of the era.


These beautiful red ware bowls are only glazed on the inside.  Good for mixing, serving, and storing.


I believe this is a salt cellar.  Salt was considered a spice, was often mentioned as a "sauce" to be served with meats, and was expensive, though not as expensive as pepper and other imported spices.  The container could be something else, though, since it wasn't labeled.


So there you have it.  A brief tour though the Tudor Kitchens at Hampton Court Palace.  I hope you go there some day and witness an actual cooking event.  They do demonstrations with experts who are in costume and probably in character.  I want to hear about your adventure!


Cookies Consent

This website uses cookies to offer you a better Browsing Experience. By using our website, You agree to the use of Cookies

Learn More