Tuesday, June 15, 2021

Cheesy Chile Relleno Puff - A Most Favorite Redo

The last post of the year is reserved for one of my favorite recipes.  In 2018 I made a chile relleno souffle that was a lot like a favorite recipe I have made for decades.  The reason I used that particular recipe is that I lost the original recipe (several times, actually) but found this version.

Recently I was sorting a stack of handwritten recipes I had received from my mom when she closed down her household.  There I found my original recipe, which I had written for her years ago.  Hooray for Mom!  I knew then I needed to make it again.

I wrote this years and years ago.

Cheesy Chile Relleno Puff   (4 servings)

7 ounce can whole green chiles

4 ounces Monterey Jack cheese, shredded

6 eggs, slightly beaten

3/4 cup milk

1 tbsp. flour

1 tsp. baking powder

1/2 tsp garlic salt

4 ounces Cheddar cheese, shredded

That is a white cheddar sitting on top of the Monterey Jack.

In a greased 7" x 11" baking dish, layer split chiles and Monterey Jack cheese.  Combine eggs, milk, flour, baking powder, and garlic salt; mix well.  Pour over chiles, top with Cheddar cheese.  Bake at 350 degrees F for 30 minutes until puffed and browned.

Serve with Chile Sauce:

8 ounce can tomato sauce

1/4 cup hot picante sauce

1 tsp oregano

(Mix and heat for 5 minutes)


Good with warm flour tortillas or with tortilla chips and guacamole.

Enjoy!


My Notes

I use Ortega or Anaheim chiles as they are mild enough in heat that I can serve it to just about anyone.  They have a distinct flavor that makes this puff tasty.

Also, instead of using garlic salt, I put in 1/4 tsp garlic powder and 1/4 tsp salt.  It is okay to use more.

The layers, in order:


Although I used a glass baking dish, I did not change the temperature of the oven.  Even at 350 degrees F, it took 40 minutes to get the puff browned.

My tastes have changed over the years so I no longer make the Chile Sauce, although it is good. 

I prefer to serve it with a tasty, chunky salsa (I use mild but you could choose hotter), home made guacamole (with seasoned salt and lime juice), and a spoonful of sour cream.


The Verdict

It was very puffy coming out of the oven but settled afterwards.  I suspect my baking powder is getting old as I recall it staying puffy (or at least puffier) when served.  But never mind.  It still looks good and tastes wonderful!

You can't beat the egg, chile, cheese combination.  It is flavorful with a creamy and rich mouthfeel.  The toppings just add to the variety of tastes, and they all work together well.

Think of it as an omelet or fritatta with a Mexican twist.  

You could use more of the chiles to get a thicker layer.  Just be careful not to overwhelm the egg and cheese flavors with them.  

Yellow Cheddar makes this dish more attractive to the eye but the sharp white Cheddar I used was very good.  I think the sharper the Cheddar the better it works with the strong chile flavor.

I laughed at first when I read that it served four:  it is cooked in a big dish for four people.  I thought maybe it should be for eight people.  

But the recipe is right -- four people will probably want to have two pieces each of this flavorful main course, even with side dishes like a good salad or an appetizer like tortilla chips and salsa.  

It is always a success.  Give it a try!


Tuesday, June 1, 2021

Gallinas estofadas - Braised Chickens

I am enjoying working my way through Encarnación Pinedo's book, El cocinero español.   

Today I am trying her recipe, "Gallinas estofadas", which is Braised Chickens, found on page 22.  It appealed to me because it puts both meat and fruit in the same dish, which is something I always love.  It also grabbed my attention because while I have put raisins in with chicken (for example, sliced apples, raisins, sliced onions with chicken and the covered with broth or apple juice and sprinkled with appropriate spices), I have never put pineapple in with it.

But pineapple should be something I have done because I love sweet-and-sour chicken at Chinese restaurants and they usually have chunks of pineapple included.  

So here goes!

Gallinas estofadas

Se limpia la gallina, se mecha por todas partes con jamón, ajo y clavo, friéndose despues con manteca y sal en una olla.

En seguida se le echa tomate asado y molido, cebollas chicas enteras, ó si fueren grandes, cortadas en cuartos, dejándose freir :  tambien se sazona, cuando está al fuego, con canela, pimienta y clavo molido, almendras, pasas y piña picada ; se cubre la gallina con partes iguales de vino de Málaga ú otro vino generoso y agua, tapándose despues con una servilleta y una cazuela encima con agua ; se deja hervir la gallina hasta que esté perfectamente cocida y quede el caldillo espeso.

Tambien podrá taparse el guiso con una servilleta y una tapadera apropósito, para no permitir que escape el vapor.

Braised chickens.

The hen is cleaned, it is interlarded everywhere with ham, garlic and cloves, then fried with fat and salt in a pan.

Then a roasted and ground tomato is added; whole little onions, or if they are big, cut into quarters, and allowed to fry: it is also seasoned, when it is on fire, with cinnamon, pepper and ground cloves, almonds, raisins and chopped pineapple ; the hen is covered with equal parts of wine from Málaga or another fortified wine and water, then covered with a wet napkin and a saucepan on top; boil the chicken until it is perfectly cooked and the broth is thick.

You can also cover the stew with a napkin and an appropriate cover, so as not to allow the steam to escape.


My Redaction

2 lb, 5 ounces chicken (in this case, boneless, skinless pieces of thigh meat)

     (or a whole chicken; see notes below)

4 ounces cubed ham

1 tsp. chopped garlic

4 whole cloves

1/2 tsp. salt

olive oil

14.5 ounce can stewed tomatoes, coarsely pureed

8 ounces onion, sliced into bite-sized pieces

1 tsp. cinnamon

1 tsp. ground pepper

1/4 tsp. ground cloves

2 ounces sliced almonds

3 ounces raisins

10 ounces fresh pineapple, chopped or cubed (weigh after peeling)

8 ounces port and 8 ounces water

(more salt to taste when finished)

Remove the vermouth and use port instead.

Cook the chicken, ham, garlic, whole cloves, and 1/2 tsp. salt in a large Dutch oven along with the olive oil.  The chicken should be browned.

Add the tomato puree and sliced onion, and fry some more.

Add the cinnamon, pepper, ground cloves, almonds, raisins, and pineapple.  Mix well.  

Add the port and water, or what amount it takes to cover the mixture.  

Bring to a boil, then immediately reduce the heat so the stew barely simmers.  Cover tightly and allow to cook for 2 to 3 hours or until the chicken is cooked to tender.

Chicken, ham, and seasonings browning

Added the tomatoes and onion

Added the spices, fruit, and nuts

Added the port and water

After simmering for a while.

My Notes

Miss Pinedo recommends using a fortified wine that is sweet.  I thought I wanted to use vermouth (and that is why it is in the ingredients picture).  But once I started assembling the stew, I realized that the strong, herbal taste of the vermouth was not right for this recipe, so I switched to the port, which is also a fortified wine.

It wasn't clear to me if she intended the chicken to be whole or cut up.  Interlarding means mixing or layering, and you can do that with either type.  However I didn't have a whole chicken available, so I used big chunks of the thigh meat.  I liked that it was already boneless and skinless.

The tomato seemed the basis for the sauce, so I felt I was still accurate in using canned, stewed tomatoes.  

It also seemed like a long, slow cooking was appropriate, not only to braise a whole chicken but also to give the sauce a chance to thicken.  Although I did wonder how much wine and water would be needed to cover a whole chicken in a pot!  I believe that if you use a whole chicken, you should use the same amount of liquid I used for the stew so that the meat braises.  

I also wondered how the sauce would thicken considering that you aren't supposed to let the steam out.

The Verdict

It cooked through the evening, then I chilled it overnight and reheated it to serve the next day.

I served with with warmed flour tortillas, which were handy for scooping and holding the stew.  Spoons were also useful.  : )


The meat was cooked just right -- tender, just at the point of shredding.  The big chunks of meat (which I didn't cut up in advance) broke up easily with the spoon.  

The pineapple remained in its cubed state, and added a bright acid bite as well as a little chewy aspect.  The raisins were sweet and the onions tender and mild.  The sliced almonds added a nice crunch.

The sauce was wonderful -- the tomatoes, port, and spices blended together well into a rich flavor that supported all the others.  There was a nice, mild burn from the pepper (freshly ground) and the cloves were not too dominant.  

We both wanted more salt on it, which is why I suggest you adjust the salt to taste at the end.  I thought adding more salt brought out the taste of the spices even more.

My guest taster and I loved it.  We agreed the long, slow cooking was just right to get the meat "perfectly cooked" as Miss Pinedo wanted, and although the broth did not get thick, it did get thicker.  

We had the stew for several meals and enjoyed it each time.  

If I was doing this for a whole chicken, I would baste it occasionally while it was braising.

Success!


Saturday, May 15, 2021

Ante de Camote y Piña - A Luscious Dessert with Sweet Potatoes and Pineapple

In the previous post I wrote about making a mamón, a cake that is traditional to the Oaxaca region of Mexico.  Its recipe came from Encarnación Pinedo's book, El cocinero español.

The mamón turned out beautifully and was ready for me to use it in this recipe, Ante de Camote y Pina.  An "ante" is a dessert with a long history - the Encyclopedic Dictionary of Mexican Gastronomy defines it as:

[An] Old dish made of bread (sponge cake or marquesote) bathed in a mixture of sugar syrup and fruit pulp, and decorated with dried fruits or pieces of the same fruit with which it was made.  Its origin dates back several centuries in Spain, but it is not known exactly how long it was prepared.  In the sixteenth and seventeenth centuries, certain sweet preparations were made in Mexican convents that were used before the meal; that is why they were called "before."  Sometimes they included ground chicken breast.

Taste and tradition changed over time, and in the second half of the 19th century they were already served after the meal, as dessert.  Its name and most of its ingredients were preserved, since they were made mainly from fruits as we know them today.  The former sweets for dessert are considered of Mexican origin, because here they underwent many changes and tropical fruits typical of these lands were used.  Ante was a very popular dessert in Oaxaca during the 19th and early 20th centuries, but today the tradition is dying out. 

Miss Pinedo's book has a whole category on antes, some using apples or apricots, some with milk, and even one with chocolate.  I chose this one because the combination of pineapple with sweet potatoes intrigued me.

Ante de camote y piña  (page 16)

Para una piña se tomarán tres libras de camote que se rayarán o molerán sin dejarles hebra alguna.

A cada libra de estas frutas se le pondrá libra y media de azúcar: Todo se pondrá al fuego hasta que tome punto de pasta, que es el de pegarse al cazo.

Se hará almíbar de medio punto con un poco de vino blanco para rociar con ella el mamón rebanado. Se pondrá una capa de mamón y otra de pasta hasta llegar á la última, la que se rociará con canela en polvo.


Sweet Potato and Pineapple Ante

For each pineapple, three pounds of sweet potato will be taken; they will be finely grated or ground with any fibers.

Each pound of these fruits will be given a pound and a half sugar: everything will be put on the fire until it takes point of paste, which will stick to the saucepan.

A syrup will be made with a little wine white; sprinkle the mamón with it. Put a layer of cake and another of paste, repeat until reaching the last, the one sprinkled with cinnamon powder.


My Redaction

1/2 pound fresh pineapple (weighed after peeling and coring)

1/2 pound sweet potato (weighed after peeling)

1 1/2 pounds sugar

4 ounces white wine

4 ounces sugar

powdered cinnamon

mamón (see previous post for recipe)

Filling ingredients

Chop the pineapple into small pieces (not pureed), being sure to keep all the juice.

Chop or grate the sweet potato into tiny pieces, about the size of a grain of rice.

Put these in a saucepan (with the juice!) and mix in the 1 1/2 pounds of sugar.

Cook over medium heat, stirring only occasionally, until the mixture starts to thicken, at about 135 degrees F.  Reduce heat as needed to keep the mixture from boiling over.  Remove from the heat when it reaches temperature.

In the meantime, make a simple syrup by mixing the white wine and 4 ounces of sugar together in a small pan.  Cook over medium high heat, stirring constantly, until the mixture becomes clear and begins to boil.  Remove from the heat.

Create the ante by slicing the mamón into 1/2 inch thick pieces and layering them like this:

  • A layer of mamón, with about 1/3 of the simple syrup spooned evenly over it
  • About half of the pineapple mixture spread over the mamón 
  • Another layer of mamón with syrup
  • Another layer of pineapple mixture
  • The final layer of mamón with syrup
Sprinkle the top with powdered cinnamon.  

Let stand to cool and allow the syrup to distribute through the mamón.

My Notes

Since the fresh pineapple I bought was small and weighed about 3 pounds, I decided that the ratio of pineapple to sweet potato should be one-to-one.  I used the food processor to chop the pineapple.  I didn't want it to be too finely chopped as I thought some texture in the fruit layer would be good.

I chopped the sweet potato separately and finely.  Since it was going to be cooked in the syrup and wouldn't necessarily become pureed, I didn't want big, chewy chunks in it.


The pineapple juice initially moistened the sugar and then the sugar extracted more juice.  It didn't take long for the mixture to be wet.


Cooking it over medium high heat got it to boiling quickly.

Then I turned the heat down so it was cooking but not going crazy.

I had to decide how far it should cook.  Should it be taken off the fire as soon as it felt thick?  Or should it cook until it stuck to the side of the pan?  Both of these were suggested in the recipe.  Also, Miss Pinedo's instructions in a different part of the book on cooking syrups like this described the hard ball stage of cooking sugar.  That takes it to about 145 degrees F.  

It started looking thick around 120 degrees F.  It was more sticky at around 135 degrees F.  I took it to 145 degrees F.

It was then I realized this was probably a mistake, as the little bit that had stuck to the stirring spoon set up hard: not break-your-teeth hard but pull-out-your-fillings sticky and chewy.  If it got too cool before I assembled the ante, I wouldn't be able to spread it.  So I worked quickly to put it all together.

First a layer of mamón, then spooned some wine syrup over the top.  Not a lot since she said to sprinkle it.

Mamón only

With the lovely tasting wine syrup

Then I poured the pineapple mixture over it and spread it with a spoon.  I tried to get it to the sides to show off its color against the white of the mamón.

Three layers of mamón seemed right -- not too tall but still interesting to look at and, hopefully, the right proportion of fruit to cake.  When I was sprinkling the cinnamon on top, it got a little out of control and I put on more than I intended.


Ante, first attempt.

I had both filling and mamón left over, so I dissolved the filling in water and recooked it, this time to 135 degrees F.  I made another batch of the wine syrup.  This time I really soaked the mamón with the syrup because I had made a larger quantity:  6 ounces white wine to 6 ounces sugar.  The filling spread well.  I went a little crazy with the cinnamon on top.


Ante, second attempt.

The Verdict

I had three new guest tasters, one of whom had eaten mamón before.  She declared mine "excellent" and said they all liked the ante. 

My two other guest tasters and I tried both versions.  We all agreed on these assessments:

The first version had a crispy mamón and the filling was chewy.  That was good!  The mamón was sturdy enough to stand up to the filling and it was intriguing to have a bite of "cake" that was more like a very light cookie.  The wine syrup made the mamón just a little bit moist and added a floral under-flavor - almost not noticeable but still appreciated.  Having the moisture kept each bite from being too dry or chewy.

The filling had a robust flavor that was mainly pineapple but you could tell it wasn't just pineapple.  So the sweet potato did add flavor and it definitely added texture.  I was surprised it didn't soften when it was cooked, which makes me think that it candied.  I had anticipated it would smooth out and turn the whole filling into a paste.  It was more like a chunky, chewy candy.  I was glad I had chopped the sweet potato into such tiny pieces or it could have been too chunky.

The cinnamon on top was really such a good idea.  It was the perfect accompaniment to all the other flavors.  Whoever thought of that deserves kudos.  

The second version was very different in texture.  Recooking the filling to a softer stage meant it wasn't chewy; it resisted my bite a little but wasn't something I had to chew to eat.  It was more like those cake fillings that are made of fruit and thickened with cornstarch -- moist and firm but not hard.  

Also, I had soaked the mamón with a lot more syrup because I had read that it was supposed to soak up the liquid.  This made a huge difference in its texture -- cutting a bite with my fork, I felt that it was much softer and it made that "moist cake" noise. 

Putting the soaked mamón with the softer filling was a very good idea.  With both of them being softer than the first version, we felt they were well-balanced.  The cinnamon on top was still a good idea.

So both were a success!  If you want crispy, don't soak the mamón too much.  If you want moist, really soak it with the syrup.  Matching the chewiness of the filling is good, too.  

One comment that my two guest tasters made that surprised me was that they both felt it wasn't too sweet.  Why was I surprised?  There is sugar in everything!  But overall, the impression they got was "not too sweet", which they liked.  

If I make this again, I would change the shape of the mamón, making it thin and bigger, like a layer cake round or square.  I liked the three layer effect and the balance of the about 1/2 inch mamón with the thinner layer of filling between.  I didn't like how I had to piece it together to make the layers.  How much syrup would I use to soak the mamón?  I think it would depend on how I felt at the time.  Both the moist and the crispy versions were good.

Don't forget the cinnamon on top!


Saturday, May 1, 2021

Mamones de Almidón -- An Historical Flour-free Cake

I've been reading Encarnación Pinedo's 1898 cookbook, El cocinero español.   Miss Pinedo lived near San Jose, California during the last half of the 19th century and became an accomplished cook.  Her book is the only collection of Rancho era cooking we have, the food of the Californios.  Her family lived in that area before California became part of the United States, and they were highly influential for many years.  This is an important resource for understanding this time period.

One category that caught my attention was called "Ante."  Now that means "before", so I took it to mean it was an appetizer or a first course.  But the recipes described a dessert, and that confused me.  Seven of the eight recipes called for fruit cooked into a thick syrup and put into layers with an ingredient called "mamón".  The eighth called for "bizcocho", which is a biscuit.  I believed from this that mamón was bread or cake.  

A look around the internet first seemed that my hunch was right.  I found a recipe for a chiffon cake called mamon, but it was from the Philippines, and I wasn't sure it was the same thing.  Digging some more, I found that mamón could refer to the Spanish lime, which is like a cross between a lychee and a lime.  It is a fruit that people mostly eat fresh, although it is popular as a juice.  Looking hard at the recipes, I tried to imagine a first course refreshing beverage made with slices of Spanish limes.

But that just didn't seem right. Miss Pinedo lived in Northern California, and Spanish limes don't grow there.  They could have been shipped but the recipes just seem to point to a cake.

I set that question aside and continued to read.  And, guess what?  I found a whole section on mamones much later on in the book.  Yes, I was right, they are cakes or rolls, sweetened and sometimes flavored with anise or sweet almonds.  The word "mamón" means "sucker", because sometimes they are moistened with a sugar syrup which they "suck up" or absorb.  Another name for the mamón is "marquesote", and you can click here to read more about it.

To make an ante I needed to first make a mamón, and that is what this post is about.  Come back again for the next post, which will be about the ante.

Here is Miss Pinedo's recipe, as found on page 153 of her book.

Mamones de almidón.

Se baten veinte y cuatro huevos, separadas las claras de las yemas, hasta que se pongan duras.

Aparte se mezclan con las claras dos pozuelos de azúcar en polvo, y estando bien incorporada, se le añadirán las yemas, revolviendo todo cerca de la estufa, vaciando en el batido diez y ocho onzas de almidón de maíz: se seguirá batiendo con una mano mientras se le pone con la otra el almidón, para que no forme granos. Tan luego como todo esté incorporado, se vaciará prontamente en las cajas, que solo se llenarán hasta la mitad para ponerlas á cocer en un horno suave.


Starch Mamones

Twenty-four eggs are beaten, the whites separated from the yolks, until they get hard.

In addition, two cups of powdered sugar are mixed with the whites, and then the yolks are well incorporated, stirring everything near the stove, then empty into the batter eighteen ounces cornstarch:  continue beating with one hand while putting the starch in with the other, so that it does not form lumps.   As soon as everything is incorporated, it will be promptly emptied into the boxes, which will only be filled halfway; put them to cook in a soft oven.


My Notes

I didn't know this technique, so I looked around the internet.  Click here to see the video that helped me understand what to do.  I used the quantities in this video so I didn't have to use 24 eggs.  Note that I used powdered sugar as Miss Pinedo specified.

Redaction

5 eggs, separated

300 grams cornstarch

180 grams powdered sugar

Preheat the oven to 300 degrees F.

Beat the egg whites until stiff.

Add the powdered sugar in batches and mix it well into the egg whites, using a low speed on the mixer and stopping the scrape the sides as needed.  

Add the yolks, one at a time, incorporating each one well before adding the next.

Then add the cornstarch, a big spoonful at a time, incorporating it well before adding the next and stopping to scrape the sides as needed.

Once the batter is done, pour it into pans.  I chose to use four tiny loaf pans because I thought that shape would be best for the ante.  Each pan was ungreased and filled about halfway.

The pans went onto a bigger pan so they could all be handled at once.  

They baked for 40 minutes, until a pick inserted into the middle came out clean.

I let them cool in their pans on a wire rack until I could easily hold them, then I slid a spatula around the sides.  They all popped out easily.  They finished cooling on the rack.

Egg whites plus powdered sugar

And now with the yolks

The batter has the cornstarch and the pans are half full.

Fresh out of the oven!

Final cooling

A close up.

The Verdict

I sliced one loaf into 1/2 inch wide pieces lengthwise.  The texture was perfect:  uniformly tiny holes, no part was too dry or too wet.  The exterior was just a little darker than the interior -- not over- or undercooked.

I tasted one.  As a cake, it left something to be desired.  The mouthfeel was more pasty than I expected, and rather dry, and the flavor was almost not there.  I suppose that was to be expected as it was just cornstarch, sugar, and eggs.  I think my mouth was expecting a moist piece of cake and this wasn't it.

But I knew how it was to be handled for the ante, so I consider it a success.  Tune in to the next post to see how the ante turned out.


Thursday, April 15, 2021

Barebottom Cheesecake

What do you think of when you have a huge chunk of cream cheese that is threatening to go bad on you?  Well, I thought of cheesecake.  The next thought was, "Which cheesecake recipe?"  You see, I have a copy of The Joy of Cheesecake by Dana Bovbjerg and Jeremy Iggers, and it gives me many, many luscious options.

ISBN 0-8120-4278-6

What was I in the mood for?  Heavy?  Light?  Custardy?  Marbled?  Flavored with spices or fruit?  

It ended being decided by how much sour cream I had in the house.  With a little less than 2 cups, and not having any heavy cream, I had to limit myself to the recipes that required less than those two.  

I chose the Barebottom Cheesecake on page 84:

We call this one the Barebottom Cheesecake because it works well even without a crust -- great if you are in a hurry or if you don't have any crumbs on hand.  This is one of the cheesecakes we test on the customers of the Sheepshead Cafe in Iowa City.  It proved to be one of the most popular ones ever served there.  

With a recommendation like that, how could I resist?  I chose to skip the crust and make it truly bare bottom.

Barebottom Cheesecake 

1 1/2 pounds cream cheese

1 cup granulated sugar

2 tablespoons all-purpose flour

6 large eggs, separated

2 teaspoons lemon juice

1 teaspoon vanilla extract

1 cup sour cream

That is a big chunk of cream cheese!
1.  Preheat the oven to 325 degrees.

2.  In a large mixing bowl, beat the cream cheese, sugar, and flour until light and fluffy, about 5 minutes.

3.  Add the egg yolks, one at a time, beating thoroughly after each until the mixture is smooth and blended.

4.  Add the lemon juice and the vanilla, then also stir in the sour cream.

5.  Whip the eggs whites until they form soft peaks, then fold into the cream-cheese mixture.

6.  Pour the mixture into the prepared crust or into an ungreased baking pan and bake for 1 hour, 10 minutes, until the center of the cake is firm.

7.  Cool the cake in the oven for 1 hour, with the door cracked open, then cool to room temperature.  Chill.

My Notes

I used my 9-inch springform pan as they recommended.  Since I was not doing a crust, I left it ungreased.

I chose to use vanilla sugar instead of regular sugar because I could.  I still put in the full measure of vanilla extract, though.  I love vanilla!

Before beating

The cream cheese, sugar, and flour were beaten for five minutes because I used a timer.  The mixture looked light and fluffy as required.

After beating

I had put all the yolks into one cup because I didn't read ahead in the instructions, but I used a tablespoon measure to scoop them out for the "one at a time" requirement.  They made the mixture a delightful soft yellow color.

The mixture was moved into a very large mixing bowl and the metal bowl was washed to ready it for the egg whites.  I think I took them to the firm peaks stage (past soft peaks) but I hoped it wouldn't be a problem.

It was a lot of mixture to fold in with the egg whites.  My experience is that it is easy to miss folding in the batter near the sides and especially at the bottom, so I put in extra attention on those areas.  Once it looked like there was no batter anywhere that didn't have egg white in it, I declared it folded.

The quantity of the batter was absolutely perfect for the springform pan.  I was astonished at how well it fit.  

A Perfect Fit!

It went into the oven while I promised myself not to open the door at all until the 1 hour and 10 minutes mark had passed.  It smelled good while it was baking!

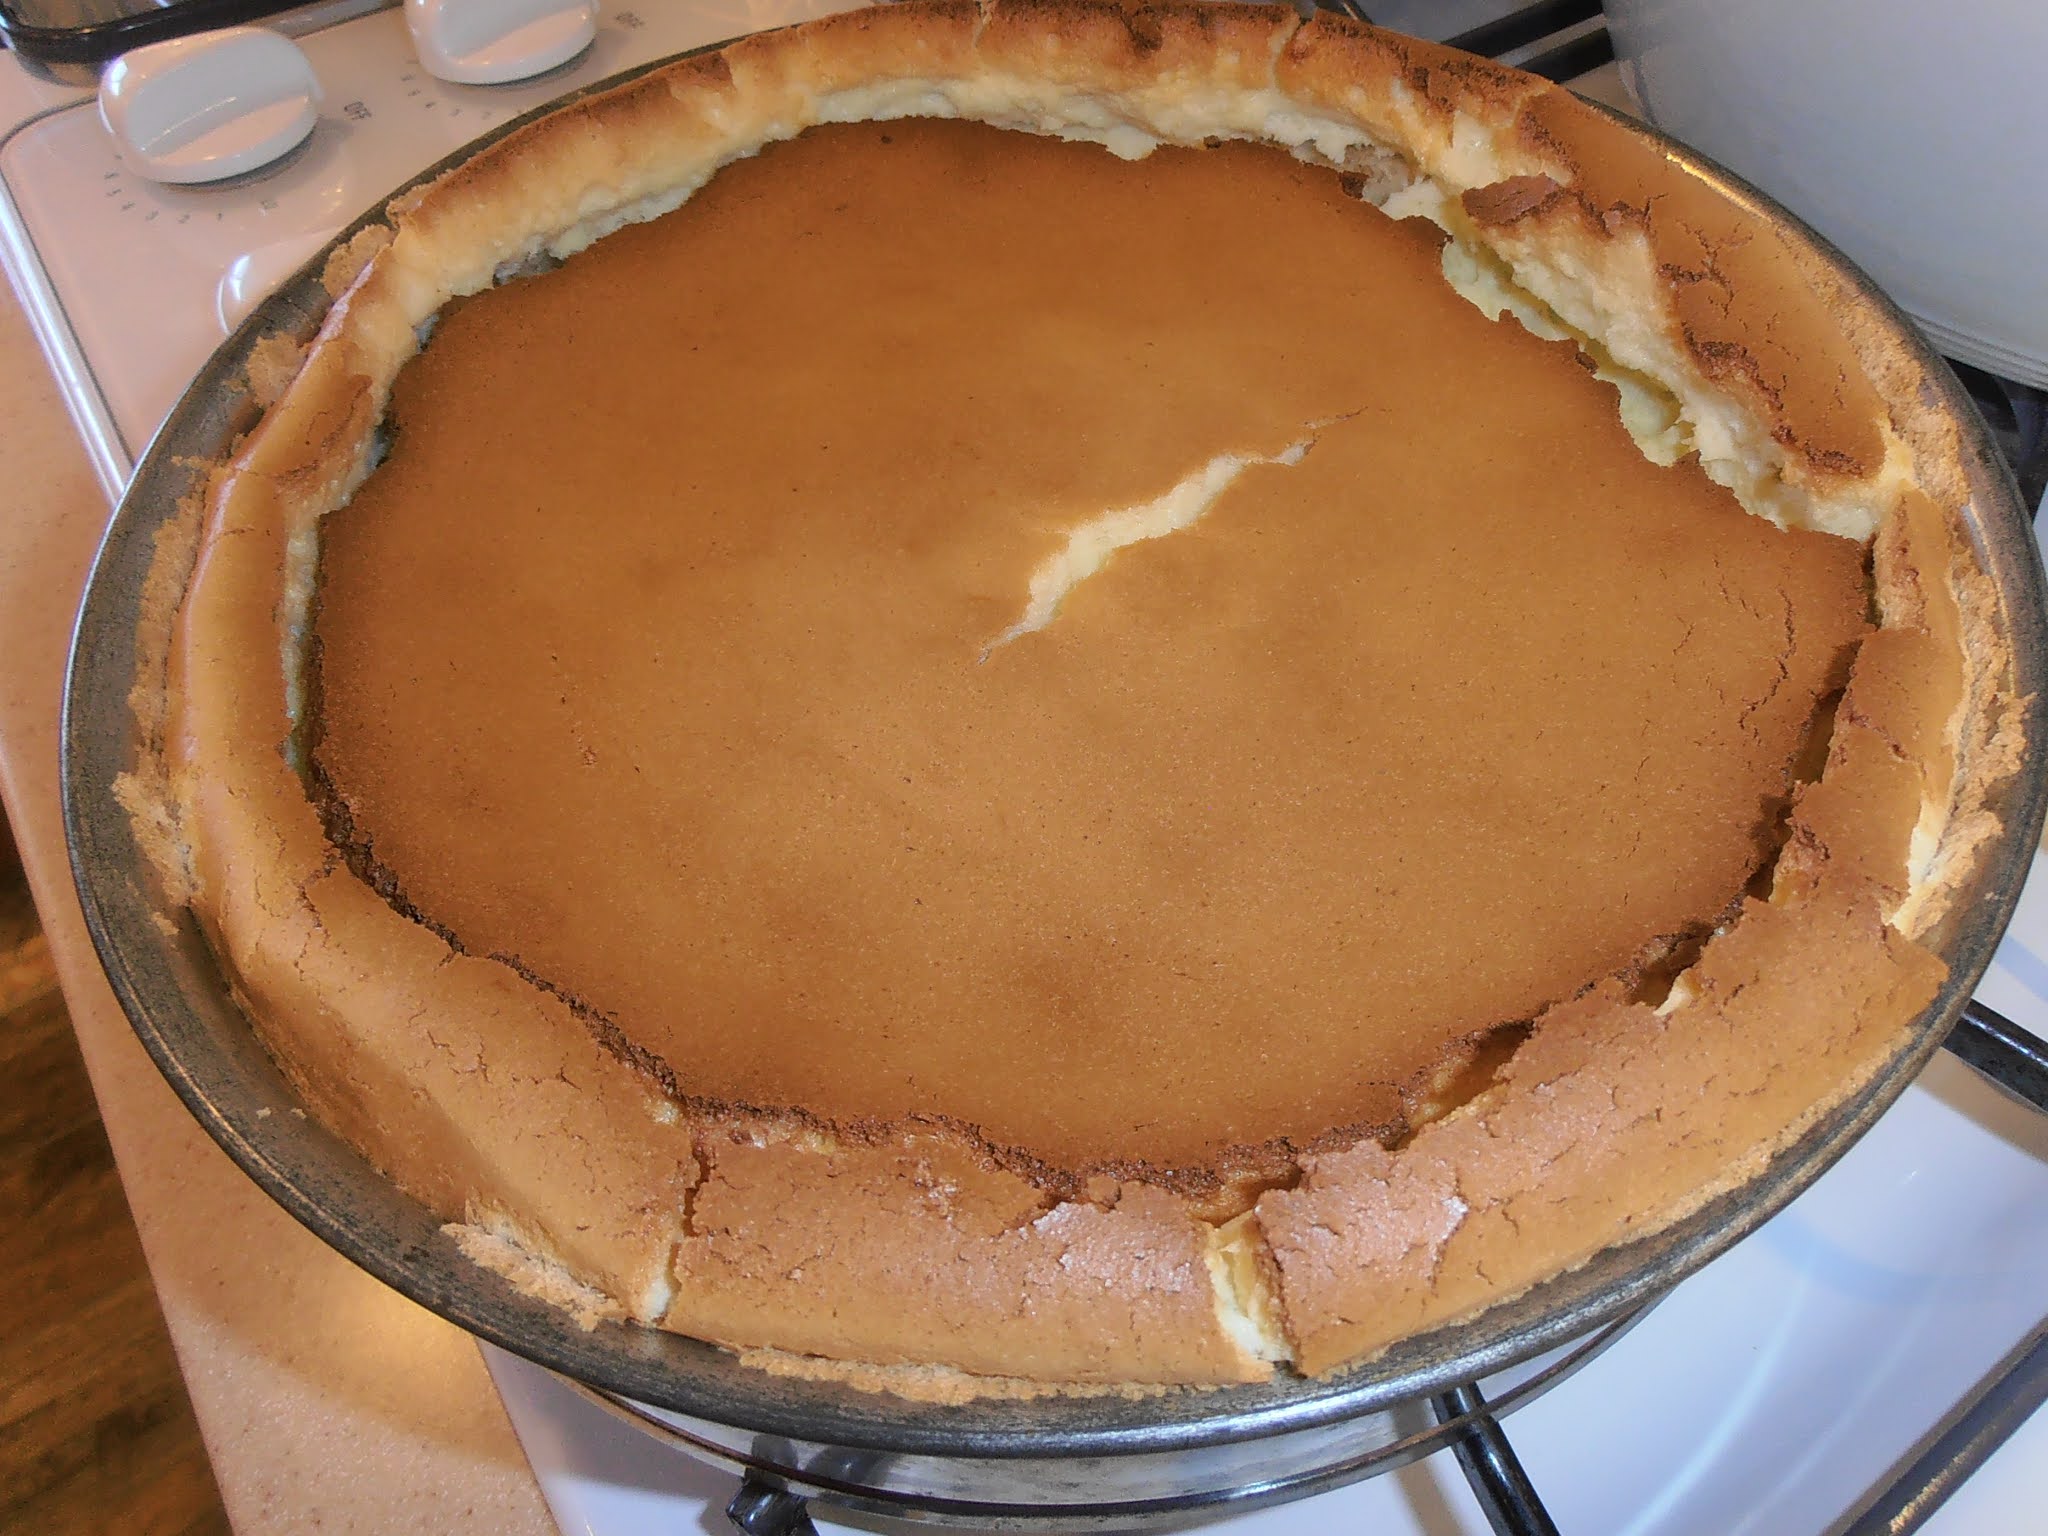
I have to admit that this result is not what I was expecting:

Right after baking.

A very brown top and sides, the uniform tearing around the perimeter.  Well, at least the center was firm!  Perhaps I could have turned off the oven earlier but I wanted to see how this would turn out.

It cooled in the oven for one hour with the door open just wide enough for the handle of a wooden spoon to fit.

And then it sank.

After cooling in the oven for one hour.

I saw it sink more while it was cooling to room temperature.


The Verdict

My guest taster and I tried it without chilling it.  


It was hard to remove a piece without it falling apart, but then again, I didn't take off the springform ring.  So much was stuck to it that I wondered if the cheesecake would hold together or be torn apart if I removed the ring.  Also, I felt I needed to leave it on when it went into the refrigerator.  I will try that after the cheesecake has chilled.

How did it taste?  I was concerned the brown top would taste overcooked, but it didn't.  It was firm and a little toasty in flavor but not burnt or scorched or bad.

The interior texture was smooth, and each bite was so very light and yet was also moist, which we both liked.  It was almost like eating nothing.  One piece did not fill me like some cheesecakes do.

The lemon and vanilla came through, but very subtly.  There was also the cheese flavor but not strongly so.  Honestly, it was like eating light, tasty clouds.

We discussed the idea of adding a topping, like raspberries or a fruit compote, which we thought would be nice but truly not needed.  My guest taster said this was a "stand alone dessert."  I agreed.  It was fine even without a bottom crust.

The parts of the cheesecake that stuck to the sides of the pan were drier and more eggy in flavor.  Not bad, just not as nice as the moist interior.

Would I do this again?  Yes.  I call it a success.  But I would be more careful about getting the egg whites to just soft peak.  Did taking them further cause this to rise and fall so much?  I don't know but the description didn't mention this could happen, so I would guess that was the problem.  I would like to have the whole cake as moist and tender as the center was, and to avoid the drier parts that stuck to the ring.

We had a piece after it had chilled, too.  It was still wonderful and was nicely accompanied by a sherry-based liqueur.


Cookies Consent

This website uses cookies to offer you a better Browsing Experience. By using our website, You agree to the use of Cookies

Learn More